Xamarin Forms - StackLayoutのVerticalOptions(Expands)について
(非常にピンポイントな話題ですが)Xamarin FormsのStackLayoutにおける、子コントロールの配置で、「VerticalOptions(HorizontalOptions)」指定時の動きについて纏めたいと思います(特にExpandsに焦点を当てて)。
このネタ、先日の「Xamarin.Forms本 邦訳読書会 #2」にて私が「どんな動きでしたっけ?」と言って、皆さんを(闇に引き込み)こんな動きだよーと口頭で説明していただいたものなんです(でも、誰が説明しても分かりにくい的な話もあり、やはり、厳密には自分でコーディング&実行で検証する必要がありました)
xamarinformsbookreading.connpass.com
VerticalOptions / HorizontalOptions プロパティ
「VerticalOptions / HorizontalOptions プロパティ」は、Xamarin.Forms.Viewクラスの LayoutOptions構造体型 プロパティです。
Viewクラスは、Label や Button、StackLayout や Grid などのすべてのUI要素の基本クラスです。
これらのプロパティを指定することで、対象コントロール(View要素)のLayout上での配置(サイズやパディング)に影響を与えます。
LayoutOptions構造体
LayoutOptionsは構造体で、以下の2つのプロパティを持ちます。
public LayoutAlignment Alignment { get; set; }
配置方法についていかから選択します。
Center - 中央寄せ
Start - 開始点寄せ(横方向であれば Left、縦方向であれば Top)
End - 終了点寄せ(横方向であれば Right、縦方向であれば Bottom)
Fill - 領域全体を満たすpublic Boolean Expands { get; set; }
親の領域が余った場合、「領域を与えてもらうか?(サイズを拡張してもらうか?)」のフラグを指定します。
コードによる指定
動作については後で説明するとして、指定の仕方は C# コードからでは以下のようになります。
this.label1.VerticalOptions = new LayoutOptions(LayoutAlignment.Center, false);

this.button1.VerticalOptions = new LayoutOptions(LayoutAlignment.Fill, true);
XAMLによる指定
上記 cs と同様の設定をXAMLで行うと以下のようになります。
<Label Text="Label1" VerticalOptions="Center" />
<Button Text="ボタン" VerticalOptions="FillAndExpand" />
“Center"とか"FillAndExpand"とかは、「LayoutOptionsConverter型コンバータ」によって「LayoutOptions.Alignment / LayoutOptions.Expands」に変換設定されます。
・・・分かりにくいし想像つかないですね・・・
なので、以下のいくつかのパターンの例を・・例は話を単純にするために「StackLayoutを利用。OrientationはVertical。」とします。
サンプルで試す
ex1) シンプルに
StackLayoutにLabelを5つ配置します。
配置された領域を分かりやすくするために、各要素に BackgroundColor を設定しています。
また、VerticalOptionsプロパティに何も設定していません。この場合、デフォルトの「Fill」となります。
<?xml version="1.0" encoding="utf-8"?>
<ContentPage
  xmlns="http://xamarin.com/schemas/2014/forms"
  xmlns:x="http://schemas.microsoft.com/winfx/2009/xaml"
  xmlns:local="clr-namespace:LayoutExample1"
  x:Class="LayoutExample1.LayoutExample1Page">

  <StackLayout x:Name="stack1" Orientation="Vertical" BackgroundColor="Silver">
    <StackLayout.Margin>
      <!-- iOSはトップに 20 の余白が必要 -->
      <OnPlatform x:TypeArguments="Thickness"
        iOS="0, 20, 0, 0"
        Android="0, 0, 0, 0"
        WinPhone="0, 0, 0, 0" />
    </StackLayout.Margin>

    <Label Text="Label1" BackgroundColor="Green" />
    <Label Text="Label2" BackgroundColor="White" />
    <Label Text="Label3" BackgroundColor="Yellow" />
    <Label Text="Label4" BackgroundColor="Aqua" />
    <Label Text="Label5" BackgroundColor="Gray" />
  </StackLayout>
</ContentPage>
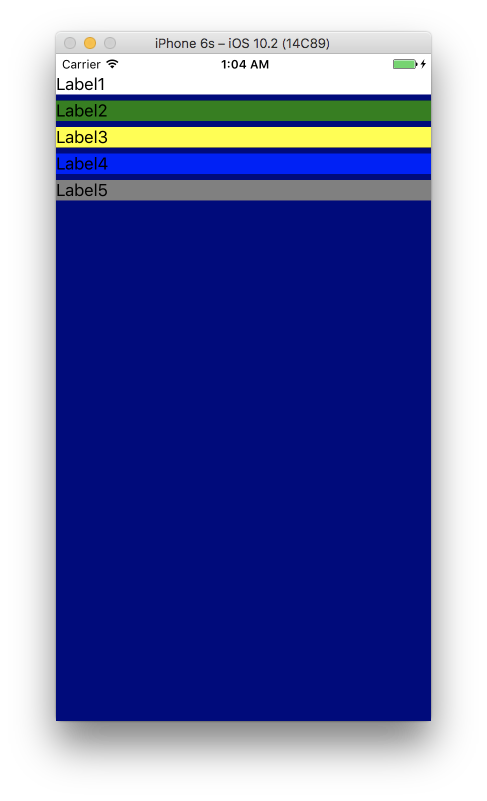
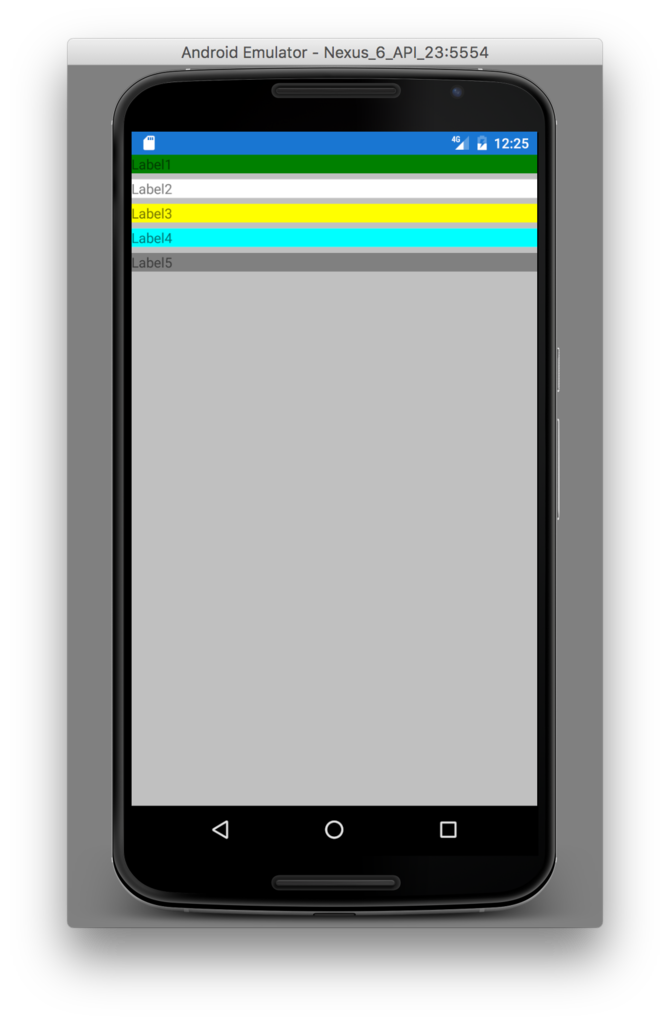
実行画面は以下の通りです。
ex2) Label間のスペース
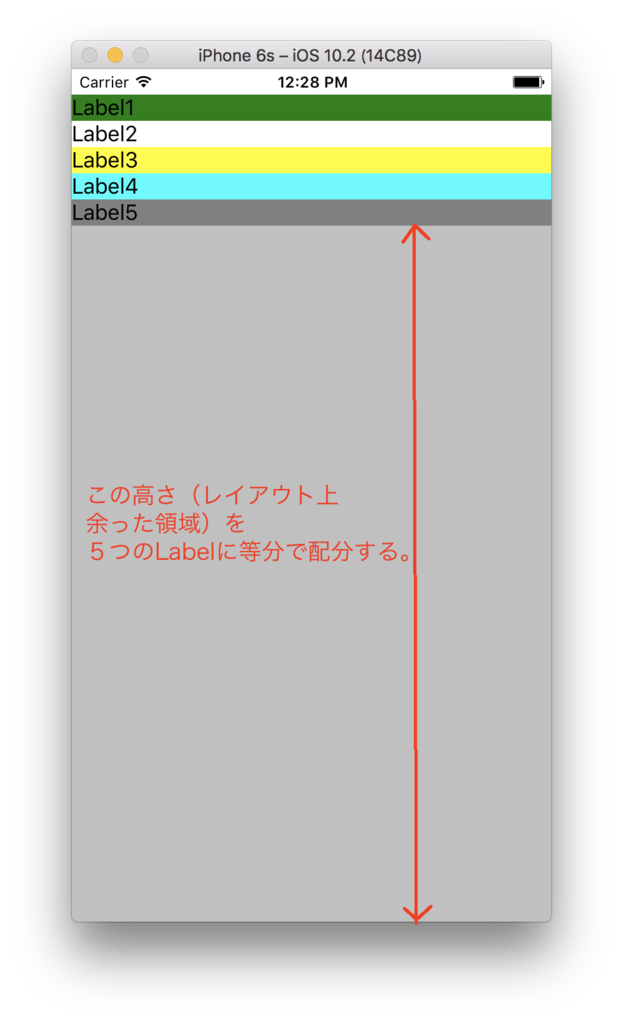
ex1)の例では、5つのLabelの間には「わずかなスペース」が存在します。
StackLayoutのBackgroundColorである Silver が Label間に見えています。
これは親ビュー側である「StackLayoutのSpacingプロパティ」で調整可能です。
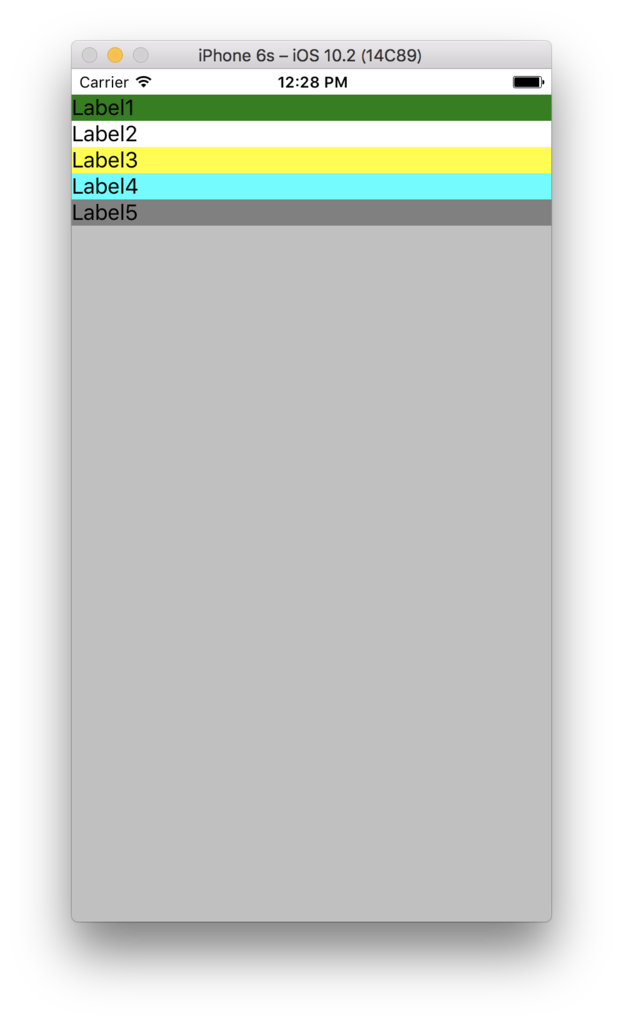
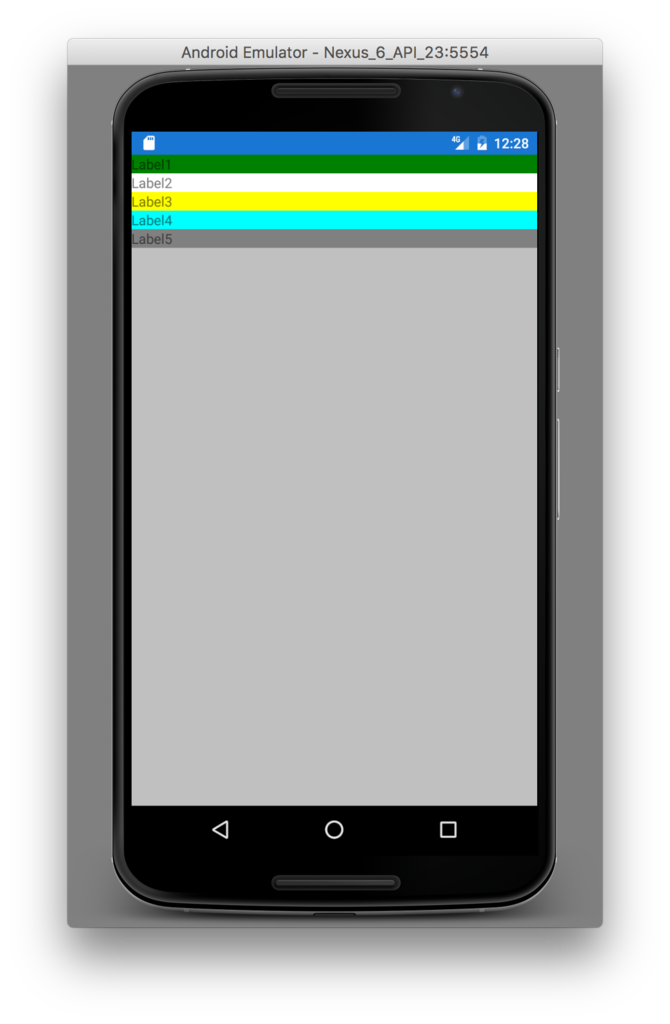
StackLayoutのSpacingに 0 を設定します。
<?xml version="1.0" encoding="utf-8"?>
<ContentPage
  xmlns="http://xamarin.com/schemas/2014/forms"
  xmlns:x="http://schemas.microsoft.com/winfx/2009/xaml"
  xmlns:local="clr-namespace:LayoutExample1"
  x:Class="LayoutExample1.LayoutExample1Page">

  <StackLayout x:Name="stack1" Spacing="0" Orientation="Vertical" BackgroundColor="Silver">
    <StackLayout.Margin>
      <!-- iOSはトップに 20 の余白が必要 -->
      <OnPlatform x:TypeArguments="Thickness"
        iOS="0, 20, 0, 0"
        Android="0, 0, 0, 0"
        WinPhone="0, 0, 0, 0" />
    </StackLayout.Margin>

    <Label Text="Label1" BackgroundColor="Green" />
    <Label Text="Label2" BackgroundColor="White" />
    <Label Text="Label3" BackgroundColor="Yellow" />
    <Label Text="Label4" BackgroundColor="Aqua" />
    <Label Text="Label5" BackgroundColor="Gray" />
  </StackLayout>
</ContentPage>
実行画面は以下です。
ex3) FillAndExpand を指定する
5つのLabelのVerticalOptionsに「FillAndExpand」を設定してみます。
<?xml version="1.0" encoding="utf-8"?>
<ContentPage
  xmlns="http://xamarin.com/schemas/2014/forms"
  xmlns:x="http://schemas.microsoft.com/winfx/2009/xaml"
  xmlns:local="clr-namespace:LayoutExample1"
  x:Class="LayoutExample1.LayoutExample1Page">

  <StackLayout x:Name="stack1" Spacing="0" Orientation="Vertical" BackgroundColor="Silver">
    <StackLayout.Margin>
      <!-- iOSはトップに 20 の余白が必要 -->
      <OnPlatform x:TypeArguments="Thickness"
        iOS="0, 20, 0, 0"
        Android="0, 0, 0, 0"
        WinPhone="0, 0, 0, 0" />
    </StackLayout.Margin>

    <Label Text="Label1" VerticalOptions="FillAndExpand" BackgroundColor="Green" />
    <Label Text="Label2" VerticalOptions="FillAndExpand" BackgroundColor="White" />
    <Label Text="Label3" VerticalOptions="FillAndExpand" BackgroundColor="Yellow" />
    <Label Text="Label4" VerticalOptions="FillAndExpand" BackgroundColor="Aqua" />
    <Label Text="Label5" VerticalOptions="FillAndExpand" BackgroundColor="Gray" />
  </StackLayout>
</ContentPage>
こうすると・・・以下の実行結果となります。
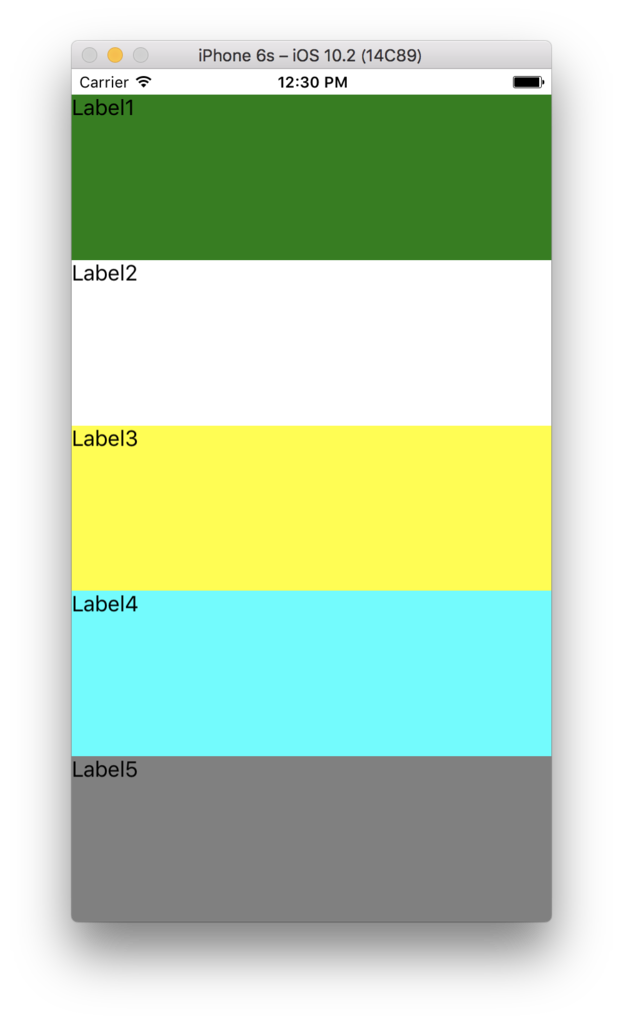
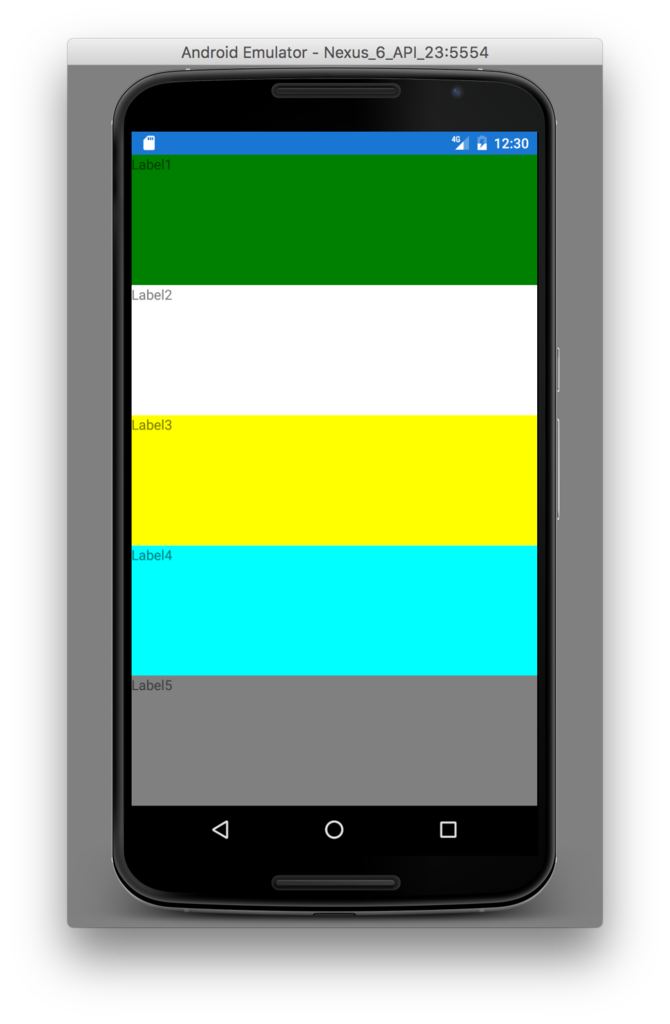
「おー!」なんか画面いっぱいに広がって「いい感じ(?)になりました!」。
子要素に「Expand」が指定されている場合、
親は、各要素を配置し、余った領域について「等分に、(Expandsが指定された)各要素に配分」します。
ex4) 次にこんなXAML定義を
StackLayoutの子として2つのStackLayoutを配置します。
1つ目の子のStackLayoutには、5つのラベルを配置します。
2つ目の子のStackLayoutには、2つのラベルを配置します。
各VerticalOptionsには FillAndExpand を指定します。
<?xml version="1.0" encoding="utf-8"?>
<ContentPage
  xmlns="http://xamarin.com/schemas/2014/forms"
  xmlns:x="http://schemas.microsoft.com/winfx/2009/xaml"
  xmlns:local="clr-namespace:LayoutExample1"
  x:Class="LayoutExample1.LayoutExample1Page">

  <StackLayout Orientation="Vertical" Spacing="0" BackgroundColor="Red">
    <StackLayout.Margin>
      <!-- iOSはトップに 20 の余白が必要 -->
      <OnPlatform x:TypeArguments="Thickness"
        iOS="0, 20, 0, 0"
        Android="0, 0, 0, 0"
        WinPhone="0, 0, 0, 0" />
    </StackLayout.Margin>

    <StackLayout Orientation="Vertical" BackgroundColor="Navy" Spacing="0" VerticalOptions="FillAndExpand">
      <Label Text="Label1" BackgroundColor="White" VerticalOptions="FillAndExpand" />
      <Label Text="Label2" BackgroundColor="Green" VerticalOptions="FillAndExpand" />
      <Label Text="Label3" BackgroundColor="Yellow" VerticalOptions="FillAndExpand" />
      <Label Text="Label4" BackgroundColor="Blue" VerticalOptions="FillAndExpand" />
      <Label Text="Label5" BackgroundColor="Gray" VerticalOptions="FillAndExpand" />
    </StackLayout>

    <StackLayout Orientation="Vertical" BackgroundColor="Fuchsia" Spacing="0" VerticalOptions="FillAndExpand">
      <Label x:Name="labelA" Text="LabelA" BackgroundColor="White" VerticalOptions="FillAndExpand" />
      <Label x:Name="labelB" Text="LabelB" BackgroundColor="Green" VerticalOptions="FillAndExpand" />
    </StackLayout>
  </StackLayout>
</ContentPage>
以下が実行画面です。
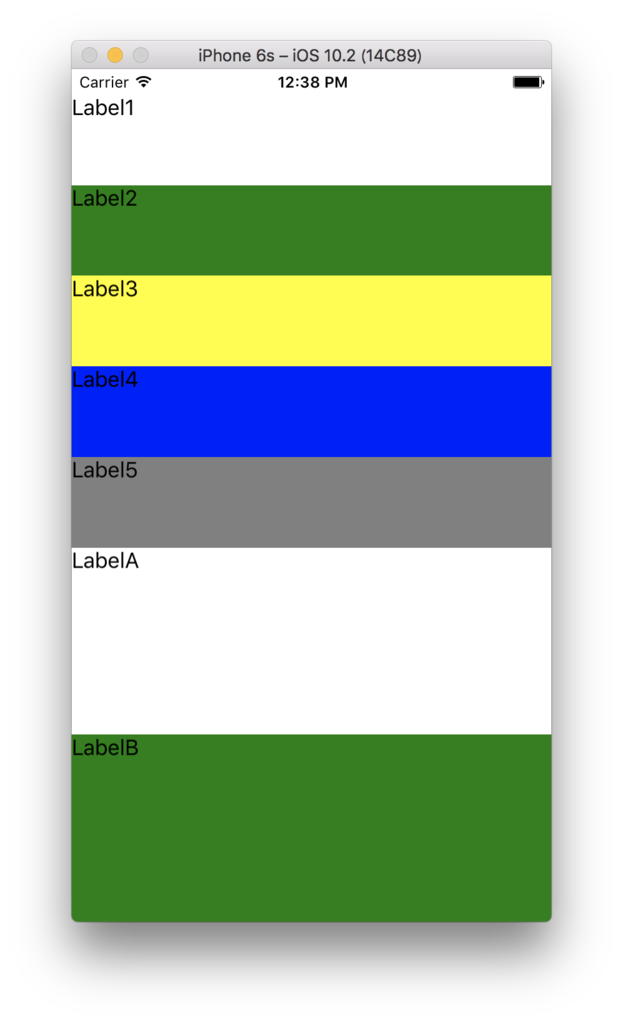
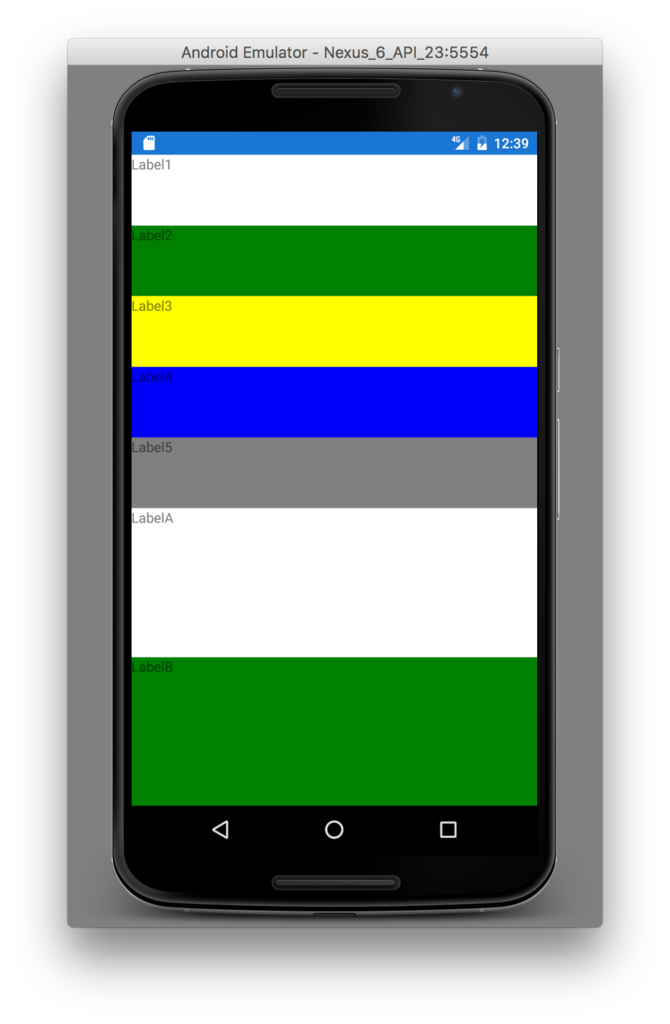
予想通りだったでしょうか?
ポイントは「1つ目の子StackLayout と 2つ目のStackLayout の高さは異なる」という点です。
以下のようなサイズ調整になります。
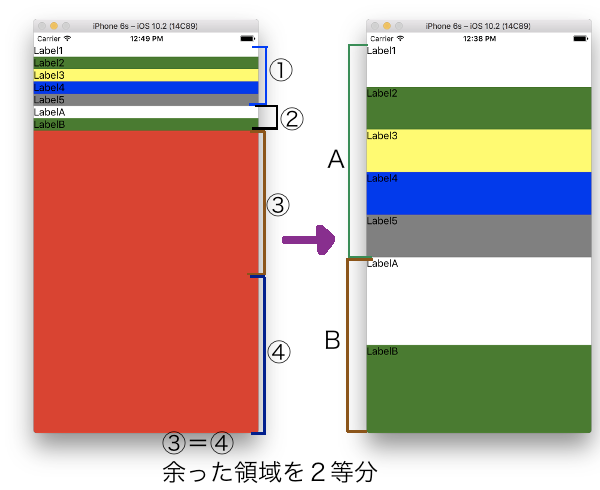 A = ①+③
B = ②+④
ex5) 上記に至るパターンの解析(1)
ex4) の結果が想像できた方は、VerticalOptionsの Extends の動作を理解されていることでしょう。
頭の中に「??」が浮かんだ方の為に、更に以下に幾つかのサンプルを紹介します。
ex4)のサンプルの FillAndExpand を Fill に変更します。
<?xml version="1.0" encoding="utf-8"?>
<ContentPage
  xmlns="http://xamarin.com/schemas/2014/forms"
  xmlns:x="http://schemas.microsoft.com/winfx/2009/xaml"
  xmlns:local="clr-namespace:LayoutExample1"
  x:Class="LayoutExample1.LayoutExample1Page">

  <StackLayout Orientation="Vertical" Spacing="0" BackgroundColor="Red">
    <StackLayout.Margin>
      <!-- iOSはトップに 20 の余白が必要 -->
      <OnPlatform x:TypeArguments="Thickness"
        iOS="0, 20, 0, 0"
        Android="0, 0, 0, 0"
        WinPhone="0, 0, 0, 0" />
    </StackLayout.Margin>

    <StackLayout Orientation="Vertical" BackgroundColor="Navy" Spacing="0" VerticalOptions="Fill">
      <Label Text="Label1" BackgroundColor="White" VerticalOptions="Fill" />
      <Label Text="Label2" BackgroundColor="Green" VerticalOptions="Fill" />
      <Label Text="Label3" BackgroundColor="Yellow" VerticalOptions="Fill" />
      <Label Text="Label4" BackgroundColor="Blue" VerticalOptions="Fill" />
      <Label Text="Label5" BackgroundColor="Gray" VerticalOptions="Fill" />
    </StackLayout>

    <StackLayout Orientation="Vertical" BackgroundColor="Fuchsia" Spacing="0" VerticalOptions="Fill">
      <Label Text="LabelA" BackgroundColor="White" VerticalOptions="Fill" />
      <Label Text="LabelB" BackgroundColor="Green" VerticalOptions="Fill" />
    </StackLayout>
  </StackLayout>
</ContentPage>
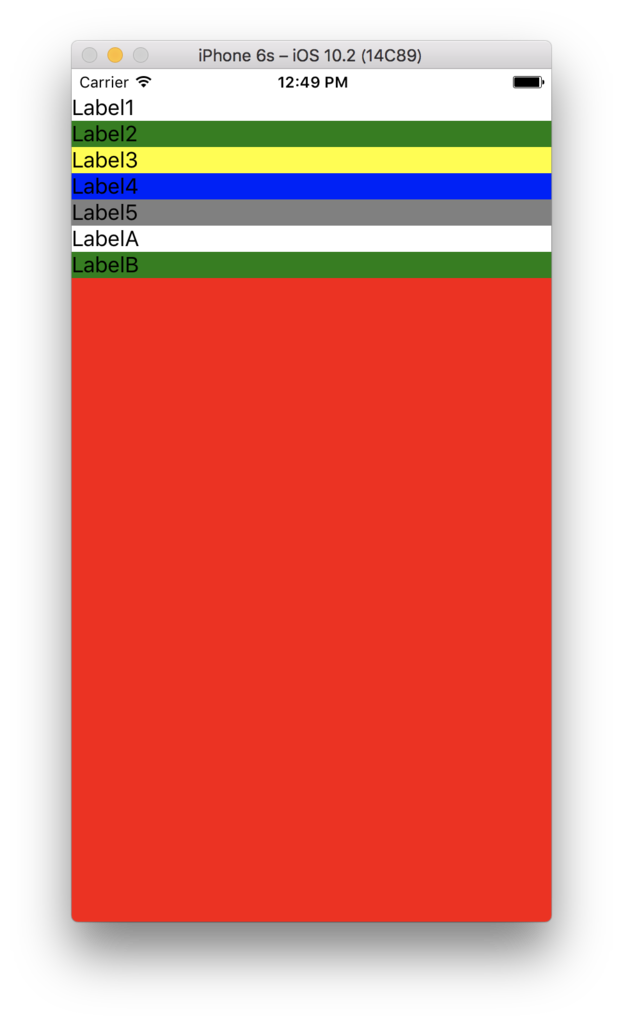
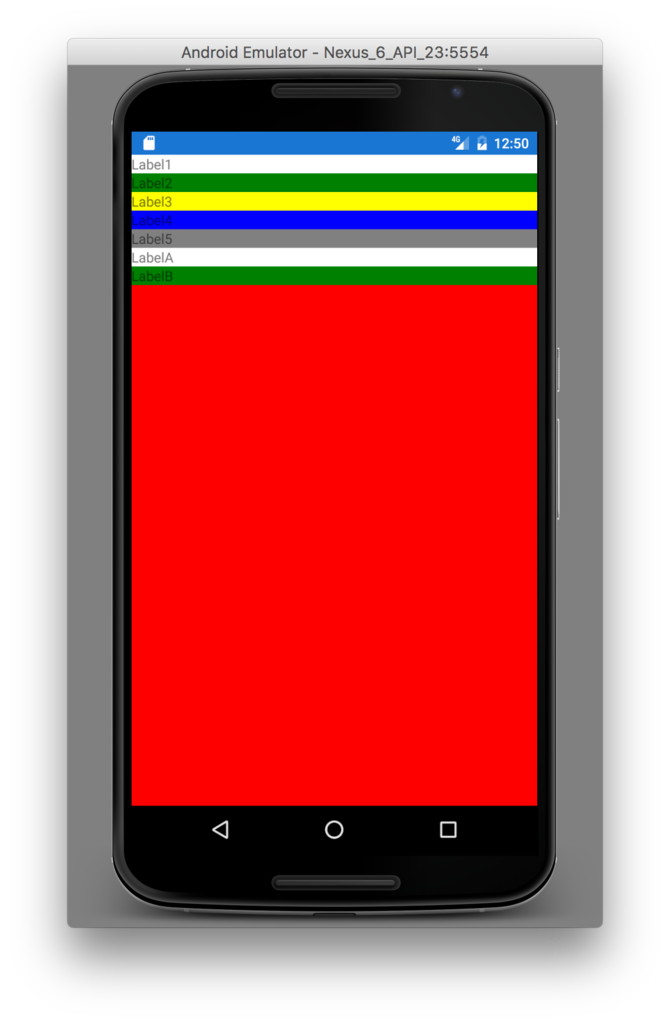
実行画面は以下です。各ラベルに必要な領域が取られ、下に領域が余ります。余った領域には親のStackLayoutのBackgroundColorが見えています。
ex6) 上記に至るパターンの解析(2)
ex5)に対して「1つ目の子StackLayoutのVerticalOptionsを Fill → FillAndExpand」に修正します。
<?xml version="1.0" encoding="utf-8"?>
<ContentPage
  xmlns="http://xamarin.com/schemas/2014/forms"
  xmlns:x="http://schemas.microsoft.com/winfx/2009/xaml"
  xmlns:local="clr-namespace:LayoutExample1"
  x:Class="LayoutExample1.LayoutExample1Page">

  <StackLayout Orientation="Vertical" Spacing="0" BackgroundColor="Red">
    <StackLayout.Margin>
      <!-- iOSはトップに 20 の余白が必要 -->
      <OnPlatform x:TypeArguments="Thickness"
        iOS="0, 20, 0, 0"
        Android="0, 0, 0, 0"
        WinPhone="0, 0, 0, 0" />
    </StackLayout.Margin>

    <StackLayout Orientation="Vertical" BackgroundColor="Navy" Spacing="0" VerticalOptions="FillAndExpand">
      <Label Text="Label1" BackgroundColor="White" VerticalOptions="Fill" />
      <Label Text="Label2" BackgroundColor="Green" VerticalOptions="Fill" />
      <Label Text="Label3" BackgroundColor="Yellow" VerticalOptions="Fill" />
      <Label Text="Label4" BackgroundColor="Blue" VerticalOptions="Fill" />
      <Label Text="Label5" BackgroundColor="Gray" VerticalOptions="Fill" />
    </StackLayout>

    <StackLayout Orientation="Vertical" BackgroundColor="Fuchsia" Spacing="0" VerticalOptions="Fill">
      <Label Text="LabelA" BackgroundColor="White" VerticalOptions="Fill" />
      <Label Text="LabelB" BackgroundColor="Green" VerticalOptions="Fill" />
    </StackLayout>
  </StackLayout>
</ContentPage>
実行画面は以下です。
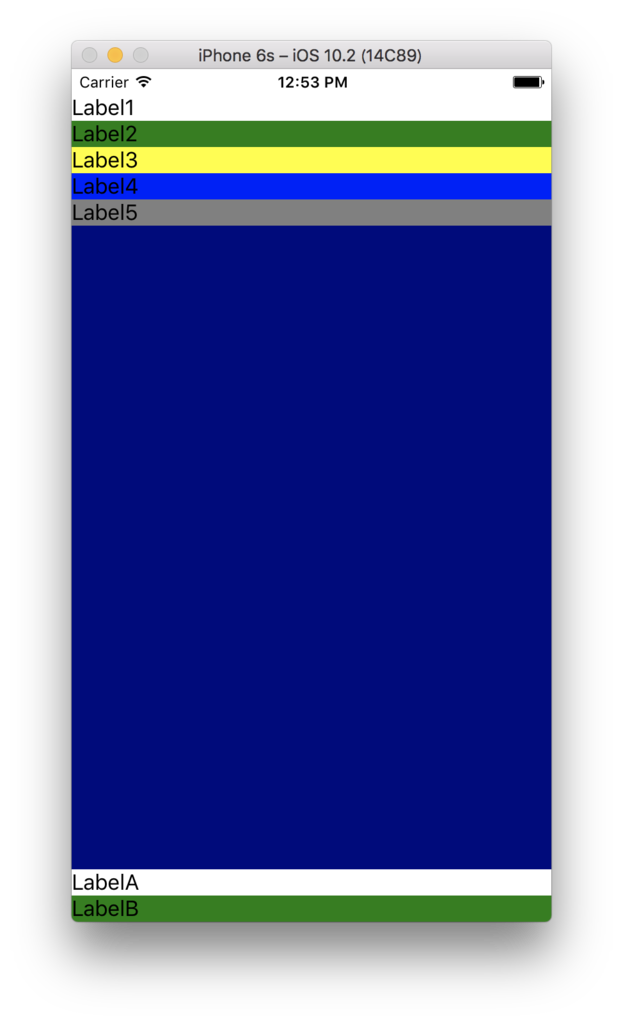
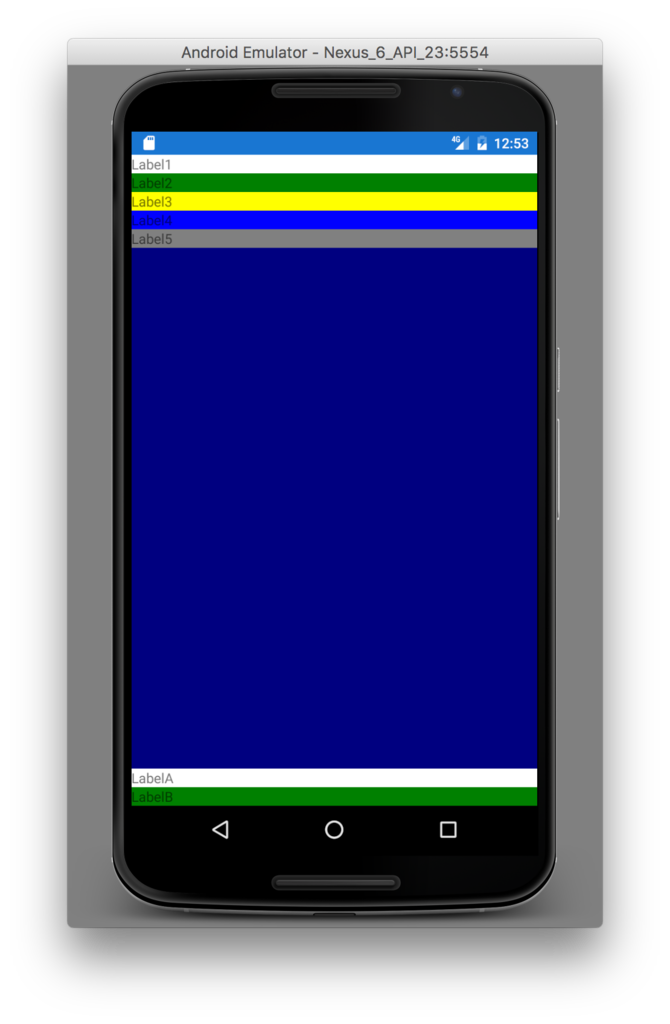
ex5)では「5つのLabelを含むStackLayout と 2つのLabelを含むStackLayout」を配置した後の余った領域は、そのままにされていました(親StackLayoutのBackgroundColorが前面に見えている状態になる)。
ex6)では1つ目のStackLayoutが Expands 指定されています。レイアウトの仕組みとして「余った領域は、Expands指定された子要素に等分に分配される」ので、ここではExpand指定された唯一のStackLayoutに領域配分されます(BackgroundColor=Navyで領域を確認することができます)。
ex7) 上記に至るパターンの解析(3)
次に ex6) に以下の修正を加えます。
「1つ目のStackLayoutの子Labelの VerticalOptions を FillAndExpand に修正」
<?xml version="1.0" encoding="utf-8"?>
<ContentPage
  xmlns="http://xamarin.com/schemas/2014/forms"
  xmlns:x="http://schemas.microsoft.com/winfx/2009/xaml"
  xmlns:local="clr-namespace:LayoutExample1"
  x:Class="LayoutExample1.LayoutExample1Page">

  <StackLayout Orientation="Vertical" Spacing="0" BackgroundColor="Red">
    <StackLayout.Margin>
      <!-- iOSはトップに 20 の余白が必要 -->
      <OnPlatform x:TypeArguments="Thickness"
        iOS="0, 20, 0, 0"
        Android="0, 0, 0, 0"
        WinPhone="0, 0, 0, 0" />
    </StackLayout.Margin>

    <StackLayout Orientation="Vertical" BackgroundColor="Navy" Spacing="0" VerticalOptions="FillAndExpand">
      <Label Text="Label1" BackgroundColor="White" VerticalOptions="FillAndExpand" />
      <Label Text="Label2" BackgroundColor="Green" VerticalOptions="FillAndExpand" />
      <Label Text="Label3" BackgroundColor="Yellow" VerticalOptions="FillAndExpand" />
      <Label Text="Label4" BackgroundColor="Blue" VerticalOptions="FillAndExpand" />
      <Label Text="Label5" BackgroundColor="Gray" VerticalOptions="FillAndExpand" />
    </StackLayout>

    <StackLayout Orientation="Vertical" BackgroundColor="Fuchsia" Spacing="0" VerticalOptions="Fill">
      <Label Text="LabelA" BackgroundColor="White" VerticalOptions="Fill" />
      <Label Text="LabelB" BackgroundColor="Green" VerticalOptions="Fill" />
    </StackLayout>
  </StackLayout>
</ContentPage>
実行画面は以下です。
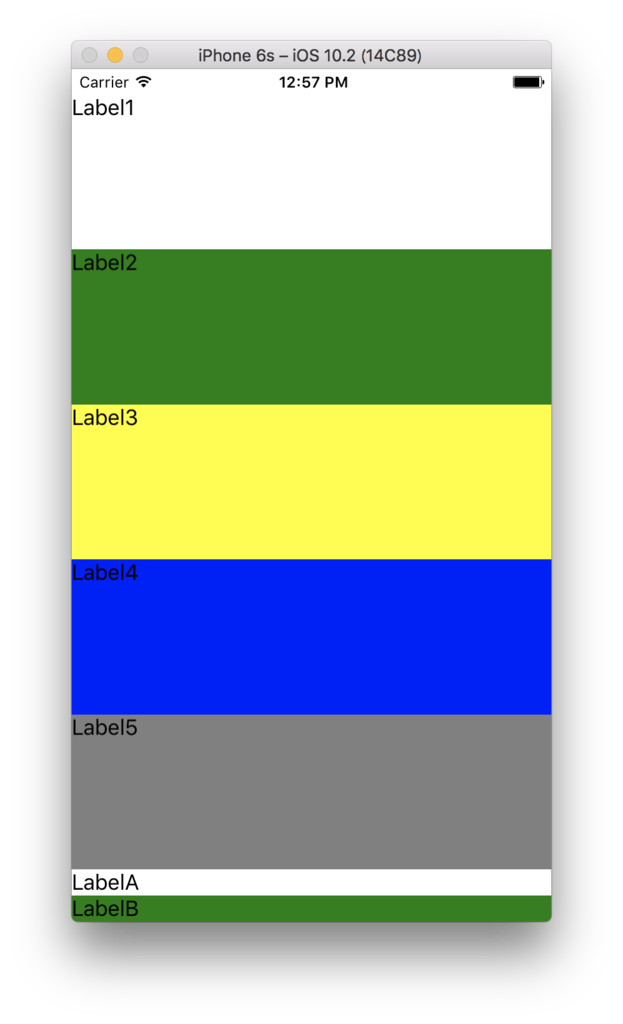
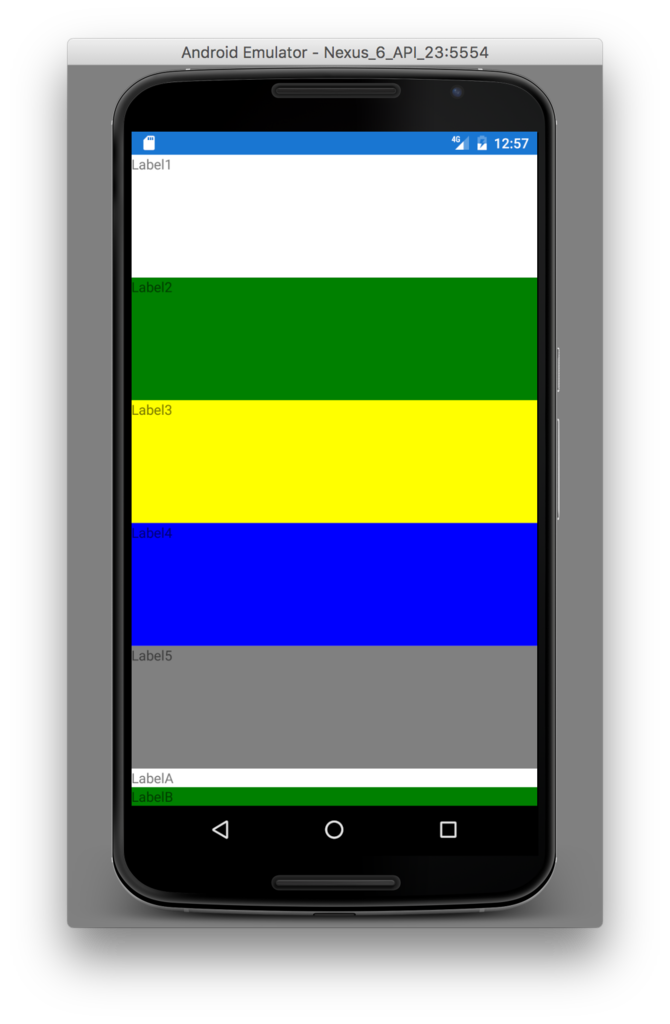
ex6)では1つ目のStackLayoutに割り当てられた領域がそのまま余っていましたが、このex7)では、そのStackLayoutの5つの子LabelのVerticalOptionsがFillAndExpandになった為、余った領域を等分した高さが、5つのLabelに配分されています。
ex8)上記に至るパターンの解析(4)
もういい加減しつこいですが・・・
ex7)に対して以下の修正を加えます。
2つ目のStackLayoutのVerticalOptionsをFillAndExpandに修正。
<?xml version="1.0" encoding="utf-8"?>
<ContentPage
  xmlns="http://xamarin.com/schemas/2014/forms"
  xmlns:x="http://schemas.microsoft.com/winfx/2009/xaml"
  xmlns:local="clr-namespace:LayoutExample1"
  x:Class="LayoutExample1.LayoutExample1Page">

  <StackLayout Orientation="Vertical" Spacing="0" BackgroundColor="Red">
    <StackLayout.Margin>
      <!-- iOSはトップに 20 の余白が必要 -->
      <OnPlatform x:TypeArguments="Thickness"
        iOS="0, 20, 0, 0"
        Android="0, 0, 0, 0"
        WinPhone="0, 0, 0, 0" />
    </StackLayout.Margin>

    <StackLayout Orientation="Vertical" BackgroundColor="Navy" Spacing="0" VerticalOptions="FillAndExpand">
      <Label Text="Label1" BackgroundColor="White" VerticalOptions="FillAndExpand" />
      <Label Text="Label2" BackgroundColor="Green" VerticalOptions="FillAndExpand" />
      <Label Text="Label3" BackgroundColor="Yellow" VerticalOptions="FillAndExpand" />
      <Label Text="Label4" BackgroundColor="Blue" VerticalOptions="FillAndExpand" />
      <Label Text="Label5" BackgroundColor="Gray" VerticalOptions="FillAndExpand" />
    </StackLayout>

    <StackLayout Orientation="Vertical" BackgroundColor="Fuchsia" Spacing="0" VerticalOptions="FillAndExpand">
      <Label Text="LabelA" BackgroundColor="White" VerticalOptions="Fill" />
      <Label Text="LabelB" BackgroundColor="Green" VerticalOptions="Fill" />
    </StackLayout>
  </StackLayout>
</ContentPage>
実行画面は以下です。
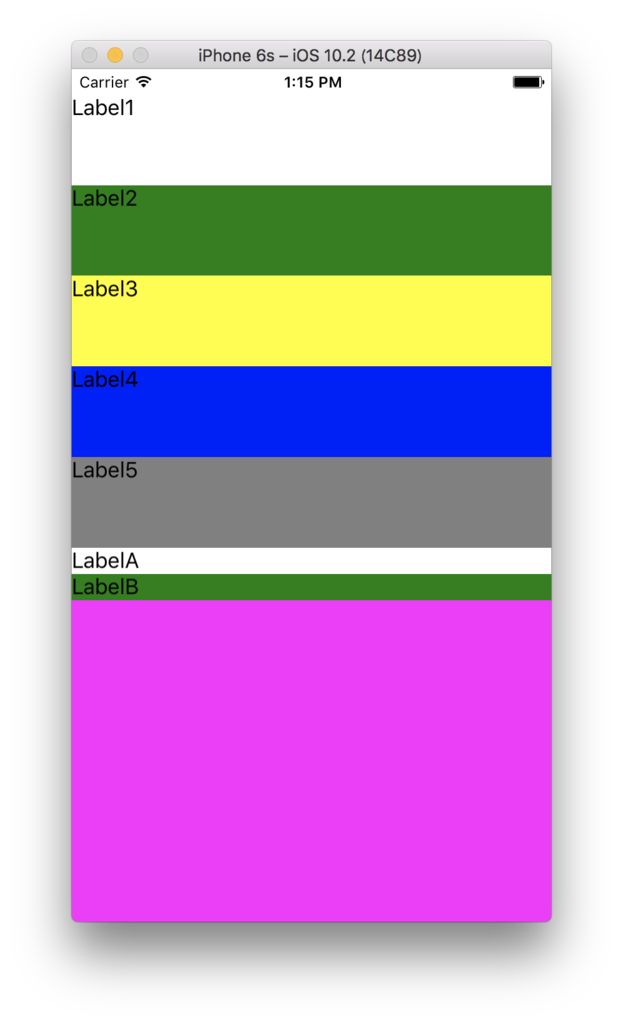
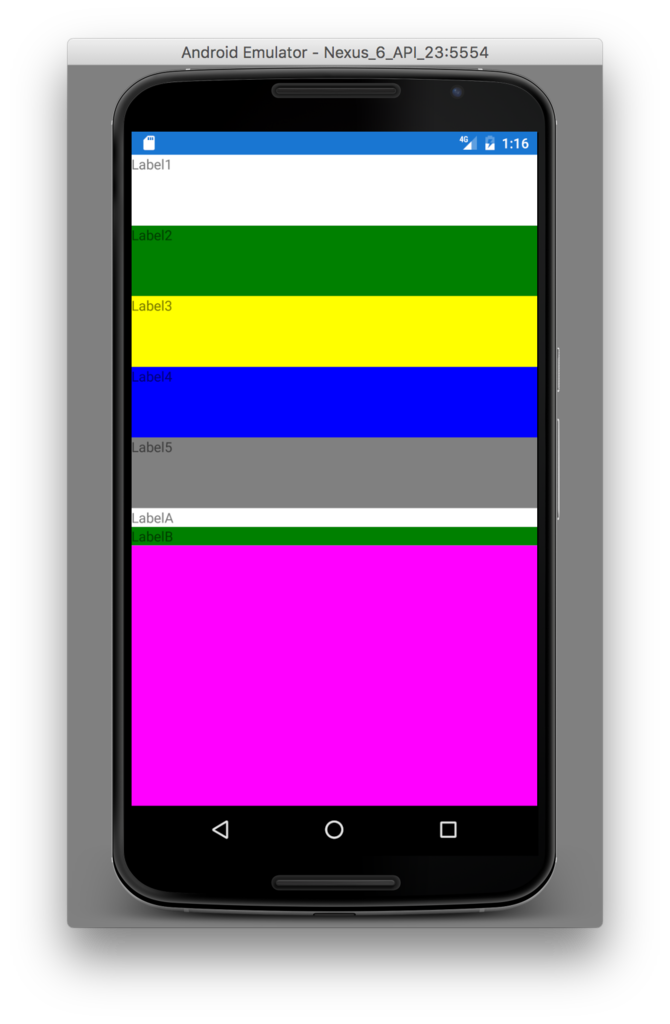
余った領域を 1つ目のStackLayout と 2つ目のStackLayout で等分に分け合いました。
これで ex4) の動作の振る舞いにつながったはずです!
コントロール(ビュー要素)が必要とするサイズとは?
上記で使用した StackLayout や Label は「必要な領域を計算し、Expands指定がある場合には余った領域を分配する」という動きをしました。
では、「必要な領域」とは何か?
それは「Xamarin.Forms.VisualElement.OnMeasure()」メソッドで行われています。
LabelやButtonやその他の各UI要素自身が、自らを表示するのに必要な領域(サイズ)をこのメソッドで返却します。
つまりStackLayoutなどの子要素を持つUI要素は、子に必要サイズを聞いて回り、結果として子を含む自らの必要サイズを呼び出し元に返却します。
OnMeasure()を使ったサンプル
ではLabelを継承した MyLabel を以下のように実装してみます。
OnMeasure()メソッドをオーバーライドし、強制的に必要サイズを Width=200 / Height=100 とします。
using System;
namespace LayoutExample1
{
  public class MyLabel : Xamarin.Forms.Label
  {
    public MyLabel()  : base()
    {
    }

    protected override Xamarin.Forms.SizeRequest OnMeasure(double widthConstraint, double heightConstraint)
    {
      return new Xamarin.Forms.SizeRequest(
        new Xamarin.Forms.Size(200, 100),
        new Xamarin.Forms.Size(200, 100));
    }
  }
}
MyLabelを使用した画面XAMLの定義は以下です。
<?xml version="1.0" encoding="utf-8"?>
<ContentPage
  xmlns="http://xamarin.com/schemas/2014/forms"
  xmlns:x="http://schemas.microsoft.com/winfx/2009/xaml"
  xmlns:local="clr-namespace:LayoutExample1"
  x:Class="LayoutExample1.LayoutExample1Page">

  <StackLayout x:Name="parentStack" Orientation="Vertical" Spacing="0" BackgroundColor="Red" VerticalOptions="Fill">
    <StackLayout.Margin>
      <!-- iOSはトップに 20 の余白が必要 -->
      <OnPlatform x:TypeArguments="Thickness"
        iOS="0, 20, 0, 0"
        Android="0, 0, 0, 0"
        WinPhone="0, 0, 0, 0" />
    </StackLayout.Margin>

      <local:MyLabel Text="Label1" BackgroundColor="White" VerticalOptions="Fill" />
      <local:MyLabel Text="Label2" BackgroundColor="Green" VerticalOptions="Fill" />
      <local:MyLabel Text="Label3" BackgroundColor="Yellow" VerticalOptions="Fill" />
      <local:MyLabel Text="Label3" BackgroundColor="Blue" VerticalOptions="Fill" />
  </StackLayout>
</ContentPage>
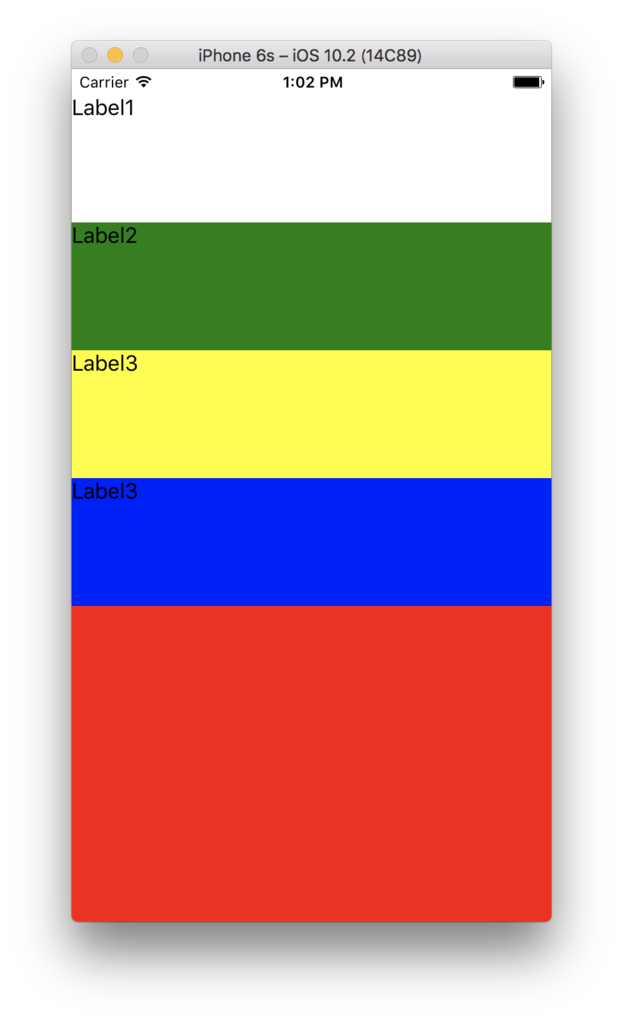
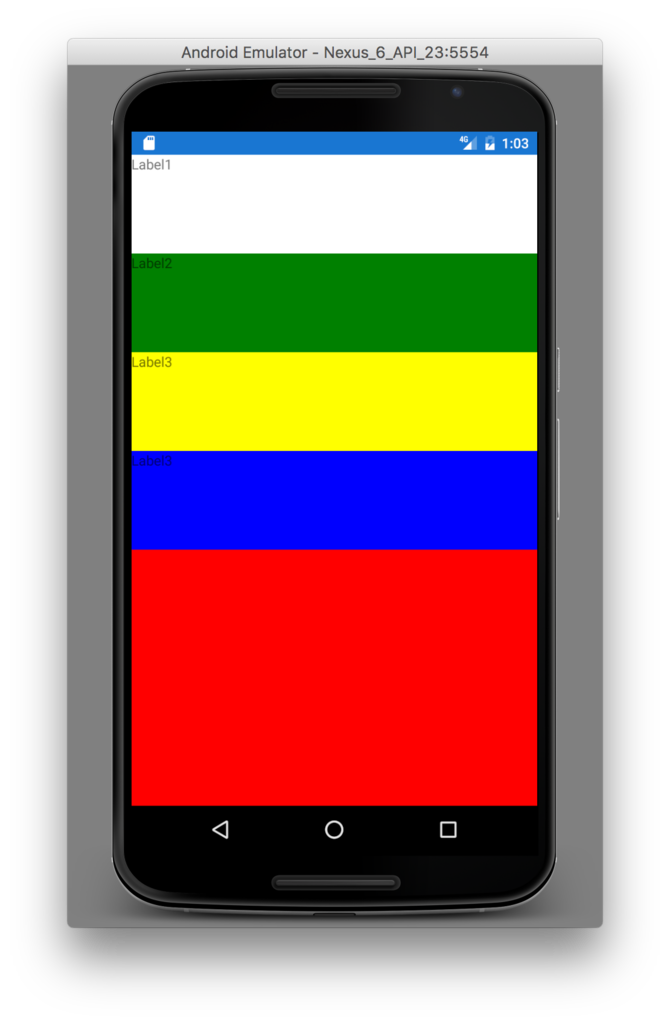
実行すると以下のように Label が Height 100で表示されていることを確認することができます。
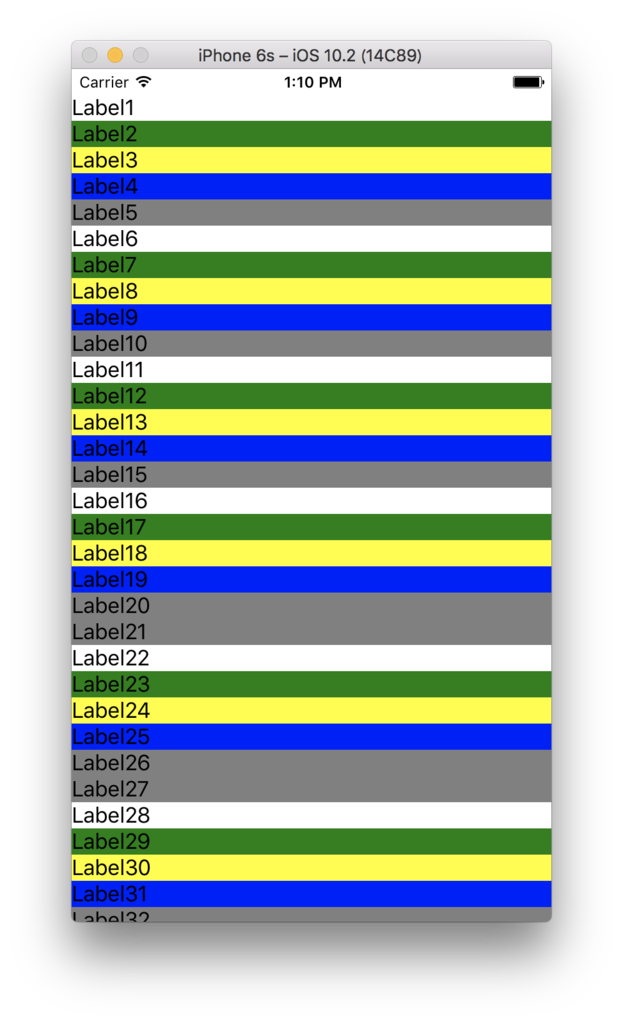
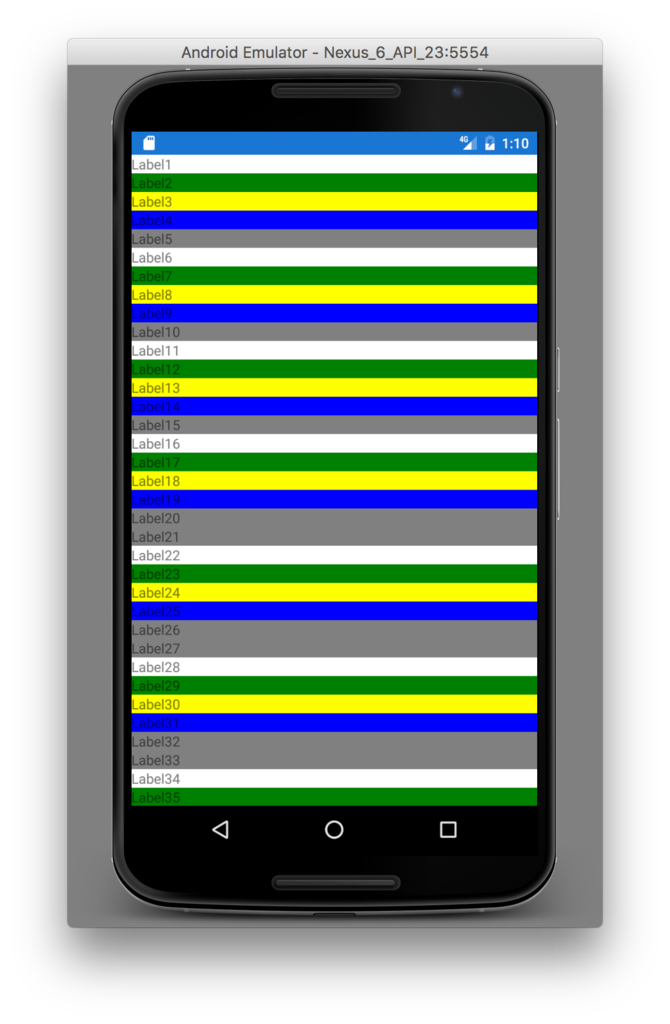
(おまけ)画面から溢れるほどUIが配置されている場合
画面に収まりきらないほどUIが配置されていた場合、そのまま画面から溢れ、表示・操作できない状態になります。
<?xml version="1.0" encoding="utf-8"?>
<ContentPage
  xmlns="http://xamarin.com/schemas/2014/forms"
  xmlns:x="http://schemas.microsoft.com/winfx/2009/xaml"
  xmlns:local="clr-namespace:LayoutExample1"
  x:Class="LayoutExample1.LayoutExample1Page">

  <StackLayout Orientation="Vertical" Spacing="0" BackgroundColor="Red">
    <StackLayout.Margin>
      <!-- iOSはトップに 20 の余白が必要 -->
      <OnPlatform x:TypeArguments="Thickness"
        iOS="0, 20, 0, 0"
        Android="0, 0, 0, 0"
        WinPhone="0, 0, 0, 0" />
    </StackLayout.Margin>

    <Label Text="Label1" BackgroundColor="White" VerticalOptions="FillAndExpand" />
    <Label Text="Label2" BackgroundColor="Green" VerticalOptions="FillAndExpand" />
    <Label Text="Label3" BackgroundColor="Yellow" VerticalOptions="FillAndExpand" />
    <Label Text="Label4" BackgroundColor="Blue" VerticalOptions="FillAndExpand" />
    <Label Text="Label5" BackgroundColor="Gray" VerticalOptions="FillAndExpand" />
    <Label Text="Label6" BackgroundColor="White" VerticalOptions="FillAndExpand" />
    <Label Text="Label7" BackgroundColor="Green" VerticalOptions="FillAndExpand" />
    <Label Text="Label8" BackgroundColor="Yellow" VerticalOptions="FillAndExpand" />
    <Label Text="Label9" BackgroundColor="Blue" VerticalOptions="FillAndExpand" />
    <Label Text="Label10" BackgroundColor="Gray" VerticalOptions="FillAndExpand" />
    <Label Text="Label11" BackgroundColor="White" VerticalOptions="FillAndExpand" />
    <Label Text="Label12" BackgroundColor="Green" VerticalOptions="FillAndExpand" />
    <Label Text="Label13" BackgroundColor="Yellow" VerticalOptions="FillAndExpand" />
    <Label Text="Label14" BackgroundColor="Blue" VerticalOptions="FillAndExpand" />
    <Label Text="Label15" BackgroundColor="Gray" VerticalOptions="FillAndExpand" />
    <Label Text="Label16" BackgroundColor="White" VerticalOptions="FillAndExpand" />
    <Label Text="Label17" BackgroundColor="Green" VerticalOptions="FillAndExpand" />
    <Label Text="Label18" BackgroundColor="Yellow" VerticalOptions="FillAndExpand" />
    <Label Text="Label19" BackgroundColor="Blue" VerticalOptions="FillAndExpand" />
    <Label Text="Label20" BackgroundColor="Gray" VerticalOptions="FillAndExpand" />
    <Label Text="Label21" BackgroundColor="Gray" VerticalOptions="FillAndExpand" />
    <Label Text="Label22" BackgroundColor="White" VerticalOptions="FillAndExpand" />
    <Label Text="Label23" BackgroundColor="Green" VerticalOptions="FillAndExpand" />
    <Label Text="Label24" BackgroundColor="Yellow" VerticalOptions="FillAndExpand" />
    <Label Text="Label25" BackgroundColor="Blue" VerticalOptions="FillAndExpand" />
    <Label Text="Label26" BackgroundColor="Gray" VerticalOptions="FillAndExpand" />
    <Label Text="Label27" BackgroundColor="Gray" VerticalOptions="FillAndExpand" />
    <Label Text="Label28" BackgroundColor="White" VerticalOptions="FillAndExpand" />
    <Label Text="Label29" BackgroundColor="Green" VerticalOptions="FillAndExpand" />
    <Label Text="Label30" BackgroundColor="Yellow" VerticalOptions="FillAndExpand" />
    <Label Text="Label31" BackgroundColor="Blue" VerticalOptions="FillAndExpand" />
    <Label Text="Label32" BackgroundColor="Gray" VerticalOptions="FillAndExpand" />
    <Label Text="Label33" BackgroundColor="Gray" VerticalOptions="FillAndExpand" />
    <Label Text="Label34" BackgroundColor="White" VerticalOptions="FillAndExpand" />
    <Label Text="Label35" BackgroundColor="Green" VerticalOptions="FillAndExpand" />
    <Label Text="Label36" BackgroundColor="Yellow" VerticalOptions="FillAndExpand" />
    <Label Text="Label37" BackgroundColor="Blue" VerticalOptions="FillAndExpand" />
    <Label Text="Label38" BackgroundColor="Gray" VerticalOptions="FillAndExpand" />
    <Label Text="Label39" BackgroundColor="Gray" VerticalOptions="FillAndExpand" />
    <Label Text="Label40" BackgroundColor="White" VerticalOptions="FillAndExpand" />
    <Label Text="Label41" BackgroundColor="Green" VerticalOptions="FillAndExpand" />
    <Label Text="Label42" BackgroundColor="Yellow" VerticalOptions="FillAndExpand" />
    <Label Text="Label43" BackgroundColor="Blue" VerticalOptions="FillAndExpand" />
    <Label Text="Label44" BackgroundColor="Gray" VerticalOptions="FillAndExpand" />
  </StackLayout>
</ContentPage>
実行画面は以下です。
まとめ
余った領域は、Expands指定されたUI要素の数で等分され、各UI要素(Expands)に配分される。