Syncfusion SfTreeMap を使ってみる - Xamarin Forms
最近ちょろちょろと Syncfusion の Essential Studio for Xamarin で遊んでおりました。
ということで、各コンポーネントの使い方なんかをブログにあげていこうかな、と思います。
まずは SfTreeMap の使い方について書きたいと思います。
Syncfusion Essential Studio for Xamarin とは?
iOS / android / Forms用の便利なコントロール群のパッケージです。
これの良いところ(?)は、個人開発者や売り上げが $1 million に満たない企業であれば無償で利用できるコミュニティライセンスというものが提供されていることです。
SfTreeMapコントロール
では早速 SfTreeMap を使ってみたいと思います。
SfTreeMapは以下のようにタイル状に子要素を並べるUIコントロールです。
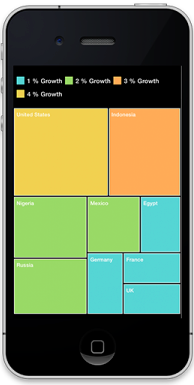
※上記画像はSyncfusionサイトより拝借m( )m
「タイル状の子要素」と表現しましたが、これは正式には「Leaf Node」と呼ばれます(Treeに対する子要素としてのLeaf、ですね)。
Leaf Node要素は「重み付け」を行うことができ、その「重み付け」に基づいてLeaf Node要素のサイズ(専有面積)が決まります。
国別の人口の大小、会社毎の売り上げの大小、人気の大小・・・などをビジュアルな一覧で表現することができます。
ステップ1(シンプルにデータバインド)
作るサンプルは以下のようなものです。
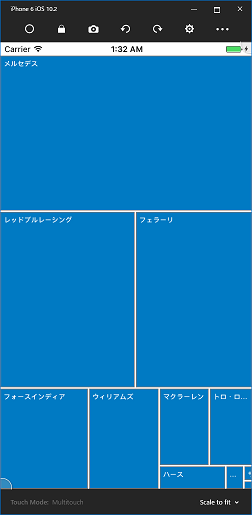
F1チームの2016年 年間リザルトを一覧します。Leaf Nodeの領域重み付けは獲得ポイント数で行います。
Nugetソースの追加
Essential Studio for Xamarin コントロールは、Nuget経由でプロジェクトに追加することができます。
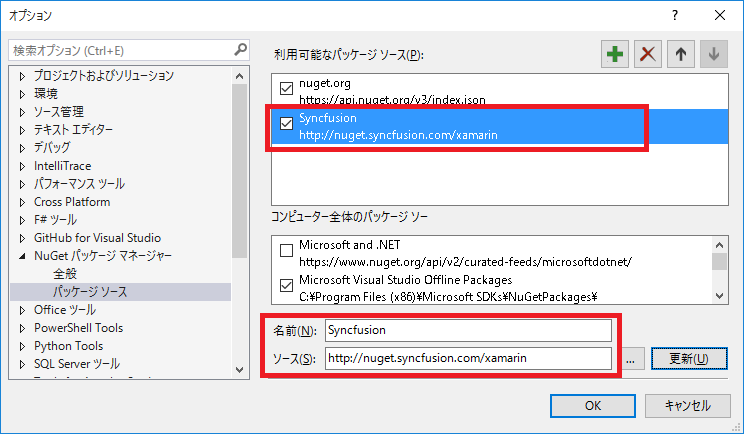
まずは Essential Studio for Xamarin 用の Nugetソース を追加します。
VS2015では、メニュー「ツール→オプション」を選択。
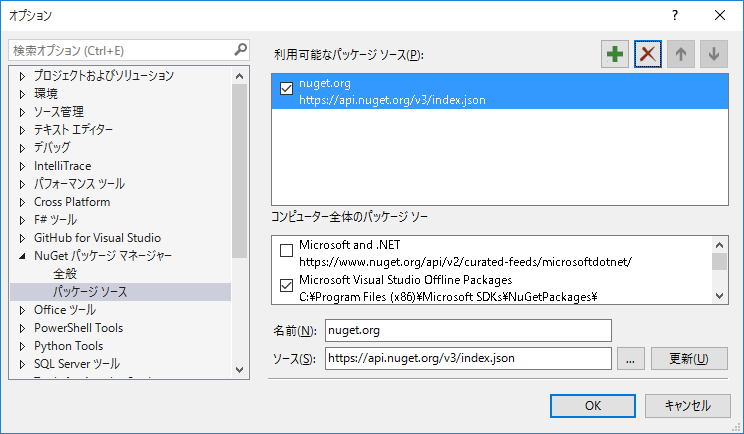
表示されたオプションダイアログから「NuGetパッケージマネージャー→パッケージソース」を選択。
プロジェクトの用意
本サンプルは、Prismを使ったプロジェクトとします。
TreeMapExampleというプロジェクト名とします。
SfTreeMapをNugetから追加します。
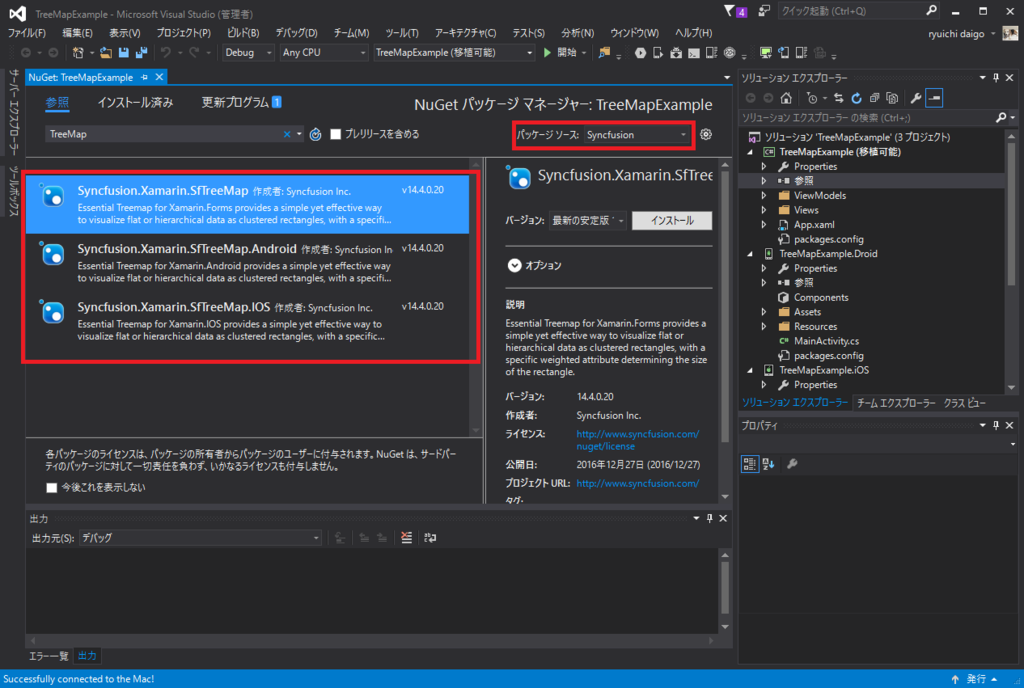
PCLプロジェクトには「Syncfusion.Xamarin.SfTreeMap」を追加します。
iOSプロジェクトには「Syncfusion.Xamarin.SfTreeMap」「Syncfusion.Xamarin.SfTreeMap.Android」を追加します。
androidプロジェクトには「Syncfusion.Xamarin.SfTreeMap」「Syncfusion.Xamarin.SfTreeMap.IOS」を追加します。
それぞれ、先程追加した Syncfusion Nugetソース からの追加になります。
iOSプロジェクトに初期化コードを追加
iOSプロジェクトの「AppDelegate.cs」の「FinishedLaunching()メソッド」に以下の実装を追加します。
// AppDelegate.cs

public override bool FinishedLaunching(UIApplication app, NSDictionary options)
{
  // 以下の1行を追加
  new Syncfusion.SfTreeMap.XForms.iOS.SfTreeMapRenderer();

  global::Xamarin.Forms.Forms.Init();
  LoadApplication(new App(new iOSInitializer()));
  return base.FinishedLaunching(app, options);
}
データモデルクラスの用意
SfTreeMapにバインドするデータモデルクラスを用意します。
// F1TeamResult.cs
using System;

namespace TreeMapExample.Models
{
  /// <summary>
  /// F1チームの年間リザルト
  /// </summary>
  public class F1TeamResult
  {
    /// <summary>
    /// チーム名を取得または設定します。
    /// </summary>
    /// <value>The name.</value>
    public string Name { get; set; }

    /// <summary>
    /// 国籍を取得または設定します。
    /// </summary>
    /// <value>The country.</value>
    public string Country { get; set; }

    /// <summary>
    /// 勝利数を取得または設定します。
    /// </summary>
    /// <value>The window.</value>
    public int Win { get; set; }

    /// <summary>
    /// 獲得ポイントを取得または設定します。
    /// </summary>
    /// <value>The points.</value>
    public int Points { get; set; }

    /// <summary>
    /// コンストラクタです。
    /// </summary>
    /// <param name="name">チーム名</param>
    /// <param name="country">国籍</param>
    /// <param name="win">勝利数</param>
    /// <param name="points">獲得ポイント</param>
    public F1TeamResult(string name, string country, int win, int points )
    {
      this.Name = name;
      this.Country = country;
      this.Points = points;
      this.Win = win;
    }
  }
}
XAMLにSfTreeMapを追加
XAMLに SfTreeMap を追加します。
<!--  MainPage.xaml -->
<?xml version="1.0" encoding="utf-8"?>
<ContentPage
  xmlns="http://xamarin.com/schemas/2014/forms"
  xmlns:x="http://schemas.microsoft.com/winfx/2009/xaml"
  xmlns:prism="clr-namespace:Prism.Mvvm;assembly=Prism.Forms"
  prism:ViewModelLocator.AutowireViewModel="True"
  x:Class="TreeMapExample.Views.MainPage"
  xmlns:sf="clr-namespace:Syncfusion.SfTreeMap.XForms;assembly=Syncfusion.SfTreeMap.XForms"
  Title="MainPage">
  <StackLayout HorizontalOptions="FillAndExpand" VerticalOptions="FillAndExpand" Margin="0,20,0,0">

    <sf:SfTreeMap x:Name="TreeMap"
      DataSource="{Binding F1TeamResults}"
      VerticalOptions="FillAndExpand"
      HorizontalOptions="FillAndExpand"
      WeightValuePath="Points">

      <sf:SfTreeMap.LeafItemSettings>
        <sf:LeafItemSettings ShowLabels="true" LabelPath="Name" >
        </sf:LeafItemSettings>
      </sf:SfTreeMap.LeafItemSettings>

    </sf:SfTreeMap>

  </StackLayout>
</ContentPage>
xmlns:sf=“clr-namespace:Syncfusion.SfTreeMap.XForms;assembly=Syncfusion.SfTreeMap.XForms”
- ポイント②
SfTreeMapコントロールを配置。
<sf:SfTreeMap x:Name=“TreeMap” …>
DataSource=“{Binding F1TeamResults}”
「F1TeamResults」はビューモデル「MainPageViewModelクラス」のプロパティになります。
- ポイント④
「LeafItemSettings」により、Leaf Nodeの表示設定を行います。
「ShowLabels=“True"」によりLeaf Node領域にラベル表示を行うことを示します。
「LabelPath="Name"」により、ラベルとして表示するデータへのパスを指定します。つまり、バインドしたデータ「F1TeamReault.Name」となります。
ViewModelを作成
XAMLに対応したビューモデルを実装します。
ObservableCollection
実装の大半を占める LoadData() は固定のコレクションデータを作成する処理になります.。
// MainPageViewModel.cs
using Prism.Mvvm;
using Prism.Navigation;
using System.Collections.ObjectModel;

using TreeMapExample.Models;

namespace TreeMapExample.ViewModels
{
  public class MainPageViewModel : BindableBase, INavigationAware
  {
    /// <summary>
    /// F1チームリザルト(SfTreeMapにデータバインドするコレクションオブジェクト)
    /// </summary>
    /// <value>The f1 team results.</value>
    public ObservableCollection<F1TeamResult> F1TeamResults { get; set; } = new ObservableCollection<F1TeamResult>();

    /// <summary>
    /// コンストラクタ
    /// </summary>
    public MainPageViewModel()
    {
      this.LoadData();
    }

    /// <summary>
    /// データをロードします。
    /// </summary>
    public void LoadData()
    {
      this.F1TeamResults.Add(
        new F1TeamResult(
          "メルセデス",
          "ドイツ",
          19,
          765
        ));

      this.F1TeamResults.Add(
        new F1TeamResult(
          "レッドブルレーシング",
          "オーストリア",
          2,
          468
        ));

      this.F1TeamResults.Add(
        new F1TeamResult(
          "フェラーリ",
          "イタリア",
          0,
          398
        ));

      this.F1TeamResults.Add(
        new F1TeamResult(
          "フォースインディア",
          "インド",
          0,
          173
        ));

      this.F1TeamResults.Add(
        new F1TeamResult(
          "ウィリアムズ",
          "イギリス",
          0,
          138
        ));

      this.F1TeamResults.Add(
        new F1TeamResult(
          "マクラーレン",
          "イギリス",
          0,
          76
        ));

      this.F1TeamResults.Add(
        new F1TeamResult(
          "トロ・ロッソ",
          "イタリア",
          0,
          63
        ));

      this.F1TeamResults.Add(
        new F1TeamResult(
          "ハース",
          "アメリカ",
          0,
          29
        ));

      this.F1TeamResults.Add(
        new F1TeamResult(
          "ルノー",
          "フランス",
          0,
          8
        ));

      this.F1TeamResults.Add(
        new F1TeamResult(
          "ザウバー",
          "スイス",
          0,
          2
        ));

      this.F1TeamResults.Add(
        new F1TeamResult(
          "マノー",
          "イギリス",
          0,
          1
        ));
    }

    public void OnNavigatedFrom(NavigationParameters parameters)
    {
    }

    public void OnNavigatedTo(NavigationParameters parameters)
    {
    }
  }
}
以上の実装で、「ステップ1(シンプルにデータバインド)」が完成しました。
ステップ2(色をカスタマイズ)
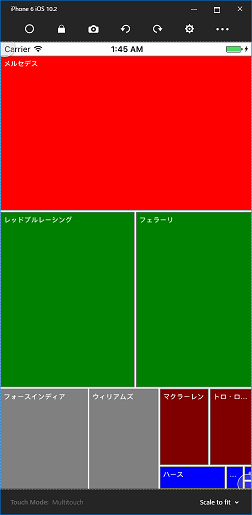
Leaf Node領域の色を「値によって領域サイズを決定する」のと同様に「値によって色を変える」事ができます。
以下が実装になります。
<?xml version="1.0" encoding="utf-8"?>
<ContentPage
  xmlns="http://xamarin.com/schemas/2014/forms"
  xmlns:x="http://schemas.microsoft.com/winfx/2009/xaml"
  xmlns:prism="clr-namespace:Prism.Mvvm;assembly=Prism.Forms"
  prism:ViewModelLocator.AutowireViewModel="True"
  x:Class="TreeMapExample.Views.MainPage"
  xmlns:sf="clr-namespace:Syncfusion.SfTreeMap.XForms;assembly=Syncfusion.SfTreeMap.XForms"
  Title="MainPage">
  <StackLayout HorizontalOptions="FillAndExpand" VerticalOptions="FillAndExpand" Margin="0,20,0,0" >

    <sf:SfTreeMap x:Name="TreeMap"
      DataSource="{Binding F1TeamResults}"
      VerticalOptions="FillAndExpand"
      HorizontalOptions="FillAndExpand"
      WeightValuePath="Points"
      ColorValuePath="Points">  <!-- ←←← 追加 -->

      <!-- ↓↓↓追加↓↓↓ -->
      <sf:SfTreeMap.LeafItemColorMapping>
        <sf:RangeColorMapping>
          <sf:RangeColorMapping.Ranges>
            <sf:Range LegendLabel="1" From="0" To="50" Color="Blue" />
            <sf:Range LegendLabel="2" From="51" To="100" Color="Maroon" />
            <sf:Range LegendLabel="3" From="101" To="200" Color="Gray" />
            <sf:Range LegendLabel="4" From="201" To="300" Color="Navy" />
            <sf:Range LegendLabel="5" From="301" To="500" Color="Green" />
            <sf:Range LegendLabel="6" From="501" To="1000" Color="Red" />
          </sf:RangeColorMapping.Ranges>
        </sf:RangeColorMapping>
      </sf:SfTreeMap.LeafItemColorMapping>
      <!-- ↑↑↑追加↑↑↑ -->

      <sf:SfTreeMap.LeafItemSettings>
        <sf:LeafItemSettings ShowLabels="true" LabelPath="Name" >
        </sf:LeafItemSettings>
      </sf:SfTreeMap.LeafItemSettings>

    </sf:SfTreeMap>

    <Button Text="Grouping" Clicked="Handle_Clicked" x:Name="Button1"/>
  </StackLayout>
</ContentPage>
- ポイント
SfTreeMapのプロパティ「ColorValuePath」を指定する。
バインドされたオブジェクトの「Pointsプロパティ」の値を評価して色を変えることを設定します。
SfTreeMap.LeafItemColorMappingを指定する。
Rangeオブジェクトを指定します。ColorValuePathプロパティの値(つまり、サンプルではF1Result.Point)の値を評価し、From - Toの値に合致したらColorプロパティ値を適用します。
実行画面が以下の通りです。
ステップ3(Leaf Nodeのテンプレートをカスタマイズ)
次に、各Leaf Nodeの表示についてカスタマイズしてみます。
完成イメージは以下の通り。
Leaf Node内には、チーム名とチームマシン画像を表示します。
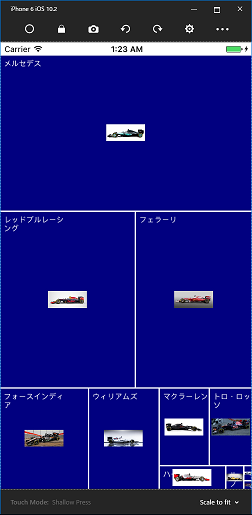
※ちょっと画像ちっちゃいけど、細かなレイアウトはご勘弁m( )m
画像リソースの追加
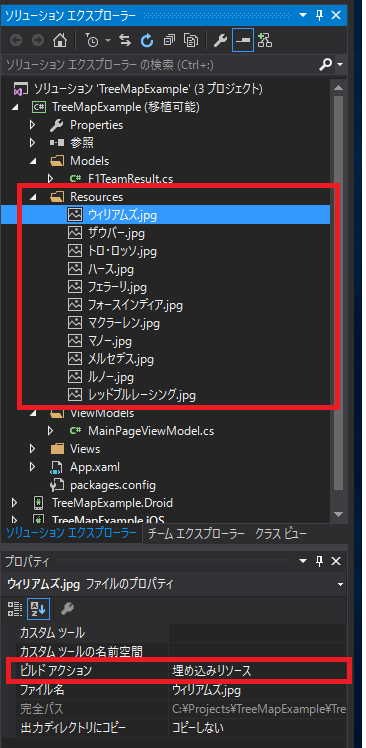
アプリケーション内で画像を使用するために jpgファイル をプロジェクトに追加します。
PCLプロジェクトに「Resourcesフォルダ」を作成して配下に jpgファイル を追加します。
「ビルドアクション」は「埋め込みリソース」とします。
モデルクラスの調整
カスタムテンプレート定義によって、画像を表示しようと思います。その為、モデルクラスにImageSourceプロパティを追加します。
// F1TeamResult.cs(ImageSource追加)
using System;

namespace TreeMapExample.Models
{
  /// <summary>
  /// F1チームの年間リザルト
  /// </summary>
  public class F1TeamResult
  {
    /// <summary>
    /// チーム名を取得または設定します。
    /// </summary>
    /// <value>The name.</value>
    public string Name { get; set; }

    /// <summary>
    /// 国籍を取得または設定します。
    /// </summary>
    /// <value>The country.</value>
    public string Country { get; set; }

    /// <summary>
    /// 勝利数を取得または設定します。
    /// </summary>
    /// <value>The window.</value>
    public int Win { get; set; }

    /// <summary>
    /// 獲得ポイントを取得または設定します。
    /// </summary>
    /// <value>The points.</value>
    public int Points { get; set; }

    /// <summary>
    /// イメージを取得または設定します。
    /// </summary>
    public ImageSource ImageSource { get; set; }

    /// <summary>
    /// コンストラクタです。
    /// </summary>
    /// <param name="name">チーム名</param>
    /// <param name="country">国籍</param>
    /// <param name="win">勝利数</param>
    /// <param name="points">獲得ポイント</param>
    public F1TeamResult(string name, string country, int win, int points )
    {
      this.Name = name;
      this.Country = country;
      this.Points = points;
      this.Win = win;

      this.ImageSource = ImageSource.FromResource(String.Format("TreeMapExample.Resources.{0}.jpg", name));
    }
  }
}
XAML定義の修正
XAMLの定義を以下のように修正します。
「<sf:SfTreeMap.ItemTemplate>」の定義が肝となります。
Template内の定義ではデータバインディング項目は「Data.xxx」となります(つまり「Data.ImageSource」は「F1TeamResult.ImageSource」に対応します)。
<?xml version="1.0" encoding="utf-8"?>
<ContentPage
  xmlns="http://xamarin.com/schemas/2014/forms"
  xmlns:x="http://schemas.microsoft.com/winfx/2009/xaml"
  xmlns:prism="clr-namespace:Prism.Mvvm;assembly=Prism.Forms"
  prism:ViewModelLocator.AutowireViewModel="True"
  x:Class="TreeMapExample.Views.MainPage"
  xmlns:sf="clr-namespace:Syncfusion.SfTreeMap.XForms;assembly=Syncfusion.SfTreeMap.XForms"
  Title="MainPage">
  <StackLayout HorizontalOptions="FillAndExpand" VerticalOptions="FillAndExpand" Margin="0,20,0,0" >

    <sf:SfTreeMap x:Name="TreeMap"
      DataSource="{Binding F1TeamResults}"
      VerticalOptions="FillAndExpand"
      HorizontalOptions="FillAndExpand"
      WeightValuePath="Points">

      <sf:SfTreeMap.LeafItemSettings>
        <sf:LeafItemSettings ShowLabels="true" LabelPath="Name" >
        </sf:LeafItemSettings>
      </sf:SfTreeMap.LeafItemSettings>

      <sf:SfTreeMap.ItemTemplate>
        <DataTemplate>
          <Grid BackgroundColor="Navy" >
            <Label Margin="5,5,0,0"
                   FontSize="11"
                   Text="{Binding Data.Name}"
                   TextColor="White"
                   HeightRequest="50"
                   WidthRequest="100"
                   HorizontalOptions="Start"
                   VerticalOptions="Start"/>
            <Image HorizontalOptions="Center"
                   VerticalOptions="Center"
                   HeightRequest="132"
                   WidthRequest="58"
                   Source="{Binding Data.ImageSource}" />
          </Grid>
      </DataTemplate>
      </sf:SfTreeMap.ItemTemplate>
    </sf:SfTreeMap>
  </StackLayout>
</ContentPage>
以上で「Leaf Nodeのテンプレートをカスタマイズ」の実装が完了しました。
まとめ
本投稿のソースコードは後でGithubにアップしようと思います。
SfTreeViewについては、まだ他にもいくつかの機能があるのですが、はじめの一歩として本投稿が参考になればと思います。
また、SfTreeViewに限らず「Syncfusion Essential Studio for Xamarin」には魅力的なコントロールが沢山あるので、これからも「自ら学びながら」この場で紹介していけたらと思います。