Xamarin Forms - StackLayoutのVerticalOptions(Expands)について
(非常にピンポイントな話題ですが)Xamarin FormsのStackLayoutにおける、子コントロールの配置で、「VerticalOptions(HorizontalOptions)」指定時の動きについて纏めたいと思います(特にExpandsに焦点を当てて)。
このネタ、先日の「Xamarin.Forms本 邦訳読書会 #2」にて私が「どんな動きでしたっけ?」と言って、皆さんを(闇に引き込み)こんな動きだよーと口頭で説明していただいたものなんです(でも、誰が説明しても分かりにくい的な話もあり、やはり、厳密には自分でコーディング&実行で検証する必要がありました)
xamarinformsbookreading.connpass.com
VerticalOptions / HorizontalOptions プロパティ
「VerticalOptions / HorizontalOptions プロパティ」は、Xamarin.Forms.Viewクラスの LayoutOptions構造体型 プロパティです。
Viewクラスは、Label や Button、StackLayout や Grid などのすべてのUI要素の基本クラスです。
これらのプロパティを指定することで、対象コントロール(View要素)のLayout上での配置(サイズやパディング)に影響を与えます。
LayoutOptions構造体
LayoutOptionsは構造体で、以下の2つのプロパティを持ちます。
public LayoutAlignment Alignment { get; set; }
配置方法についていかから選択します。
Center - 中央寄せ
Start - 開始点寄せ(横方向であれば Left、縦方向であれば Top)
End - 終了点寄せ(横方向であれば Right、縦方向であれば Bottom)
Fill - 領域全体を満たすpublic Boolean Expands { get; set; }
親の領域が余った場合、「領域を与えてもらうか?(サイズを拡張してもらうか?)」のフラグを指定します。
コードによる指定
動作については後で説明するとして、指定の仕方は C# コードからでは以下のようになります。
this.label1.VerticalOptions = new LayoutOptions(LayoutAlignment.Center, false);

this.button1.VerticalOptions = new LayoutOptions(LayoutAlignment.Fill, true);
XAMLによる指定
上記 cs と同様の設定をXAMLで行うと以下のようになります。
<Label Text="Label1" VerticalOptions="Center" />
<Button Text="ボタン" VerticalOptions="FillAndExpand" />
“Center"とか"FillAndExpand"とかは、「LayoutOptionsConverter型コンバータ」によって「LayoutOptions.Alignment / LayoutOptions.Expands」に変換設定されます。
・・・分かりにくいし想像つかないですね・・・
なので、以下のいくつかのパターンの例を・・例は話を単純にするために「StackLayoutを利用。OrientationはVertical。」とします。
サンプルで試す
ex1) シンプルに
StackLayoutにLabelを5つ配置します。
配置された領域を分かりやすくするために、各要素に BackgroundColor を設定しています。
また、VerticalOptionsプロパティに何も設定していません。この場合、デフォルトの「Fill」となります。
<?xml version="1.0" encoding="utf-8"?>
<ContentPage
  xmlns="http://xamarin.com/schemas/2014/forms"
  xmlns:x="http://schemas.microsoft.com/winfx/2009/xaml"
  xmlns:local="clr-namespace:LayoutExample1"
  x:Class="LayoutExample1.LayoutExample1Page">

  <StackLayout x:Name="stack1" Orientation="Vertical" BackgroundColor="Silver">
    <StackLayout.Margin>
      <!-- iOSはトップに 20 の余白が必要 -->
      <OnPlatform x:TypeArguments="Thickness"
        iOS="0, 20, 0, 0"
        Android="0, 0, 0, 0"
        WinPhone="0, 0, 0, 0" />
    </StackLayout.Margin>

    <Label Text="Label1" BackgroundColor="Green" />
    <Label Text="Label2" BackgroundColor="White" />
    <Label Text="Label3" BackgroundColor="Yellow" />
    <Label Text="Label4" BackgroundColor="Aqua" />
    <Label Text="Label5" BackgroundColor="Gray" />
  </StackLayout>
</ContentPage>
実行画面は以下の通りです。
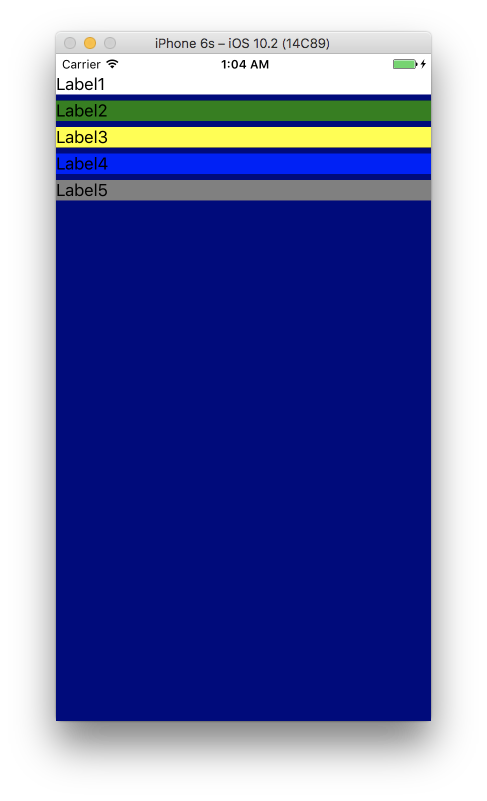
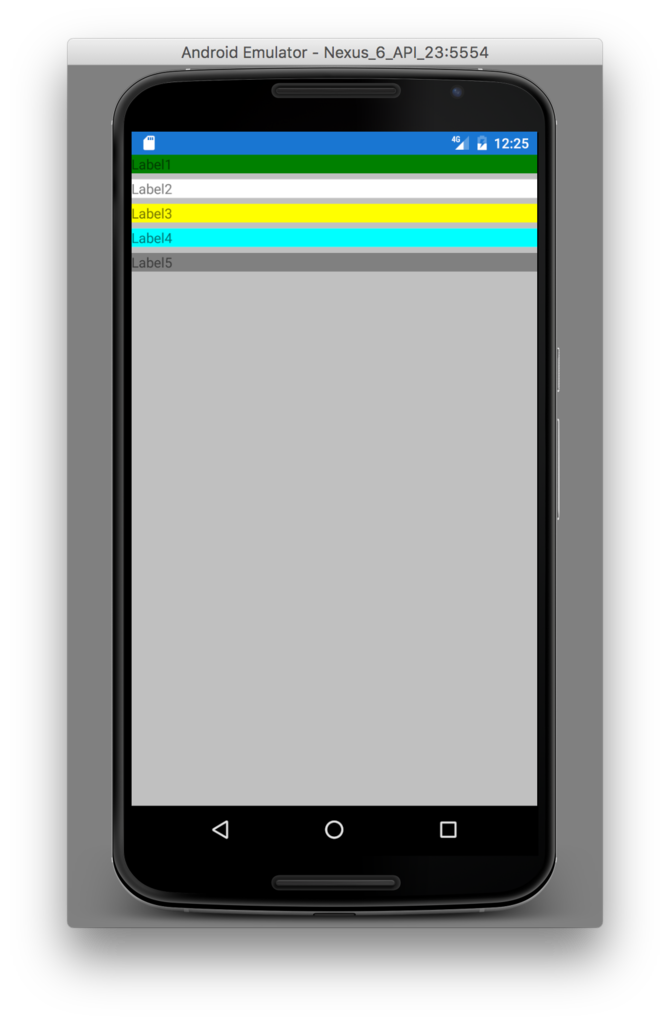
ex2) Label間のスペース
ex1)の例では、5つのLabelの間には「わずかなスペース」が存在します。
StackLayoutのBackgroundColorである Silver が Label間に見えています。
これは親ビュー側である「StackLayoutのSpacingプロパティ」で調整可能です。
StackLayoutのSpacingに 0 を設定します。
<?xml version="1.0" encoding="utf-8"?>
<ContentPage
  xmlns="http://xamarin.com/schemas/2014/forms"
  xmlns:x="http://schemas.microsoft.com/winfx/2009/xaml"
  xmlns:local="clr-namespace:LayoutExample1"
  x:Class="LayoutExample1.LayoutExample1Page">

  <StackLayout x:Name="stack1" Spacing="0" Orientation="Vertical" BackgroundColor="Silver">
    <StackLayout.Margin>
      <!-- iOSはトップに 20 の余白が必要 -->
      <OnPlatform x:TypeArguments="Thickness"
        iOS="0, 20, 0, 0"
        Android="0, 0, 0, 0"
        WinPhone="0, 0, 0, 0" />
    </StackLayout.Margin>

    <Label Text="Label1" BackgroundColor="Green" />
    <Label Text="Label2" BackgroundColor="White" />
    <Label Text="Label3" BackgroundColor="Yellow" />
    <Label Text="Label4" BackgroundColor="Aqua" />
    <Label Text="Label5" BackgroundColor="Gray" />
  </StackLayout>
</ContentPage>
実行画面は以下です。
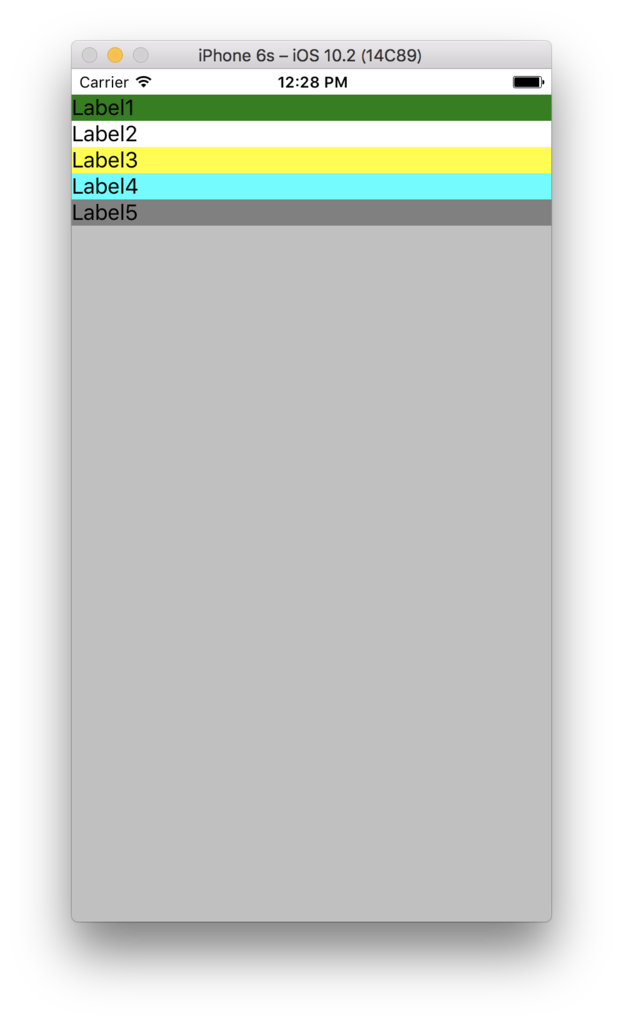
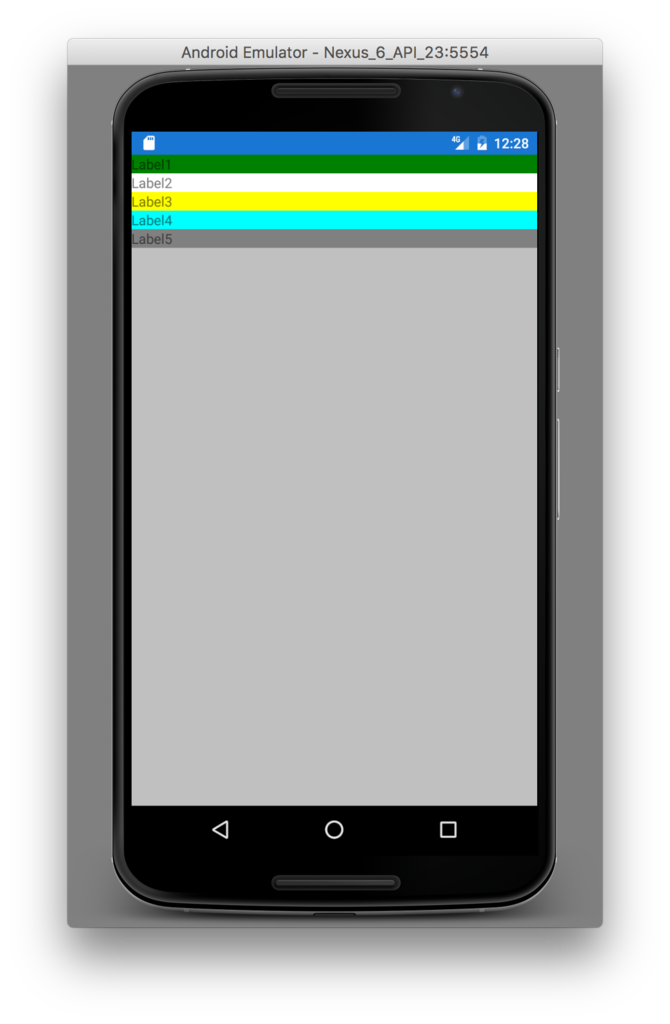
ex3) FillAndExpand を指定する
5つのLabelのVerticalOptionsに「FillAndExpand」を設定してみます。
<?xml version="1.0" encoding="utf-8"?>
<ContentPage
  xmlns="http://xamarin.com/schemas/2014/forms"
  xmlns:x="http://schemas.microsoft.com/winfx/2009/xaml"
  xmlns:local="clr-namespace:LayoutExample1"
  x:Class="LayoutExample1.LayoutExample1Page">

  <StackLayout x:Name="stack1" Spacing="0" Orientation="Vertical" BackgroundColor="Silver">
    <StackLayout.Margin>
      <!-- iOSはトップに 20 の余白が必要 -->
      <OnPlatform x:TypeArguments="Thickness"
        iOS="0, 20, 0, 0"
        Android="0, 0, 0, 0"
        WinPhone="0, 0, 0, 0" />
    </StackLayout.Margin>

    <Label Text="Label1" VerticalOptions="FillAndExpand" BackgroundColor="Green" />
    <Label Text="Label2" VerticalOptions="FillAndExpand" BackgroundColor="White" />
    <Label Text="Label3" VerticalOptions="FillAndExpand" BackgroundColor="Yellow" />
    <Label Text="Label4" VerticalOptions="FillAndExpand" BackgroundColor="Aqua" />
    <Label Text="Label5" VerticalOptions="FillAndExpand" BackgroundColor="Gray" />
  </StackLayout>
</ContentPage>
こうすると・・・以下の実行結果となります。
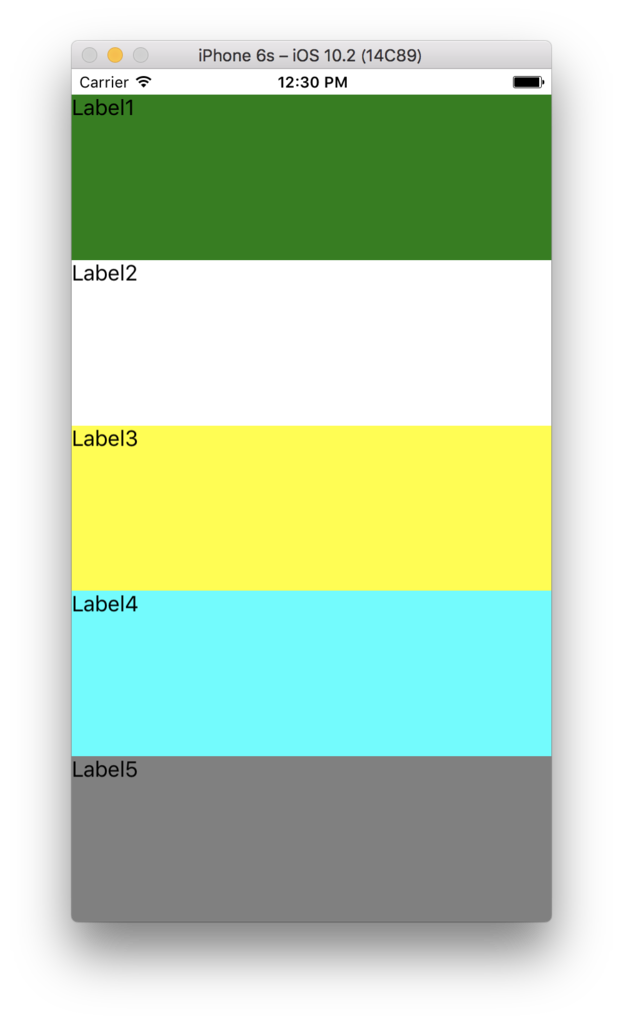
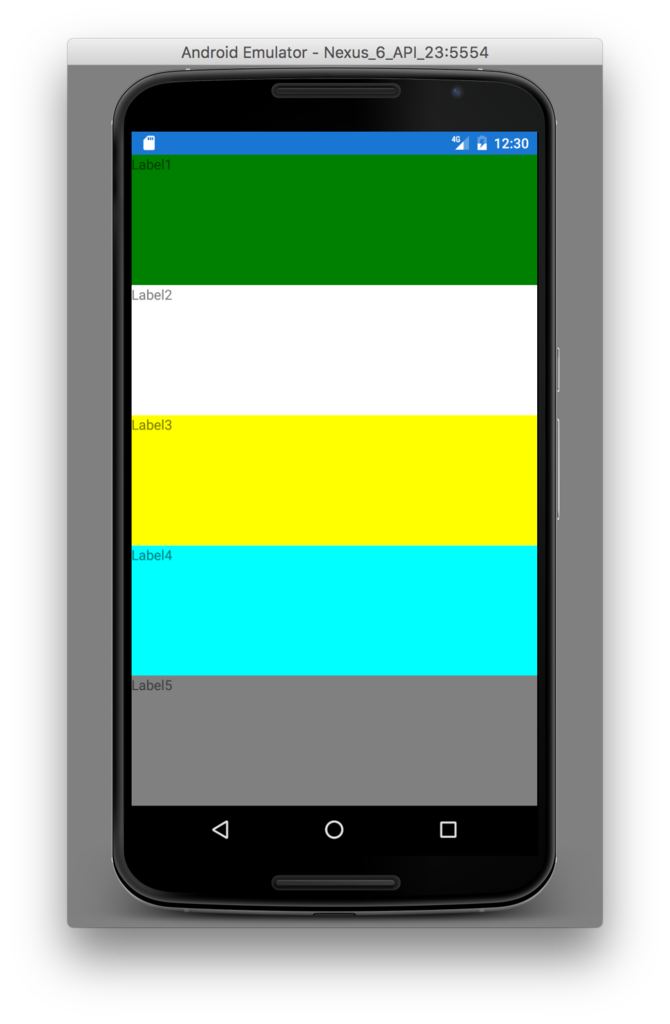
「おー!」なんか画面いっぱいに広がって「いい感じ(?)になりました!」。
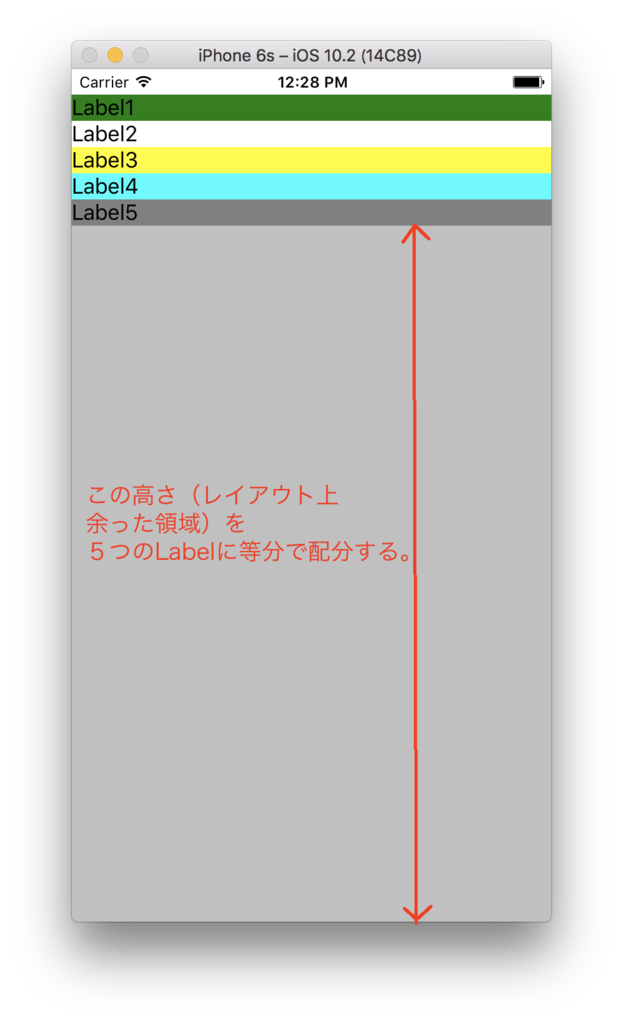
子要素に「Expand」が指定されている場合、
親は、各要素を配置し、余った領域について「等分に、(Expandsが指定された)各要素に配分」します。
ex4) 次にこんなXAML定義を
StackLayoutの子として2つのStackLayoutを配置します。
1つ目の子のStackLayoutには、5つのラベルを配置します。
2つ目の子のStackLayoutには、2つのラベルを配置します。
各VerticalOptionsには FillAndExpand を指定します。
<?xml version="1.0" encoding="utf-8"?>
<ContentPage
  xmlns="http://xamarin.com/schemas/2014/forms"
  xmlns:x="http://schemas.microsoft.com/winfx/2009/xaml"
  xmlns:local="clr-namespace:LayoutExample1"
  x:Class="LayoutExample1.LayoutExample1Page">

  <StackLayout Orientation="Vertical" Spacing="0" BackgroundColor="Red">
    <StackLayout.Margin>
      <!-- iOSはトップに 20 の余白が必要 -->
      <OnPlatform x:TypeArguments="Thickness"
        iOS="0, 20, 0, 0"
        Android="0, 0, 0, 0"
        WinPhone="0, 0, 0, 0" />
    </StackLayout.Margin>

    <StackLayout Orientation="Vertical" BackgroundColor="Navy" Spacing="0" VerticalOptions="FillAndExpand">
      <Label Text="Label1" BackgroundColor="White" VerticalOptions="FillAndExpand" />
      <Label Text="Label2" BackgroundColor="Green" VerticalOptions="FillAndExpand" />
      <Label Text="Label3" BackgroundColor="Yellow" VerticalOptions="FillAndExpand" />
      <Label Text="Label4" BackgroundColor="Blue" VerticalOptions="FillAndExpand" />
      <Label Text="Label5" BackgroundColor="Gray" VerticalOptions="FillAndExpand" />
    </StackLayout>

    <StackLayout Orientation="Vertical" BackgroundColor="Fuchsia" Spacing="0" VerticalOptions="FillAndExpand">
      <Label x:Name="labelA" Text="LabelA" BackgroundColor="White" VerticalOptions="FillAndExpand" />
      <Label x:Name="labelB" Text="LabelB" BackgroundColor="Green" VerticalOptions="FillAndExpand" />
    </StackLayout>
  </StackLayout>
</ContentPage>
以下が実行画面です。
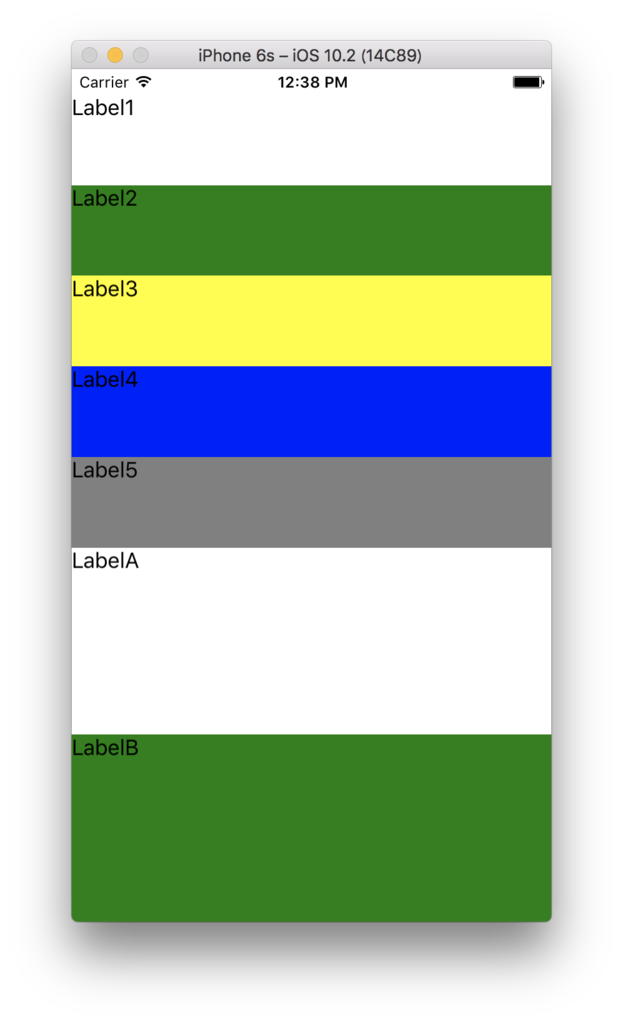
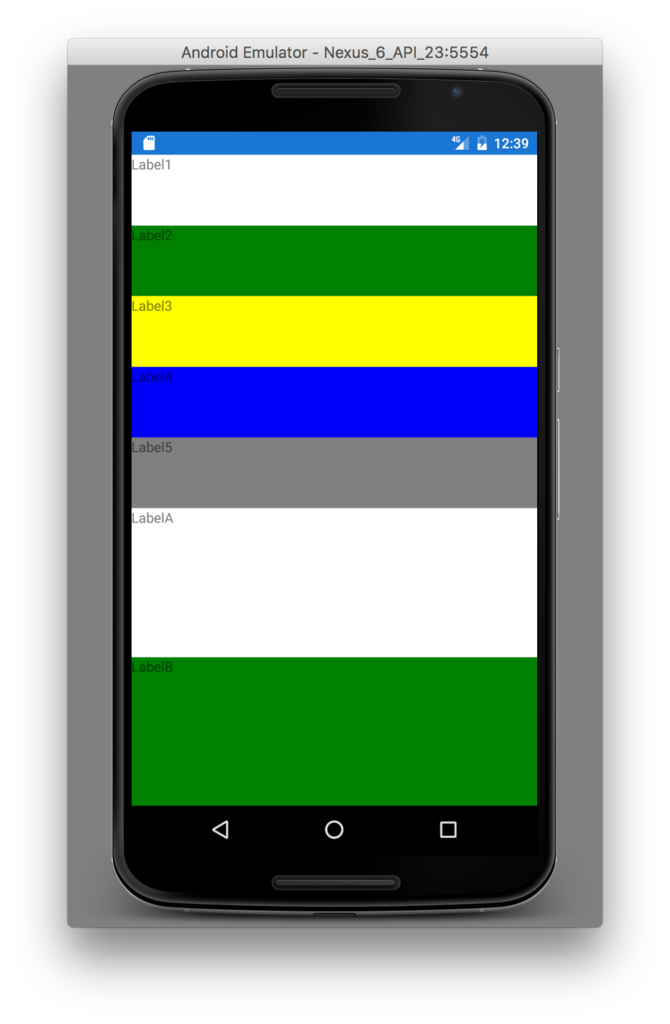
予想通りだったでしょうか?
ポイントは「1つ目の子StackLayout と 2つ目のStackLayout の高さは異なる」という点です。
以下のようなサイズ調整になります。
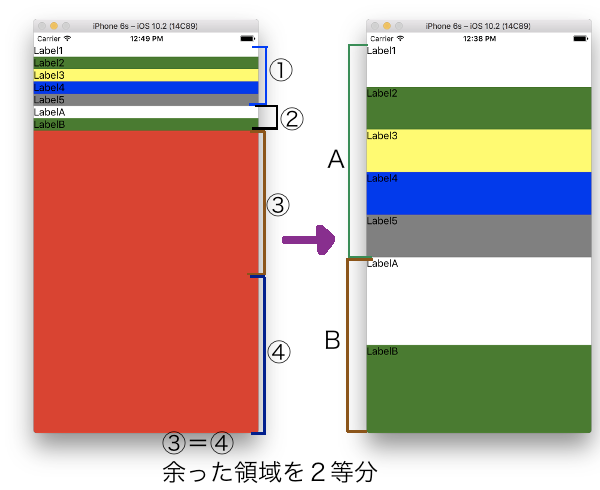 A = ①+③
B = ②+④
ex5) 上記に至るパターンの解析(1)
ex4) の結果が想像できた方は、VerticalOptionsの Extends の動作を理解されていることでしょう。
頭の中に「??」が浮かんだ方の為に、更に以下に幾つかのサンプルを紹介します。
ex4)のサンプルの FillAndExpand を Fill に変更します。
<?xml version="1.0" encoding="utf-8"?>
<ContentPage
  xmlns="http://xamarin.com/schemas/2014/forms"
  xmlns:x="http://schemas.microsoft.com/winfx/2009/xaml"
  xmlns:local="clr-namespace:LayoutExample1"
  x:Class="LayoutExample1.LayoutExample1Page">

  <StackLayout Orientation="Vertical" Spacing="0" BackgroundColor="Red">
    <StackLayout.Margin>
      <!-- iOSはトップに 20 の余白が必要 -->
      <OnPlatform x:TypeArguments="Thickness"
        iOS="0, 20, 0, 0"
        Android="0, 0, 0, 0"
        WinPhone="0, 0, 0, 0" />
    </StackLayout.Margin>

    <StackLayout Orientation="Vertical" BackgroundColor="Navy" Spacing="0" VerticalOptions="Fill">
      <Label Text="Label1" BackgroundColor="White" VerticalOptions="Fill" />
      <Label Text="Label2" BackgroundColor="Green" VerticalOptions="Fill" />
      <Label Text="Label3" BackgroundColor="Yellow" VerticalOptions="Fill" />
      <Label Text="Label4" BackgroundColor="Blue" VerticalOptions="Fill" />
      <Label Text="Label5" BackgroundColor="Gray" VerticalOptions="Fill" />
    </StackLayout>

    <StackLayout Orientation="Vertical" BackgroundColor="Fuchsia" Spacing="0" VerticalOptions="Fill">
      <Label Text="LabelA" BackgroundColor="White" VerticalOptions="Fill" />
      <Label Text="LabelB" BackgroundColor="Green" VerticalOptions="Fill" />
    </StackLayout>
  </StackLayout>
</ContentPage>
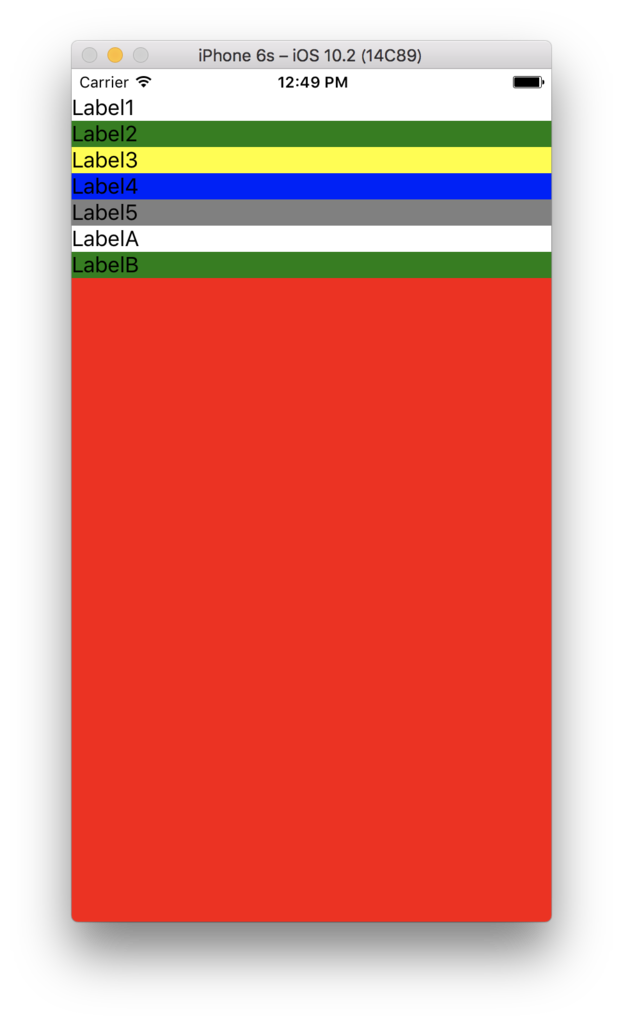
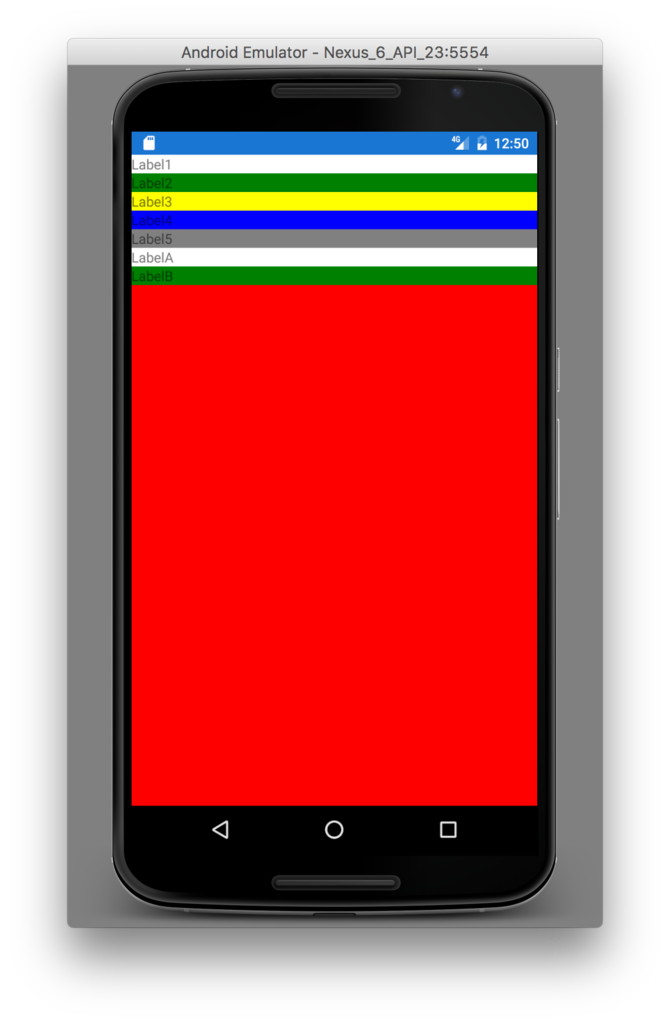
実行画面は以下です。各ラベルに必要な領域が取られ、下に領域が余ります。余った領域には親のStackLayoutのBackgroundColorが見えています。
ex6) 上記に至るパターンの解析(2)
ex5)に対して「1つ目の子StackLayoutのVerticalOptionsを Fill → FillAndExpand」に修正します。
<?xml version="1.0" encoding="utf-8"?>
<ContentPage
  xmlns="http://xamarin.com/schemas/2014/forms"
  xmlns:x="http://schemas.microsoft.com/winfx/2009/xaml"
  xmlns:local="clr-namespace:LayoutExample1"
  x:Class="LayoutExample1.LayoutExample1Page">

  <StackLayout Orientation="Vertical" Spacing="0" BackgroundColor="Red">
    <StackLayout.Margin>
      <!-- iOSはトップに 20 の余白が必要 -->
      <OnPlatform x:TypeArguments="Thickness"
        iOS="0, 20, 0, 0"
        Android="0, 0, 0, 0"
        WinPhone="0, 0, 0, 0" />
    </StackLayout.Margin>

    <StackLayout Orientation="Vertical" BackgroundColor="Navy" Spacing="0" VerticalOptions="FillAndExpand">
      <Label Text="Label1" BackgroundColor="White" VerticalOptions="Fill" />
      <Label Text="Label2" BackgroundColor="Green" VerticalOptions="Fill" />
      <Label Text="Label3" BackgroundColor="Yellow" VerticalOptions="Fill" />
      <Label Text="Label4" BackgroundColor="Blue" VerticalOptions="Fill" />
      <Label Text="Label5" BackgroundColor="Gray" VerticalOptions="Fill" />
    </StackLayout>

    <StackLayout Orientation="Vertical" BackgroundColor="Fuchsia" Spacing="0" VerticalOptions="Fill">
      <Label Text="LabelA" BackgroundColor="White" VerticalOptions="Fill" />
      <Label Text="LabelB" BackgroundColor="Green" VerticalOptions="Fill" />
    </StackLayout>
  </StackLayout>
</ContentPage>
実行画面は以下です。
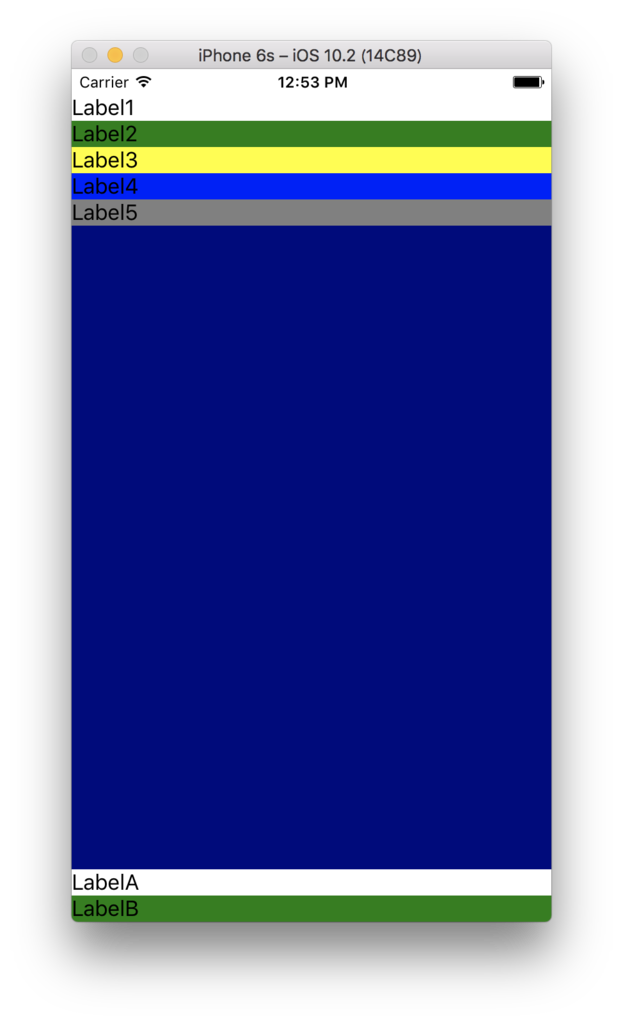
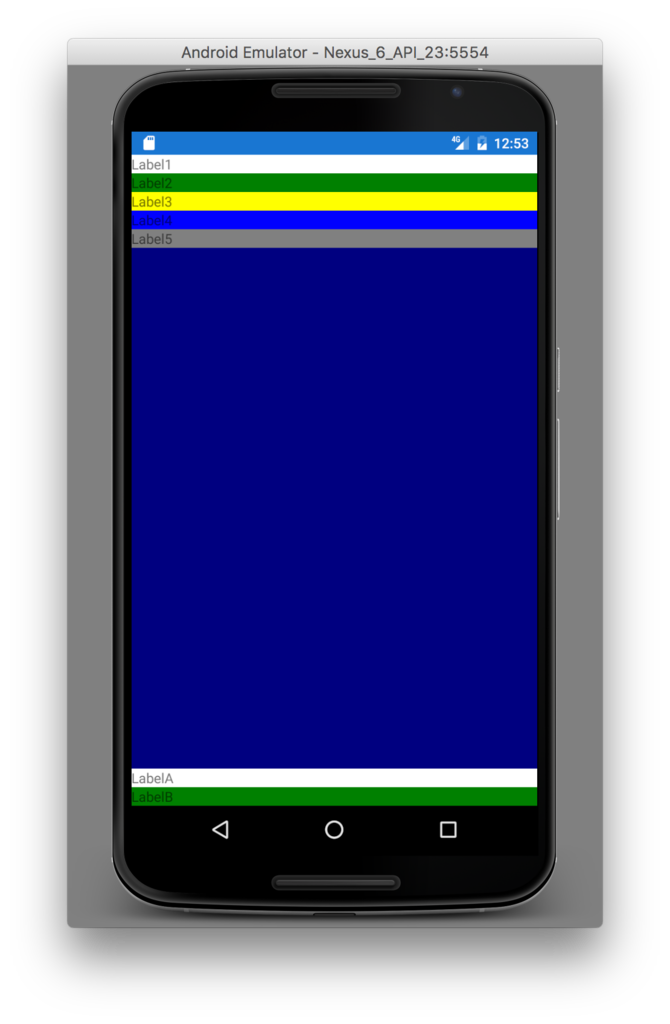
ex5)では「5つのLabelを含むStackLayout と 2つのLabelを含むStackLayout」を配置した後の余った領域は、そのままにされていました(親StackLayoutのBackgroundColorが前面に見えている状態になる)。
ex6)では1つ目のStackLayoutが Expands 指定されています。レイアウトの仕組みとして「余った領域は、Expands指定された子要素に等分に分配される」ので、ここではExpand指定された唯一のStackLayoutに領域配分されます(BackgroundColor=Navyで領域を確認することができます)。
ex7) 上記に至るパターンの解析(3)
次に ex6) に以下の修正を加えます。
「1つ目のStackLayoutの子Labelの VerticalOptions を FillAndExpand に修正」
<?xml version="1.0" encoding="utf-8"?>
<ContentPage
  xmlns="http://xamarin.com/schemas/2014/forms"
  xmlns:x="http://schemas.microsoft.com/winfx/2009/xaml"
  xmlns:local="clr-namespace:LayoutExample1"
  x:Class="LayoutExample1.LayoutExample1Page">

  <StackLayout Orientation="Vertical" Spacing="0" BackgroundColor="Red">
    <StackLayout.Margin>
      <!-- iOSはトップに 20 の余白が必要 -->
      <OnPlatform x:TypeArguments="Thickness"
        iOS="0, 20, 0, 0"
        Android="0, 0, 0, 0"
        WinPhone="0, 0, 0, 0" />
    </StackLayout.Margin>

    <StackLayout Orientation="Vertical" BackgroundColor="Navy" Spacing="0" VerticalOptions="FillAndExpand">
      <Label Text="Label1" BackgroundColor="White" VerticalOptions="FillAndExpand" />
      <Label Text="Label2" BackgroundColor="Green" VerticalOptions="FillAndExpand" />
      <Label Text="Label3" BackgroundColor="Yellow" VerticalOptions="FillAndExpand" />
      <Label Text="Label4" BackgroundColor="Blue" VerticalOptions="FillAndExpand" />
      <Label Text="Label5" BackgroundColor="Gray" VerticalOptions="FillAndExpand" />
    </StackLayout>

    <StackLayout Orientation="Vertical" BackgroundColor="Fuchsia" Spacing="0" VerticalOptions="Fill">
      <Label Text="LabelA" BackgroundColor="White" VerticalOptions="Fill" />
      <Label Text="LabelB" BackgroundColor="Green" VerticalOptions="Fill" />
    </StackLayout>
  </StackLayout>
</ContentPage>
実行画面は以下です。
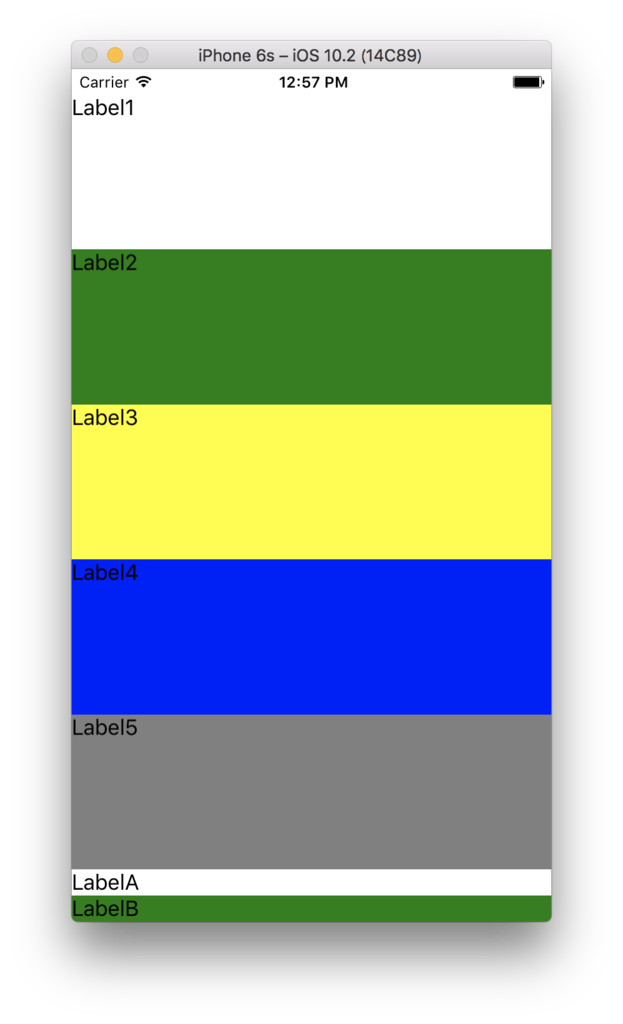
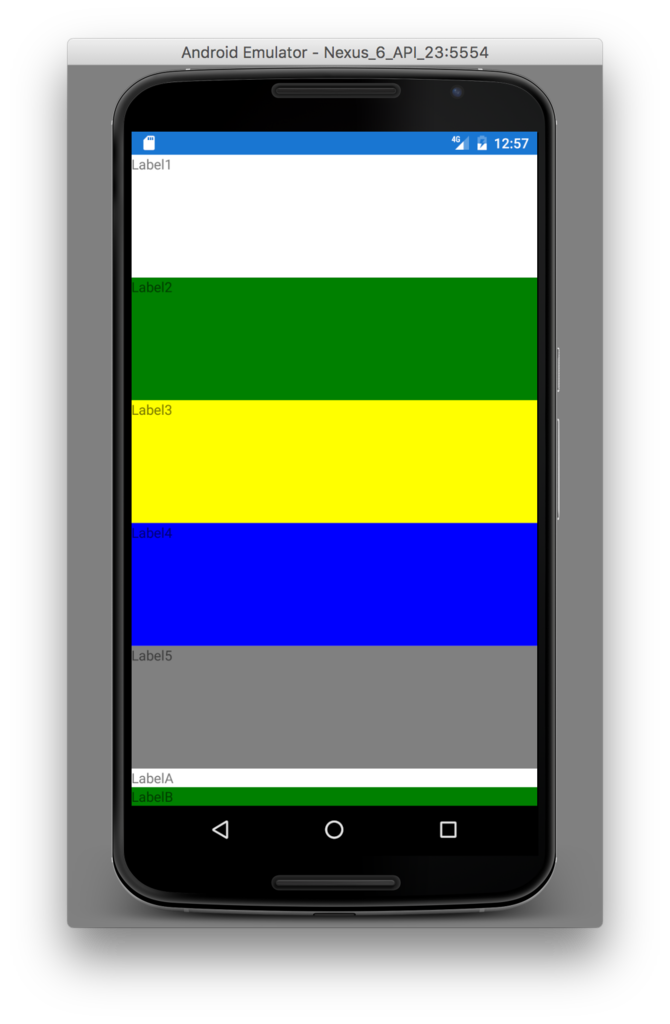
ex6)では1つ目のStackLayoutに割り当てられた領域がそのまま余っていましたが、このex7)では、そのStackLayoutの5つの子LabelのVerticalOptionsがFillAndExpandになった為、余った領域を等分した高さが、5つのLabelに配分されています。
ex8)上記に至るパターンの解析(4)
もういい加減しつこいですが・・・
ex7)に対して以下の修正を加えます。
2つ目のStackLayoutのVerticalOptionsをFillAndExpandに修正。
<?xml version="1.0" encoding="utf-8"?>
<ContentPage
  xmlns="http://xamarin.com/schemas/2014/forms"
  xmlns:x="http://schemas.microsoft.com/winfx/2009/xaml"
  xmlns:local="clr-namespace:LayoutExample1"
  x:Class="LayoutExample1.LayoutExample1Page">

  <StackLayout Orientation="Vertical" Spacing="0" BackgroundColor="Red">
    <StackLayout.Margin>
      <!-- iOSはトップに 20 の余白が必要 -->
      <OnPlatform x:TypeArguments="Thickness"
        iOS="0, 20, 0, 0"
        Android="0, 0, 0, 0"
        WinPhone="0, 0, 0, 0" />
    </StackLayout.Margin>

    <StackLayout Orientation="Vertical" BackgroundColor="Navy" Spacing="0" VerticalOptions="FillAndExpand">
      <Label Text="Label1" BackgroundColor="White" VerticalOptions="FillAndExpand" />
      <Label Text="Label2" BackgroundColor="Green" VerticalOptions="FillAndExpand" />
      <Label Text="Label3" BackgroundColor="Yellow" VerticalOptions="FillAndExpand" />
      <Label Text="Label4" BackgroundColor="Blue" VerticalOptions="FillAndExpand" />
      <Label Text="Label5" BackgroundColor="Gray" VerticalOptions="FillAndExpand" />
    </StackLayout>

    <StackLayout Orientation="Vertical" BackgroundColor="Fuchsia" Spacing="0" VerticalOptions="FillAndExpand">
      <Label Text="LabelA" BackgroundColor="White" VerticalOptions="Fill" />
      <Label Text="LabelB" BackgroundColor="Green" VerticalOptions="Fill" />
    </StackLayout>
  </StackLayout>
</ContentPage>
実行画面は以下です。
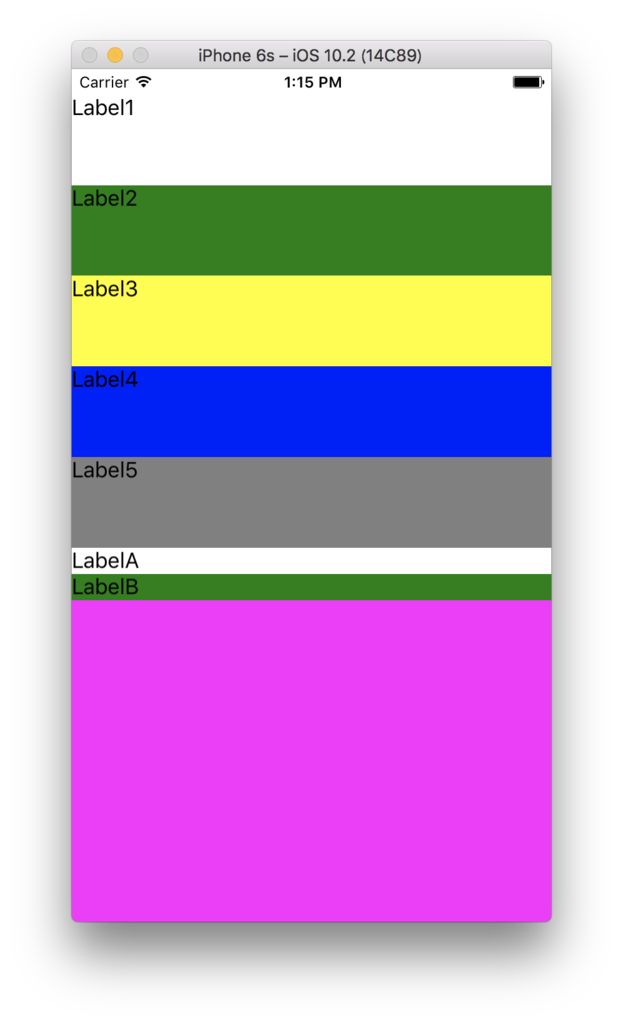
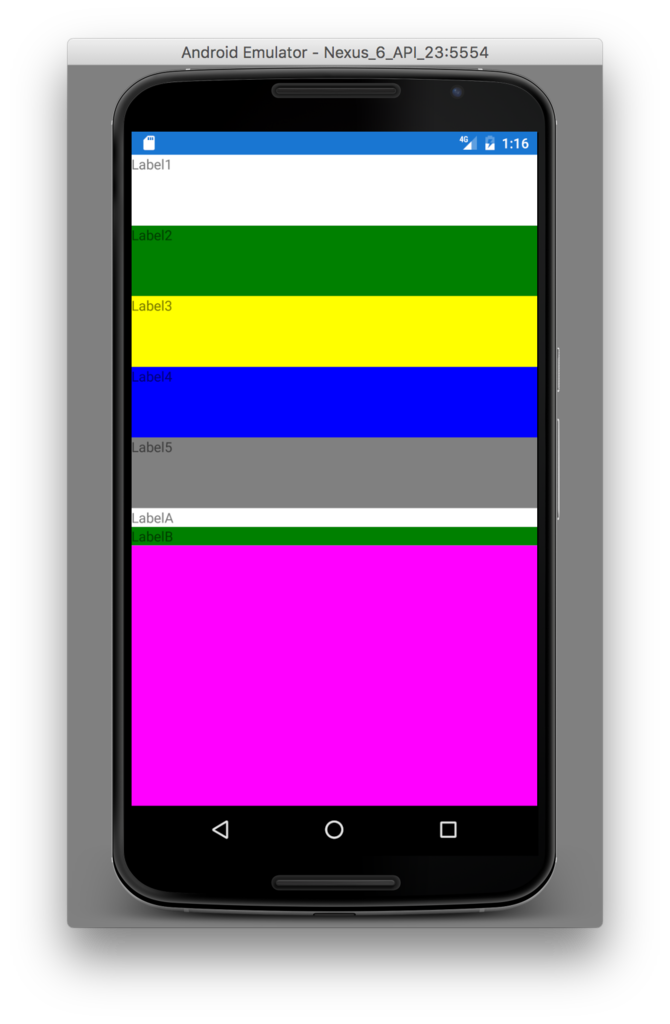
余った領域を 1つ目のStackLayout と 2つ目のStackLayout で等分に分け合いました。
これで ex4) の動作の振る舞いにつながったはずです!
コントロール(ビュー要素)が必要とするサイズとは?
上記で使用した StackLayout や Label は「必要な領域を計算し、Expands指定がある場合には余った領域を分配する」という動きをしました。
では、「必要な領域」とは何か?
それは「Xamarin.Forms.VisualElement.OnMeasure()」メソッドで行われています。
LabelやButtonやその他の各UI要素自身が、自らを表示するのに必要な領域(サイズ)をこのメソッドで返却します。
つまりStackLayoutなどの子要素を持つUI要素は、子に必要サイズを聞いて回り、結果として子を含む自らの必要サイズを呼び出し元に返却します。
OnMeasure()を使ったサンプル
ではLabelを継承した MyLabel を以下のように実装してみます。
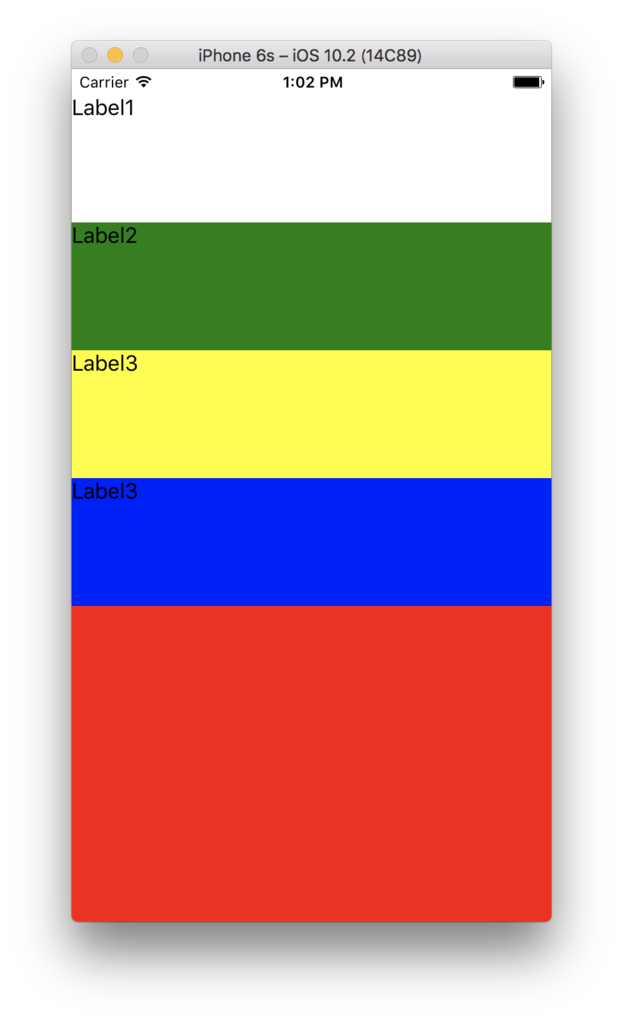
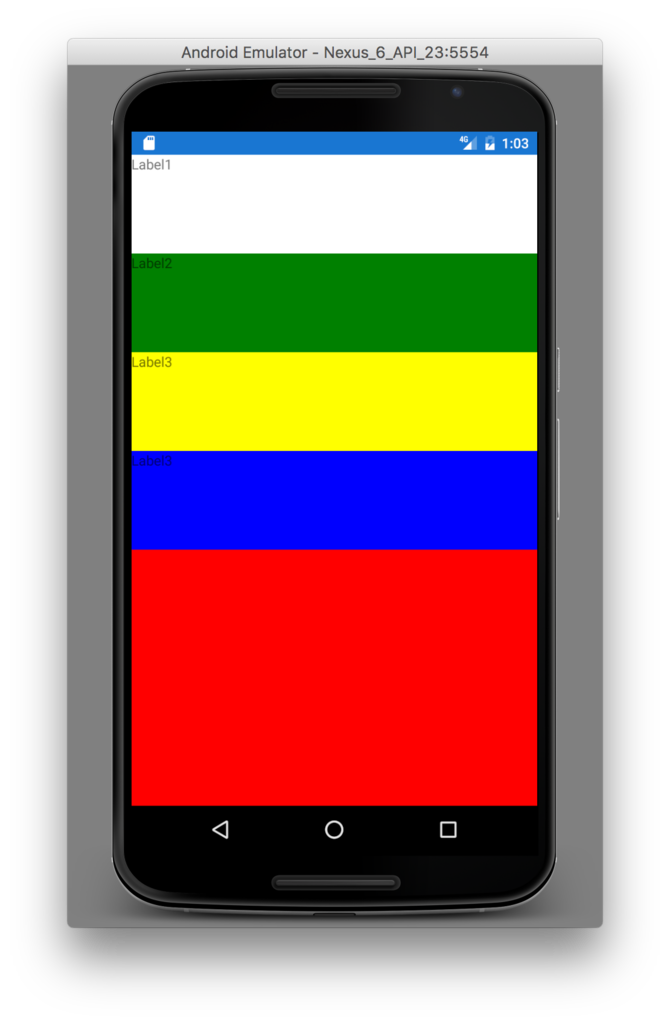
OnMeasure()メソッドをオーバーライドし、強制的に必要サイズを Width=200 / Height=100 とします。
using System;
namespace LayoutExample1
{
  public class MyLabel : Xamarin.Forms.Label
  {
    public MyLabel()  : base()
    {
    }

    protected override Xamarin.Forms.SizeRequest OnMeasure(double widthConstraint, double heightConstraint)
    {
      return new Xamarin.Forms.SizeRequest(
        new Xamarin.Forms.Size(200, 100),
        new Xamarin.Forms.Size(200, 100));
    }
  }
}
MyLabelを使用した画面XAMLの定義は以下です。
<?xml version="1.0" encoding="utf-8"?>
<ContentPage
  xmlns="http://xamarin.com/schemas/2014/forms"
  xmlns:x="http://schemas.microsoft.com/winfx/2009/xaml"
  xmlns:local="clr-namespace:LayoutExample1"
  x:Class="LayoutExample1.LayoutExample1Page">

  <StackLayout x:Name="parentStack" Orientation="Vertical" Spacing="0" BackgroundColor="Red" VerticalOptions="Fill">
    <StackLayout.Margin>
      <!-- iOSはトップに 20 の余白が必要 -->
      <OnPlatform x:TypeArguments="Thickness"
        iOS="0, 20, 0, 0"
        Android="0, 0, 0, 0"
        WinPhone="0, 0, 0, 0" />
    </StackLayout.Margin>

      <local:MyLabel Text="Label1" BackgroundColor="White" VerticalOptions="Fill" />
      <local:MyLabel Text="Label2" BackgroundColor="Green" VerticalOptions="Fill" />
      <local:MyLabel Text="Label3" BackgroundColor="Yellow" VerticalOptions="Fill" />
      <local:MyLabel Text="Label3" BackgroundColor="Blue" VerticalOptions="Fill" />
  </StackLayout>
</ContentPage>
実行すると以下のように Label が Height 100で表示されていることを確認することができます。
(おまけ)画面から溢れるほどUIが配置されている場合
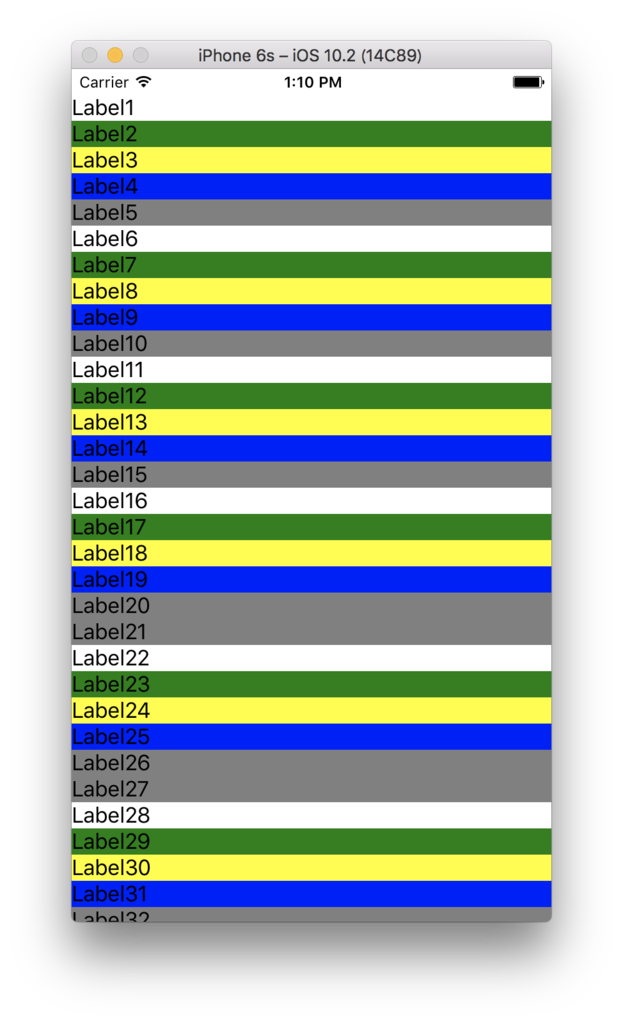
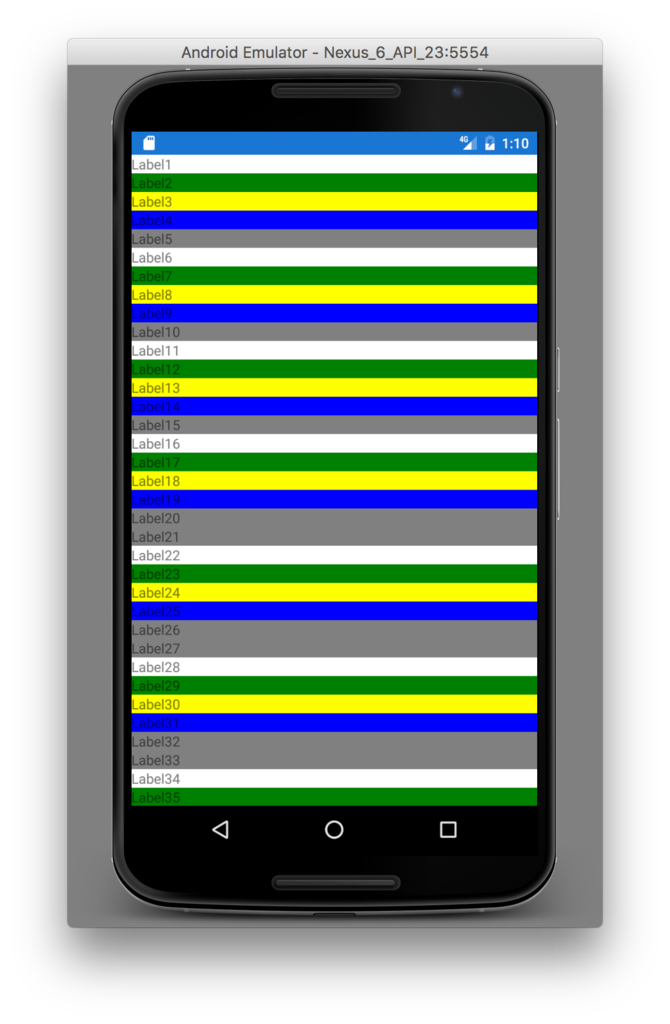
画面に収まりきらないほどUIが配置されていた場合、そのまま画面から溢れ、表示・操作できない状態になります。
<?xml version="1.0" encoding="utf-8"?>
<ContentPage
  xmlns="http://xamarin.com/schemas/2014/forms"
  xmlns:x="http://schemas.microsoft.com/winfx/2009/xaml"
  xmlns:local="clr-namespace:LayoutExample1"
  x:Class="LayoutExample1.LayoutExample1Page">

  <StackLayout Orientation="Vertical" Spacing="0" BackgroundColor="Red">
    <StackLayout.Margin>
      <!-- iOSはトップに 20 の余白が必要 -->
      <OnPlatform x:TypeArguments="Thickness"
        iOS="0, 20, 0, 0"
        Android="0, 0, 0, 0"
        WinPhone="0, 0, 0, 0" />
    </StackLayout.Margin>

    <Label Text="Label1" BackgroundColor="White" VerticalOptions="FillAndExpand" />
    <Label Text="Label2" BackgroundColor="Green" VerticalOptions="FillAndExpand" />
    <Label Text="Label3" BackgroundColor="Yellow" VerticalOptions="FillAndExpand" />
    <Label Text="Label4" BackgroundColor="Blue" VerticalOptions="FillAndExpand" />
    <Label Text="Label5" BackgroundColor="Gray" VerticalOptions="FillAndExpand" />
    <Label Text="Label6" BackgroundColor="White" VerticalOptions="FillAndExpand" />
    <Label Text="Label7" BackgroundColor="Green" VerticalOptions="FillAndExpand" />
    <Label Text="Label8" BackgroundColor="Yellow" VerticalOptions="FillAndExpand" />
    <Label Text="Label9" BackgroundColor="Blue" VerticalOptions="FillAndExpand" />
    <Label Text="Label10" BackgroundColor="Gray" VerticalOptions="FillAndExpand" />
    <Label Text="Label11" BackgroundColor="White" VerticalOptions="FillAndExpand" />
    <Label Text="Label12" BackgroundColor="Green" VerticalOptions="FillAndExpand" />
    <Label Text="Label13" BackgroundColor="Yellow" VerticalOptions="FillAndExpand" />
    <Label Text="Label14" BackgroundColor="Blue" VerticalOptions="FillAndExpand" />
    <Label Text="Label15" BackgroundColor="Gray" VerticalOptions="FillAndExpand" />
    <Label Text="Label16" BackgroundColor="White" VerticalOptions="FillAndExpand" />
    <Label Text="Label17" BackgroundColor="Green" VerticalOptions="FillAndExpand" />
    <Label Text="Label18" BackgroundColor="Yellow" VerticalOptions="FillAndExpand" />
    <Label Text="Label19" BackgroundColor="Blue" VerticalOptions="FillAndExpand" />
    <Label Text="Label20" BackgroundColor="Gray" VerticalOptions="FillAndExpand" />
    <Label Text="Label21" BackgroundColor="Gray" VerticalOptions="FillAndExpand" />
    <Label Text="Label22" BackgroundColor="White" VerticalOptions="FillAndExpand" />
    <Label Text="Label23" BackgroundColor="Green" VerticalOptions="FillAndExpand" />
    <Label Text="Label24" BackgroundColor="Yellow" VerticalOptions="FillAndExpand" />
    <Label Text="Label25" BackgroundColor="Blue" VerticalOptions="FillAndExpand" />
    <Label Text="Label26" BackgroundColor="Gray" VerticalOptions="FillAndExpand" />
    <Label Text="Label27" BackgroundColor="Gray" VerticalOptions="FillAndExpand" />
    <Label Text="Label28" BackgroundColor="White" VerticalOptions="FillAndExpand" />
    <Label Text="Label29" BackgroundColor="Green" VerticalOptions="FillAndExpand" />
    <Label Text="Label30" BackgroundColor="Yellow" VerticalOptions="FillAndExpand" />
    <Label Text="Label31" BackgroundColor="Blue" VerticalOptions="FillAndExpand" />
    <Label Text="Label32" BackgroundColor="Gray" VerticalOptions="FillAndExpand" />
    <Label Text="Label33" BackgroundColor="Gray" VerticalOptions="FillAndExpand" />
    <Label Text="Label34" BackgroundColor="White" VerticalOptions="FillAndExpand" />
    <Label Text="Label35" BackgroundColor="Green" VerticalOptions="FillAndExpand" />
    <Label Text="Label36" BackgroundColor="Yellow" VerticalOptions="FillAndExpand" />
    <Label Text="Label37" BackgroundColor="Blue" VerticalOptions="FillAndExpand" />
    <Label Text="Label38" BackgroundColor="Gray" VerticalOptions="FillAndExpand" />
    <Label Text="Label39" BackgroundColor="Gray" VerticalOptions="FillAndExpand" />
    <Label Text="Label40" BackgroundColor="White" VerticalOptions="FillAndExpand" />
    <Label Text="Label41" BackgroundColor="Green" VerticalOptions="FillAndExpand" />
    <Label Text="Label42" BackgroundColor="Yellow" VerticalOptions="FillAndExpand" />
    <Label Text="Label43" BackgroundColor="Blue" VerticalOptions="FillAndExpand" />
    <Label Text="Label44" BackgroundColor="Gray" VerticalOptions="FillAndExpand" />
  </StackLayout>
</ContentPage>
実行画面は以下です。
まとめ
余った領域は、Expands指定されたUI要素の数で等分され、各UI要素(Expands)に配分される。
「JXUGC #22 最新事例&お前のアプリを説明してもらおうの会」に参加した話
今まで、ユーザーグループやコミュニティのイベントには消極的だったのですが、2017年から色々なところに参加させていただこうかと思い、本日(1/28)の「JXUGC #22 最新事例&お前のアプリを説明してもらおうの会」にも参加させていただきました。
このイベントは比較的大きく、参加者は60人位いたでしょうか。
で、その感想を、長々と・・・会社で長々すると「面倒臭がられるけど」ここは「俺の自由の場だ!」ということで自由に長々します!(笑)。
では各セッション毎の感想を!
「がんばれガンプ ソルバルウを倒せ について」
@hiro128_777 さんのセッションでした。
ゼビウスの派生ゲームで、ソルバルウを倒す側のゲームを現在開発中ということで、それについてのお話でした(公式ゲーで無料公開されるそうです)。
技術的には、「Xamarin Forms」「Cocos Sharp」なんかを使っているとのこと。
Cocos Sharpは、2D / 3Dのゲーム開発のライブラリで、でもFormsの「UI要素(Label等)」と同様に2Dアニメーション要素(例えばソルバルウのキャラ画像)を扱えるとの事。
そして、その仕組みが故、FormsのPCLに実装を持ってくることができ、普通に作ってもコードの90%を(iOS / androidの)共有コードに持ってくることができるそうです。
私は、ゲームの世界は全く概念の異なる異世界のように考えてしまっていたのですが、なんだか身近に感じることができました。
そして、セッション中にもおっしゃられていましたが、ゲーム以外のアプリにもよりリッチなアニメーション効果を追加したい場合には、Cocos Sharpが使えるんじゃないか、と。
そうそう、うちの会社はエンタープライズな自社サービスを作ってるけど、ちょっとリッチな視覚効果とか好きだから使えるかも!?なのではないだろうか、と思いました。
「ゆるふわ Xamarin Tips」
@Santea3173 さんのセッションでした。
[2017/1/29 リンク追記]
サンテアさんは初めて見たのですが、院生だったんですね。あとtwitterのアイコンからもっとチャラいイメージを持っていましたが、全くもって「賢い紳士な大学院生」でした(笑)。
twitterをデータソースとして、SQLを使って検索一覧表示を行うというアプリの紹介でした。
また、そのアプリで使っているライブラリの紹介などもしていただきました。Syncfusionの「Essential Studio For Xamarin」のDataGridやPDFViewerに興味を持ったので、今度自分でも使って見たいと思いました。
また「Xamarin Formsを使うべきアプリ」「Xamarin Traditionalを使うべきアプリ」の指針も非常にまとまっていて、会社での技術選定にも役立てることができる内容だったと思います。
Xamarin Component / Nuget / Xamarin Forms Labs の説明も非常に整理されていて良かった印象です。
Xamarin Forms Labsが
This project is no longer maintained. It may not work with newer versions of Xamarin.Forms.
なのは残念に思っているのですが、別のものに置き換わるのでしょうか?
「Reactive ProperrtyでXamarinアプリの作り方が変わった」
@iseebi さんのセッションでした。
実際の開発において既存ネイティブアプリをXamarinで書き換えた経緯や技術の紹介をしていただきました。
最近私は MVVM フレームワークとしては Prism ばかり見ていたので、MVVM Light を使われたお話が逆に新鮮でした。
実は昔、私は Silverlight 開発を行っていたことがあり、その時はMVVM Lightを使っていたのです。
そして Reactive Property は素晴らしいので、もはや今からでは「最新技術を紹介するぞ!」な内容ではありませんが、自分なりの整理をこのブログでも記したいと思っています。
えーと、たしか、いせさんは「フェンリルさんの方でしたよね・・・で、採用の宣伝もしていた・・・」。
フェンリルさんは自社ソフトウェア・自社サービスの開発も行っているようで、私が所属している会社も同じく自社サービス開発企業なので、最近失われていた「こんな面白いアーキテクチャ、こんな面白い技術」を自分の会社にも広めたいな心が、少し発生しました(笑)。
「証券取引アプリ について」
@omanuke さんのセッションでした。
何と言っても 「F#」 っていうのが印象的でした。
証券取引アプリ や Xamarin というよりも、とにかく 「F#愛!F#推し!」 を強調されていましたね。
うん、確かにデモで見せていただいたコードは「F#すげー!C#どんくさいー!」な内容でした。
そう、C#で長々となるロジックがF#だと超簡潔に書けてしまうのです。
これは「型推論の言語仕様の違い」「優秀なパターンマッチング」から来るそうです。
デモの中でも、仕様変更に対して、C#ではコードの全体の各所の修正が必要になるケースでも、F#ではごくわずかな修正で対応できる例を紹介されていました。
でも、すみません!、私はC#を使い続けるでしょう(笑)。真面目な話、F#使ったら、みんな理解できないと思うのです・・・もし使って自社のソフトを開発したら・・・「あれはF#使ってるから分かんねーよ」と、虐げられるソフトウェアになってしまうと思うのです;;
真面目に技術者として気になったのは
「あのF#コードは、コンパイル後にはどのようなILになるのだろう?」
でした。おそらく、普通のIF分岐等に解釈されるものと想像していますが、C#的概念からは不思議を感じそうです。今度確認します!
あとomanukeさんのキャラが可愛かったです^^結構好きです^^
「AzureVM Power Switch について」
@yamamo さんのセッションでした。
Azureの仮想マシンをXamarin Formsアプリから「状態確認・開始・終了」するというアプリの紹介でした。
技術的には、「Active Directory Authentication Library」はXamarinにも対応してたんだあ!と思いました。ADALは以前、仕事で自社サービスをAzureAD認証するのに使ったことがあったので(Webアプリ)。
このアプリは、私の属する会社でも「使えるアプリ」になりそうな気がしました。AzureのREST APIは機能的に豊富なので、超実用的なアプリにブラッシュアップすることが可能な気がしてしまいました(紹介された以外の機能も既にある?かは不明なのですが)。
「XAML について」
@okazuki さんのセッションでした。
[2017/1/29 リンク追記] blog.okazuki.jp
この手の話、私は結構好きです。(元MSの萩原さん的な)
実は数年前に私が執筆した本の中でWPFについて書いたとき、本日、かずきさんが語ってくれたことを散々苦労しながら調べたのです(文書にする場合、「使える」以上の明確な理解と整理が必要なので^^;)。
以下のような技術要素になります。
- XAML名前空間(xmlns)とC#名前空間
- 要素とクラス
- 属性とプロパティ
- 添付プロパティ
- コンテンツプロパティ
- ディペンデンシープロパティ(今日のセッションでは出なかったけどXamarinだとバインダブルプロパティ)
多分、これらに関する知識が曖昧でもJXUGの場でこんなの作ったよー、って紹介できるし、十分開発できると思います。
でも、何かあった時、これらの基礎技術知識があるとないとでは、問題解決能力の差が出て来ると思うのです。
知っていれば10分で解決、知らないと延々分からない、的な。
「LT枠の皆様」
基本的に皆さん「制限時間内に伝えるべきことを楽しく明確に伝えることができていて」素晴らしい!って感想を持ちました!
年齢層は様々だったと思いますが、若い方、学生の方なんかが、ガンガンXamarinに取り組んでいて、さらに形ある成果物をあげているのが素晴らしいと思いました。
ここに出て来るような人達が、うちの会社にも毎年入社してくれればいいのに!って感じです(笑)
まとめ
今回、懇親会に参加予定だったのですが、所用で参加できずでした。ちょっと、話をしてみたい方も何人かおられたのですが、またの機会にお願いしたいです。
また、JXUGのイベントには大規模なものも小規模なものも参加させていただきたいと思います。
そして、自分自身に思った事は
「もっと手を動かそう!作っちゃおう!」
でした。
私は結構、「学術的に」というか論理的に物事を明確にしたがるので、実用的なものを作るより、「調査」をしてしまっているように思うので、もっと「考える前に作っちゃおう!」と思いました。
あっ、あと「全行ブレークポイントにはふいた!(笑)」
Xamarin Studio(Xamarin Forms)でxUnitする
Xamarin StudioでxUnitを利用する方法についてメモしておきます。
ユニットテストツール xUnit を Xamarin Studioで使用する方法になります。
誰でも出来るように丁寧に画面キャプチャして説明したいと思います。
アドインを追加する
テストランナーを Xamarin Studio IDE に統合する為にアドインを追加します。
Xamarin Studioを起動し「Xamarin Studio→アドイン...」メニューを選択します。
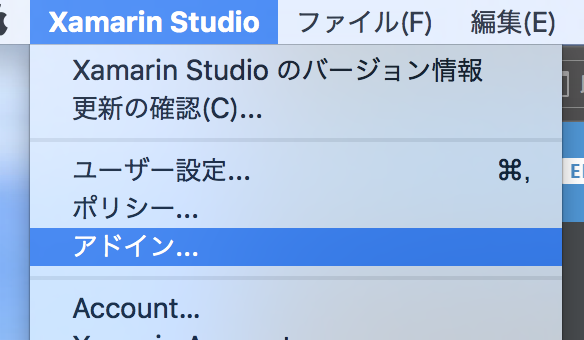
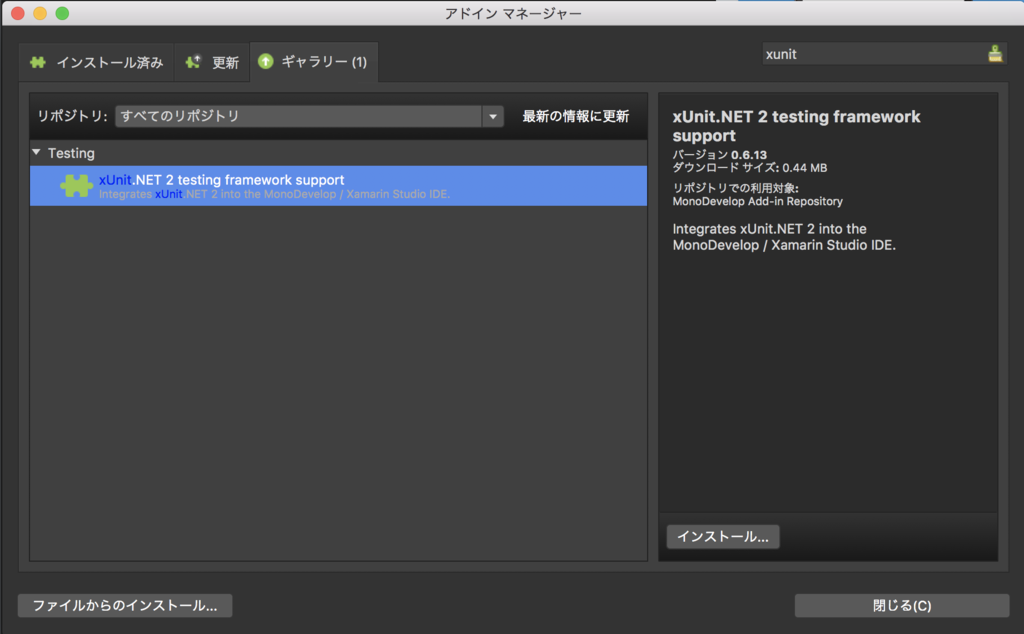
「アドイン マネージャー」が表示されます。
「ギャラリー」タブを選択し、右上の検索テキストボックスに「xunit」と入力します。
リストから「xUnit.NET 2 testing framework support」を選択し、「インストール...」ボタンをクリックします。
テスト対象のソリューションを作成
「ファイル→新しいソリューション」メニューを選択し、XFormApp1という Xamarin Forms ソリューションを作成します。

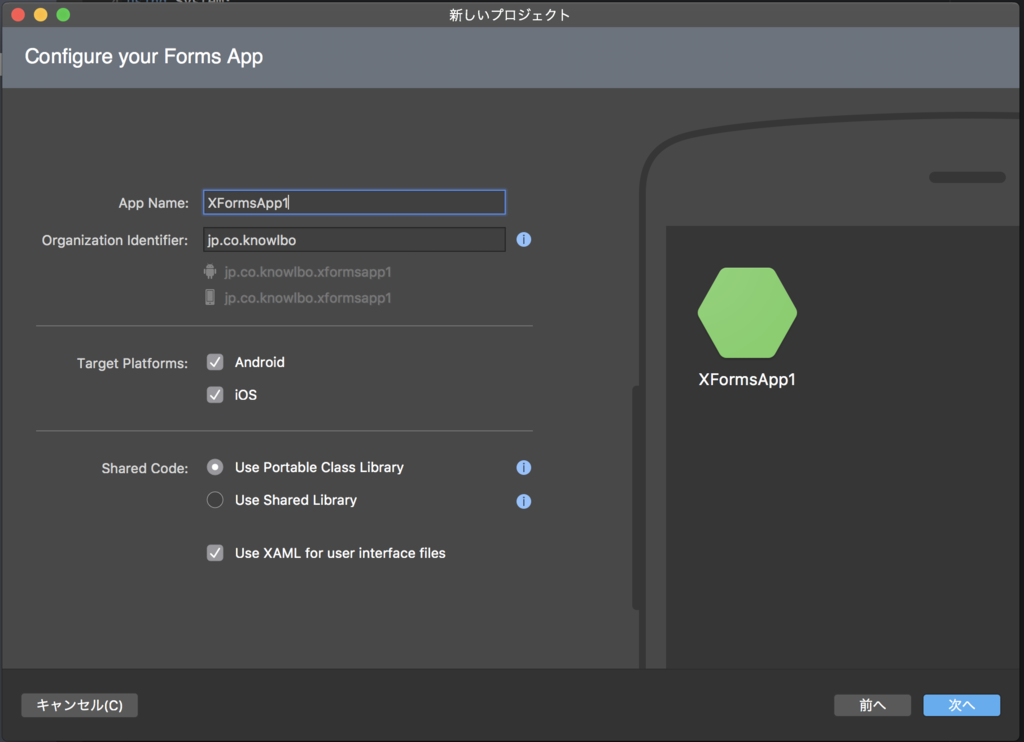

完成したソリューションは以下。
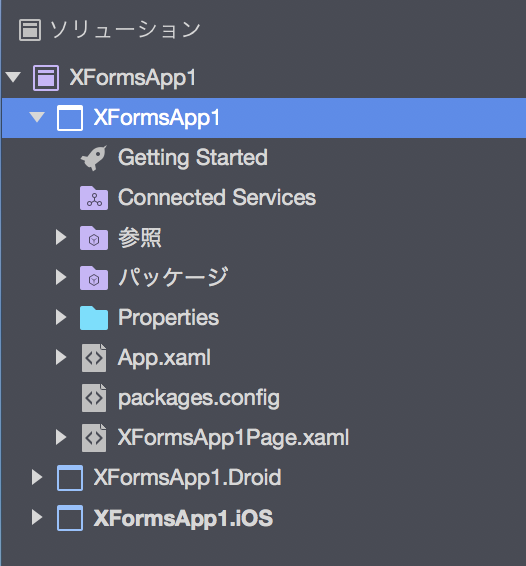
ユニットテストプロジェクトの追加
XFormsApp1ソリューションに、xUnitプロジェクトを追加します。
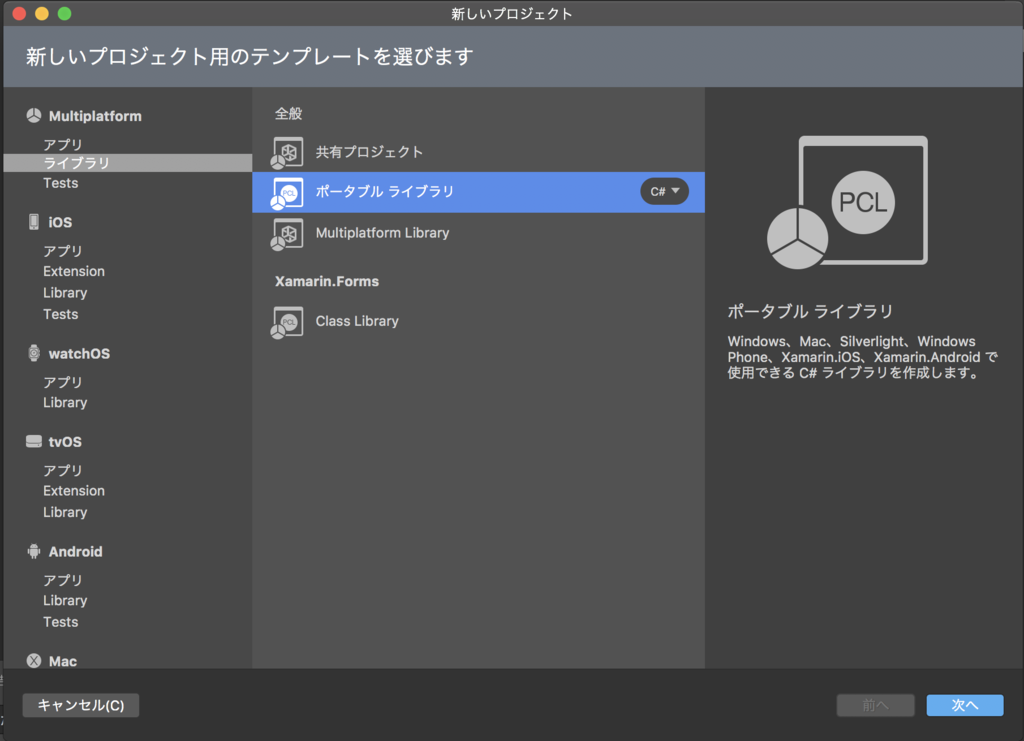
「ソリューション」からXFormsApp1をマウス右ボタンクリックし、「追加→新しいプロジェクトを追加」を選択します。

「ライブラリ→ポータブル ライブラリ」を選択します。
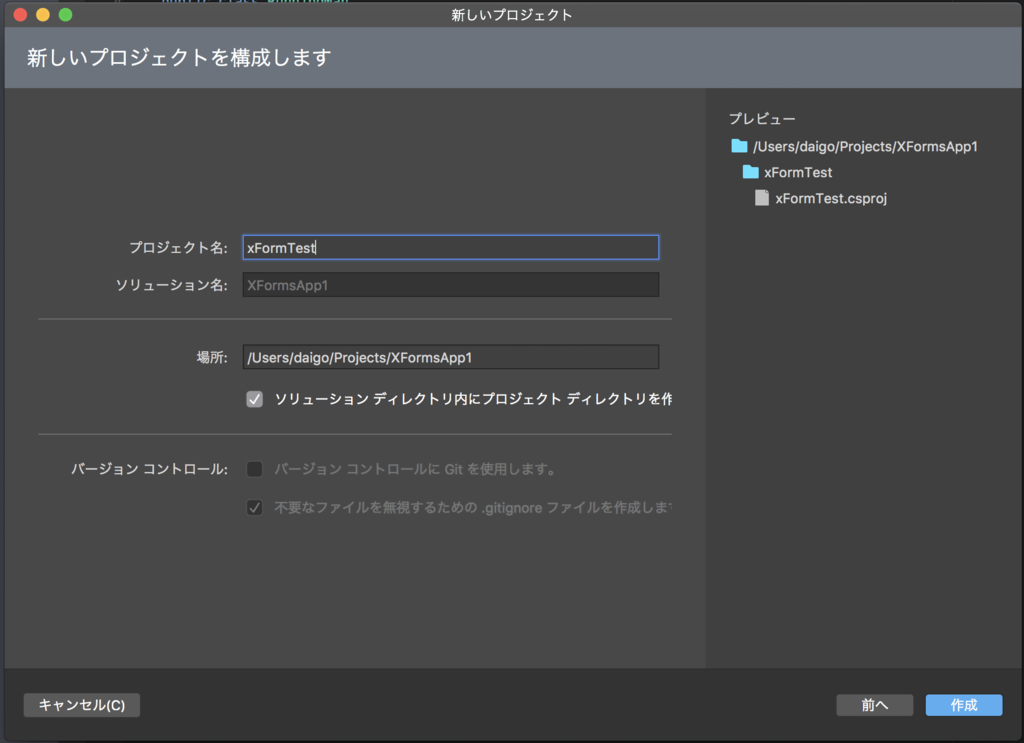
プロジェクト名を「xFormTest」とします。
ソリューション→xFormTestの「パッケージ」をダブルクリックします。

「パッケージを追加」ウィンドウが表示されるので「xUnit.net」を追加します(Add Packageクリック)。

ソリューションツリーから xFormTest の 参照 をダブルクリックし、テスト対象プロジェクト「xFormsApp1」への参照を追加しておきます。

ユニットテストコードの追加
xFormTestプロジェクトにユニットテストコードを追加します。
「ソリューション」から xFormTest をマウス右ボタンクリックし「追加→新しいファイル」を選択します。

「空のクラス」を選択し、名前に「RunningManTest」と入力します。
(Xamarin Forms PCLプロジェクトに RunningMan クラスを追加予定なので、そのユニットテストクラスを用意する想定です)

RunningManクラスは Run_4kmPerHour(int second) / Run_5kmPerHour(int second) / Run_6kmPerHour(int second) といった各時速ごとの走るメソッドを持ち、各々に消費カロリーが記録(計算)されるクラスです。
そのテストメソッドの実装が以下の RunningMaTest クラスになります。
// xFormTest/RunningMantest.cs
using System;
using Xunit;

namespace xFormTest
{
  public class RunningManTest
  {
    [Fact]
    public void TestCase1()
    {
      XFormsApp1.Models.RunningMan runningMan = new XFormsApp1.Models.RunningMan();
      runningMan.Run_4kmPerHour(10); // 4km/hで10分
      runningMan.Run_5kmPerHour(20); // 5km/hで20分

      // 消費カロリーをチェック
      Assert.Equal(runningMan.TotalCal, 2.79 * 10 + 3.90 * 20);
    }

    [Fact]
    public void TestCase2()
    {
      XFormsApp1.Models.RunningMan runningMan = new XFormsApp1.Models.RunningMan();
      runningMan.Run_6kmPerHour(15); // 6km/hで15分

      // 消費カロリーをチェック
      Assert.Equal(runningMan.TotalCal, 5.70 * 15);
    }
  }
}
テスト対象クラスを実装
テスト対象クラス「xFormsApp1/models/RunnnigMan.cs」を追加します。
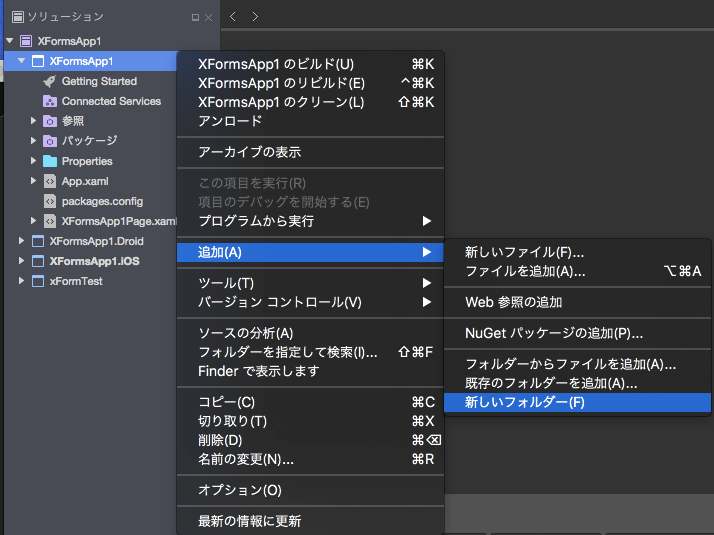
まず Modelsフォルダ を追加。
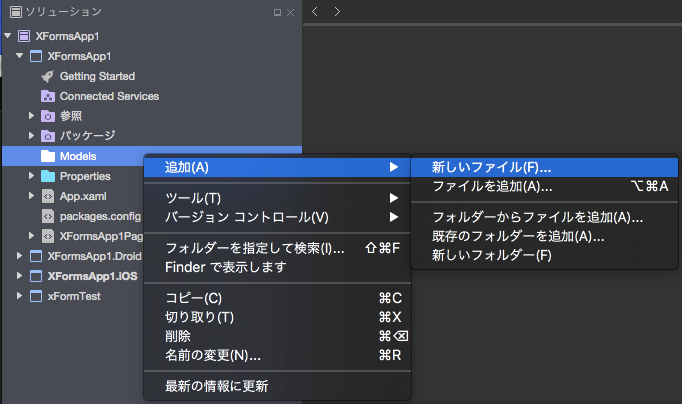
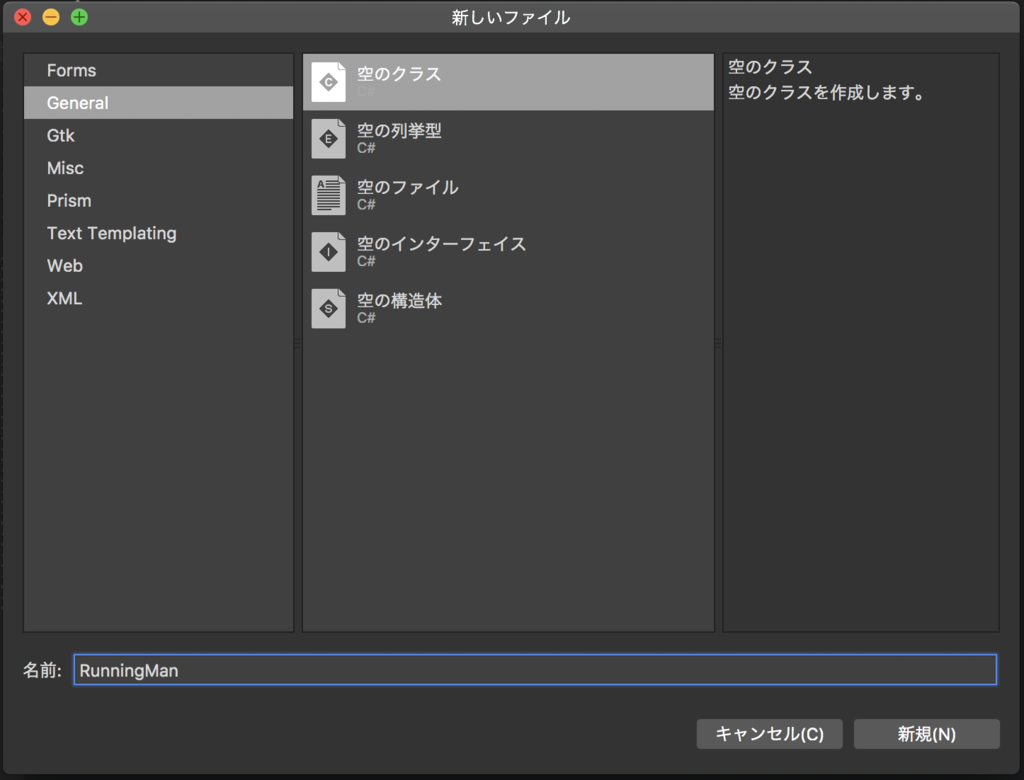
RunningMan.cs を追加。
// xFormsApp1/Models/RunningMan.cs
using System;
namespace XFormsApp1.Models
{
  public class RunningMan
  {
    /// <summary>
    /// 合計消費カロリー
    /// </summary>
    /// <value>The total cal.</value>
    public double TotalCal { get; private set;}

    /// <summary>
    /// 時速4kmで走ります。(消費カロリー:2.79kcal/sec)
    /// </summary>
    /// <param name="seconds">継続時間</param>
    public void Run_4kmPerHour(int seconds)
    {
      this.TotalCal += 2.79 * seconds;
    }

    /// <summary>
    /// 時速5kmで走ります。(消費カロリー:3.90kcal/sec)
    /// </summary>
    /// <param name="seconds">継続時間</param>
    public void Run_5kmPerHour(int seconds)
    {
      this.TotalCal += 3.90 * seconds;
    }

    /// <summary>
    /// 時速6kmで走ります。(消費カロリー:5.70kcal/sec)
    /// </summary>
    /// <param name="seconds">継続時間</param>
    public void Run_6kmPerHour(int seconds)
    {
      this.TotalCal += 5.70 * seconds;
    }
  }
}
テスト実行
メニュー「表示→テスト」をクリックします。
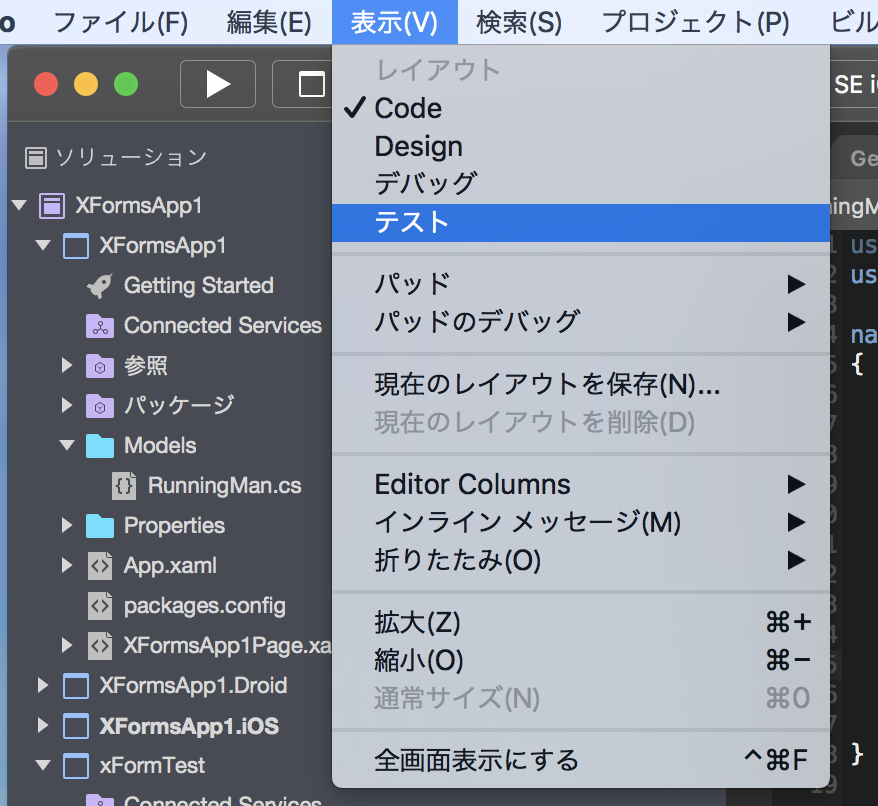
「単体テスト」「テスト結果」ペインが表示されます。
「単体テスト」には先ほど実装した単体テストメソッドが表示されています。(テストメソッドへの[Fact]属性から自動的に認識されています)

「単体テスト」の「すべて実行」ボタンをクリックすると、全ての単体テストが実行されます。
今回実装した2つのテストはともに成功するので、緑の丸がつきます。

Visual Studio for Mac で動かないの?
と私自身思いまして、ググったら・・・今のところサポートプランは無いそうです・・・;;
そもそも、私自身 Xamarin Studioのアドインや Visual Studio for Macの Extensions について、その仕組みやアーキテクチャについて知識がありませんでした。
ということで、これをきっかけに興味を持ったので、暇があったら勉強したいと思います。
プレリリース版のXamarin Formsを使う方法
前回のポストでプレリリース版「Xamarin.Forms 2.3.4.184-pre1」のPickerコントロールについて触れました。
Xamarin Studio や Visual Studio for Mac を利用して新規ソリューション(プロジェクト)を作成した場合、通常、Stable版のXamarin Formsプロジェクトが自動生成されます。
このプロジェクトに対して最新プレリリース版Xamarin Formsを適用する手順について説明します。
以下Xamarin Studioベースで画像キャプチャしていますが、Visual Studio for Macでも同様の手順です。
(Visual Studio 2015(windows)における手順も後述します)
Xamarin Studio / Visual Studio for Macの場合
ソリューションの作成
Xamarin Srudio もしくは Visual Studio for Mac で、新規のXamarin Formsアプリケーション ソリューションを作成します。
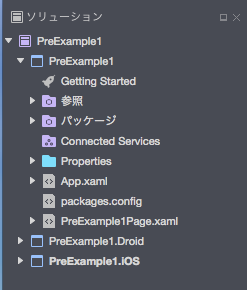
ここではソリューション名を「PreExample1」としました。Prismも使わないシンプルなXamarin Formsソリューションとしています。
パッケージの追加
PCLプロジェクト(PreExample1)、Androidプロジェクト(PreExample1.Droid)、iOSプロジェクト(PreExample1.iOS)の各プロイジェクトの「パッケージ」に対してデフォルトでは、 stable版 の Xamarin.Forms パッケージへの参照が追加されています。
これをプレリリース版に置き換えましょう。
パッケージをマウス右ボタンクリックし「パッケージの追加」メニューを選択します。
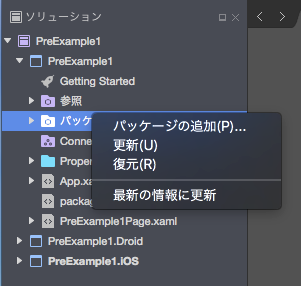
「パッケージを追加」ウィンドウが表示されます。
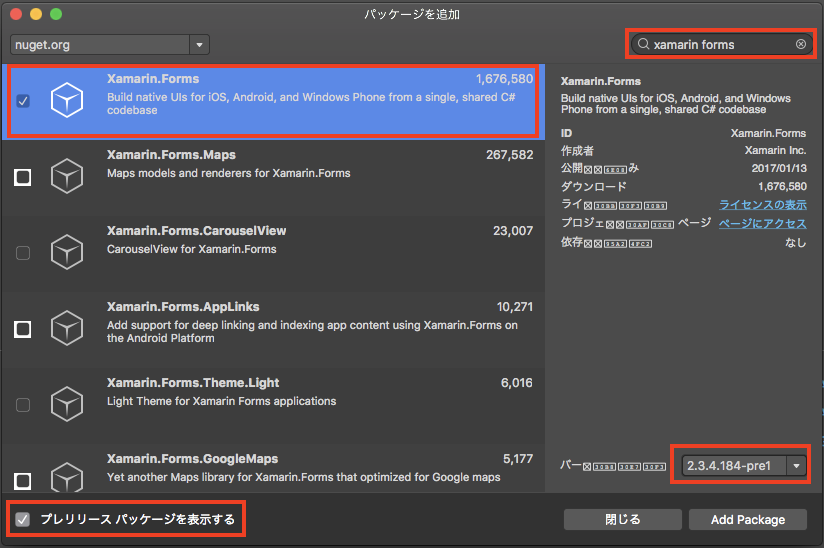
左下の「プレリリース パッケージを表示する」にチェックを入れ、右上の検索ボックスに「xamarin forms」と入力します。
一覧に表示された「Xamarin.Forms」を選択し、右下のバージョン ドロップダウンリストから利用したいバージョンを選択します(ここでは 2.3.4.184-pre1を選択)。
「OK」ボタンをクリックするとパッケージの追加(更新)が行われます。
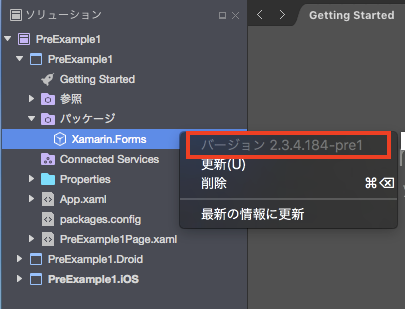
パッケージの更新完了後に、「パッケージ→Xamarin.Forms」をマウス右ボタンクリックすると、バージョンが更新されている事を確認することができます。
Android / iOSプロジェクトのパッケージも更新
上述で「PCLプロジェクト(PreExample1)」のパッケージが更新されました。
同様の手順で「Androidプロジェクト(PreExample1.Droid)・iOSプロジェクト(PreExample1.iOS)」のパッケージも最新のXamarin.Formsに更新しましょう。
Visual Studio 2015(Windows)の場合
Xamarin Formsプロジェクトを作成します。
ソリューションエクスプローラーからプロジェクトを選択→マウス右ボタン→NuGetパッケージの管理を選択します。
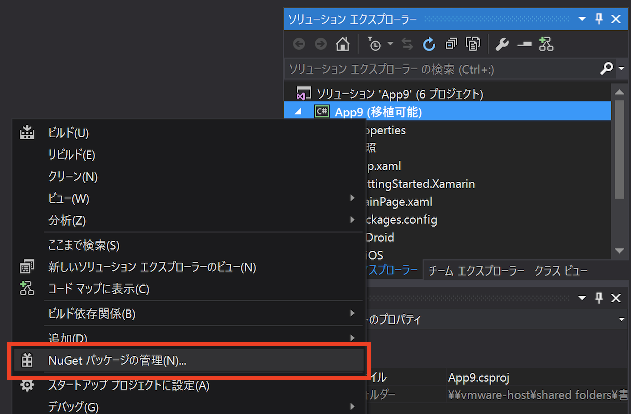
以下の「NuGetパッケージマネージャー」が表示されるので、Xamarin.Formsを選択→「プレリリースを含める」にチェック→「バージョン」から最新のプレリリース版を選択→更新ボタンクリック、操作を行います。
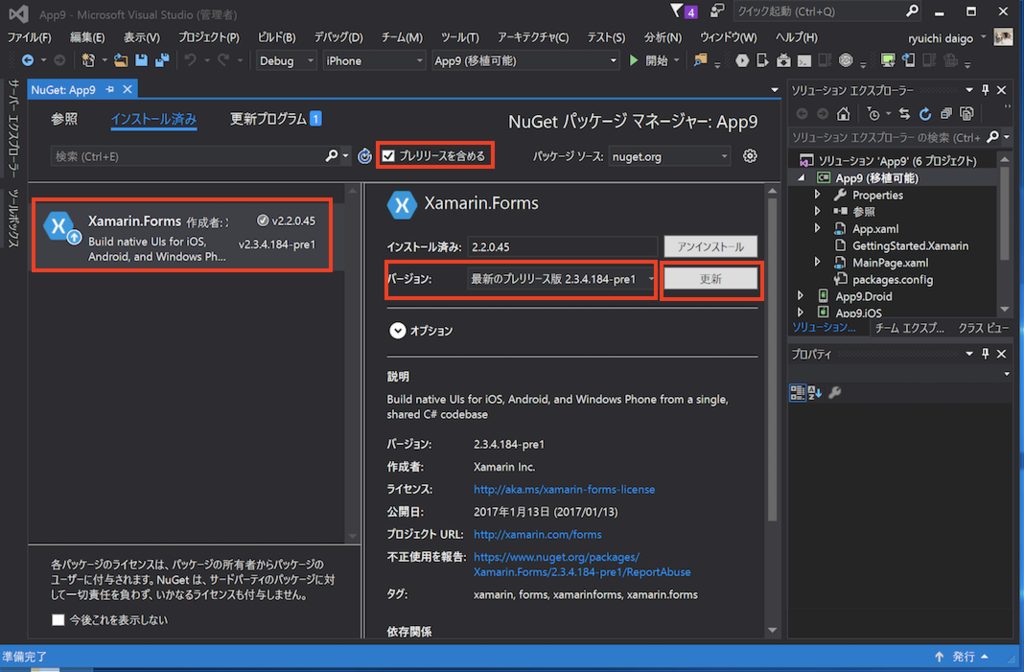
上記操作をiOS / Android / UWPの各プロジェクトにも行います。
最新版のXamarin Formsで遊べる!
さあ、最新プレリリース版の Xamarin Forms で遊びましょう!
PickerがBindableになるそうだ(Xamarin.Forms 2.3.4.184-pre1)
Xamarin Forms + MVVM開発において最も相性の悪いコントロールの代表である Picker がBindableになるそうです。
現在 Xamarin.Forms 2.3.4.184-pre1 にて実装が提供されています。
正式版への取り込みは以下のロードマップに記述されている通り「2.4.0 - February 2017」となるそうです。
そう、従来の(現状の)Pickerコントロールには、ListView.ItemsSourceのようなBindablePropertyが用意されていなかったんですよね。
あと、SelectedItemプロパティも無かったので、 SelectedIndexプロパティから選択オブジェクトを取得するという回りくどい実装が必要でした。
ということでPickerの派生クラスを自前で作ってBindablePropertyを用意するような事をする必要がありました。
以下のような感じで。
これがネイティブにサポートされる予定です(嬉しい)。
「Xamarin.Forms 2.3.4.184-pre1」のPickerを使ったサンプルを以下に置きました。
XamarinExamples/Prism/Control/UseBindablePicker at master · ryuichi111/XamarinExamples · GitHub
BindablePickerと呼んでいますが、実装自体は「Pickerコントロール」に 「ItemsSourceプロパティ / SelectedItemプロパティ」が追加される形でのアップデートになります。
Xamarin Forms(Prism)のシンプルサンプルをGithubにあげた
Xamarin Forms & Prismにおける超シンプルなサンプルをGithubにあげました。
サンプルの方針は以下です。
- Xamarin Forms + Prismプロジェクトである。
- 各種UIコントロールのプロパティはViewModelのプロパティとデータバインディングする。
- 各種UIコントロールのイベントはCommand経由でViewModelのICommandにデータバインディングする。
- 単一機能の超シンプルなサンプルを目指す。
基本的には「Buttonの使い方」とか「DatePickerの使い方」とか単一機能のシンプルなサンプルです。
内容的には、まだ、まったく足りていないので「1日1github」でソースを追加していこうと思っています(コメントとかも書いてないので・・・)。
現状は「いくつかのコントロールの使い方サンプル」「MasterDetailPageの使い方サンプル」のみ載せています。
ではー。
Prism(Xamarin Forms) における INotifyPropertyChanged
Xamarin Formsおいて ソース→ターゲット のデータバインディングでは、ソースオブジェクトに INotifyPropertyChangedインターフェイス を実装する必要があります(OneTimeモードは除く)。
この点について「素のXamarin Forms」と「Xamarin Forms With Prism」での実装方法を比較してみます。
また、Prism内部の実装を覗いて「ライブラリとして何をサポートしてくれているのか?」を見てみたいと思います。
こんなサンプルで説明します
以下のようなサンプルで説明を進めたいと思います。
実行画面は以下の通り。
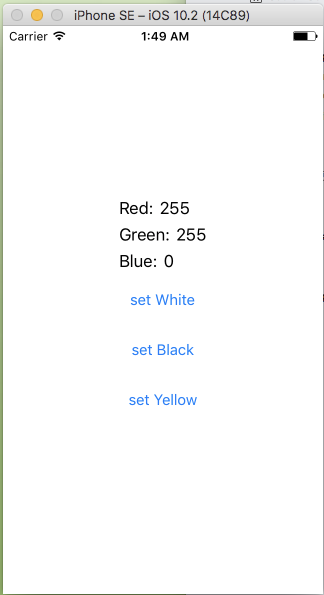
サンプルの要点は以下の通りです。
- R G Bの各値をソースとして画面上の各ラベルにデータバインドする
- 「set White」/「set Black」/「set Yellow」のボタンをクリックするとソースの RGB値 がロジック上で変更される
- ロジック上で変更された RGB値 は 即座に画面表示(ラベル)に反映される
素のXamarin Formsでは
ソースオブジェクトとして「MyColorクラス」を実装する事とします。
ソースオブジェクトは INotifyPropertyChangedインターフェイス を実装します。
ソース値変更時には PropertyChanged を呼び出します。
// MyColor.cs(ソースとなるオブジェクト)
using System;
using System.ComponentModel;

namespace Example1.Models
{
  public class MyColor : INotifyPropertyChanged
  {
    // INotifyPropertyChangedインターフェイスの実装
    public event PropertyChangedEventHandler PropertyChanged;

    // Fields
    private int red;
    private int green;
    private int blue;

    // Properties
    public int Red {
      get {
        return this.red;
      }
      set {
        if (this.red != value) {
          this.red = value;
          OnPropertyChanged("Red");
        }
      }
    }

    public int Green {
      get {
        return this.green;
      }
      set {
        if (this.green != value) {
          this.green = value;
          OnPropertyChanged("Green");
        }
      }
    }

    public int Blue {
      get {
        return this.blue;
      }
      set {
        if (this.blue != value) {
          this.blue = value;
          OnPropertyChanged("Blue");
        }
      }
    }

    // プロパティ値の変更を通知します
    protected virtual void OnPropertyChanged(string propertyName)
    {
      PropertyChanged?.Invoke(this, new PropertyChangedEventArgs(propertyName));
    }
  }
}
- PropertyChanged?.Invoke(this, new PropertyChangedEventArgs(propertyName));
「?」はC#言語仕様で「nullでなければ呼び出す」、つまりPropertyChangedがnullでなければInvoke()を呼び出します。
ページの実装は以下の通りです。
// CustomColorPage.xaml(ページ定義)
<?xml version="1.0" encoding="utf-8"?>
<ContentPage
  xmlns="http://xamarin.com/schemas/2014/forms"
  xmlns:x="http://schemas.microsoft.com/winfx/2009/xaml"
  x:Class="Example1.CustomColorPage">

  <StackLayout HorizontalOptions="Center" VerticalOptions="Center">
    <StackLayout Orientation="Horizontal">
      <Label Text="Red:"/>
      <Label Text="{Binding Red}" />
    </StackLayout>
    <StackLayout Orientation="Horizontal">
      <Label Text="Green:"/>
      <Label Text="{Binding Green}" />
    </StackLayout>
    <StackLayout Orientation="Horizontal">
      <Label Text="Blue:"/>
      <Label Text="{Binding Blue}" />
    </StackLayout>
    <StackLayout Orientation="Vertical">
      <Button Text="set White" Clicked="whiteButtonClicked"/>
      <Button Text="set Black" Clicked="blackButtonClicked"/>
      <Button Text="set Yellow" Clicked="yellowButtonClicked"/>
    </StackLayout>
  </StackLayout>
</ContentPage>
コードビハインドクラスで、ソースオブジェクト MyColor をインスタンス化して、BindingContextに設定する事でデータバインディングを行います。
// CustomColorPage.xaml.cs(コードビハインドクラス)
using System;
using Xamarin.Forms;

using Example1.Models;

namespace Example1
{
  public partial class CustomColorPage : ContentPage
  {
    // ソースオブジェクト
    public MyColor MyColor { get; } = new MyColor();

    // コンストラクタ
    public CustomColorPage()
    {
      InitializeComponent();

      this.BindingContext = this.MyColor;
    }

    // Whiteボタンクリックイベントハンドラ
    public void whiteButtonClicked(object sender, EventArgs e)
    {
      this.MyColor.Red = 255;
      this.MyColor.Green = 255;
      this.MyColor.Blue = 255;
    }

    // Blackボタンクリックイベントハンドラ
    public void blackButtonClicked(object sender, EventArgs e)
    {
      this.MyColor.Red = 0;
      this.MyColor.Green = 0;
      this.MyColor.Blue = 0;
    }

    // Yellowボタンクリックイベントハンドラ
    public void yellowButtonClicked(object sender, EventArgs e)
    {
      this.MyColor.Red = 255;
      this.MyColor.Green = 255;
      this.MyColor.Blue = 0;
    }
  }
}
Prismでは
ソースオブジェクトは BindableBaseクラス を継承します。
ソースオブジェクトはViewModelクラスとします。
ソース変更時には SetProperty() メソッドを呼び出します。
// MainPageViewModel.cs(ビューモデルクラス)
using Prism.Commands;
using Prism.Mvvm;
using System.Windows.Input;

namespace PrismExample1.ViewModels
{
  public class CustomColorPageViewModel : BindableBase
  {
    // Fields
    private int red;
    private int green;
    private int blue;

    // Properties(for DataBind)
    public int Red {
      get {
        return this.red;
      }
      set {
        this.SetProperty(ref this.red, value);
      }
    }

    public int Green {
      get {
        return this.green;
      }
      set {
        this.SetProperty(ref this.green, value);
      }
    }

    public int Blue {
      get {
        return this.blue;
      }
      set {
        this.SetProperty(ref this.blue, value);
      }
    }

    // コマンド
    public ICommand WhiteCommand { get; }

    public ICommand BlackCommand { get; }

    public ICommand YellowCommand { get; }

    // Constructor
    public CustomColorPageViewModel()
    {
      // ボタンクリックコマンド時のイベント処理
      this.WhiteCommand = new DelegateCommand(() =>
      {
        this.Red = 255;
        this.Green = 255;
        this.Blue = 255;
      });

      this.BlackCommand = new DelegateCommand(() =>
      {
        this.Red = 0;
        this.Green = 0;
        this.Blue = 0;
      });

      this.YellowCommand = new DelegateCommand(() =>
      {
        this.Red = 255;
        this.Green = 255;
        this.Blue = 0;
      });
    }
  }
}
ページ実装は以下の通りです。
ボタンクリック時の挙動は Command をCustomColorPageViewModeの各ICommandにデータバインディングします。
// CustomColorPage.xaml(ページ定義)
<?xml version="1.0" encoding="utf-8"?>
<ContentPage
  xmlns="http://xamarin.com/schemas/2014/forms"
  xmlns:x="http://schemas.microsoft.com/winfx/2009/xaml"
  xmlns:prism="clr-namespace:Prism.Mvvm;assembly=Prism.Forms"
  prism:ViewModelLocator.AutowireViewModel="True"
  x:Class="PrismExample1.Views.CustomColorPage"
  Title="MainPage">
  <StackLayout HorizontalOptions="Center" VerticalOptions="Center">
    <StackLayout Orientation="Horizontal">
      <Label Text="Red:"/>
      <Label Text="{Binding Red}" />
    </StackLayout>
    <StackLayout Orientation="Horizontal">
      <Label Text="Green:"/>
      <Label Text="{Binding Green}" />
    </StackLayout>
    <StackLayout Orientation="Horizontal">
      <Label Text="Blue:"/>
      <Label Text="{Binding Blue}" />
    </StackLayout>
    <StackLayout Orientation="Vertical">
      <Button Text="set White" Command="{Binding WhiteCommand}"/>
      <Button Text="set Black" Command="{Binding BlackCommand}"/>
      <Button Text="set Yellow" Command="{Binding YellowCommand}"/>
    </StackLayout>
  </StackLayout>
</ContentPage>
SetProperty()とは
Prism版ではソースオブジェクトのセッター内で、SetProperty()メソッドというものが使われています(素のXamarin Forms実装では「PropertyChangedEventHandler」を扱う部分)。
SetProperty()メソッドは、Prismライブラリ内の「Prism.Mvvm.BindableBaseクラス(Prismアセンブリ)」で実装されています。
Prismはオープンソースとして以下のGithubでソース一式が公開されています。
その中で BindableBaseクラス の実装は以下です。
Prism/BindableBase.cs at master · PrismLibrary/Prism · GitHub
2017/1/8時点の実装ソースを抜粋させていただくと以下となります(コメント文は除去しています)。
using System;
using System.ComponentModel;
using System.Linq.Expressions;
using System.Runtime.CompilerServices;

namespace Prism.Mvvm
{
  /// <summary>
  /// Implementation of <see cref="INotifyPropertyChanged"/> to simplify models.
  /// </summary>
  public abstract class BindableBase : INotifyPropertyChanged
  {
    public event PropertyChangedEventHandler PropertyChanged;

    protected virtual bool SetProperty<T>(
      ref T storage,
      T value,
      [CallerMemberName] string propertyName = null)
    {
      if (object.Equals(storage, value)) return false;

      storage = value;
      this.OnPropertyChanged(propertyName);

      return true;
    }

    protected virtual void OnPropertyChanged(
      [CallerMemberName]string propertyName = null)
    {
      PropertyChanged?.Invoke(this, new PropertyChangedEventArgs(propertyName));
    }

    protected virtual void OnPropertyChanged<T>(
      Expression<Func<T>> propertyExpression)
    {
      var propertyName = PropertySupport.ExtractPropertyName(propertyExpression);
      this.OnPropertyChanged(propertyName);
    }
  }
}
SetProperty()メソッドの引数は3つ。
第1引数は ref でプロパティの値を保持する変数(フィールド変数)を受け取ります。
第2引数は 変更後の値 を受け取ります。
第3引数は 変更が発生したプロパティ名を文字列で受け取ります。[CallerMemberName]属性が付けられ、デフォルト値としてnullが指定されています。CallerMemberName属性はC# 5で導入された属性で「呼び出し元のプロパティ名・メソッド名」が割り当てられます。つまり、ソースオブジェクトのプロパティセッターからSetProperry()を呼び出す場合、第3引数は省略しても暗黙的にプロパティ名が指定されます。
では、続けて SetProperty() の内部実装に目を移します。
if (object.Equals(storage, value)) return false;
現在値と変更値の比較を行い、変更がなければそのままリターンします。
storage = value;
値の変更をフィールド変数に代入しています。
this.OnPropertyChanged(propertyName);
OnPropertyChanged()メソッドの呼び出しを行なっています。
OnPropertyChanged()メソッドの実装は以下の通りです。
PropertyChanged?.Invoke(this, new PropertyChangedEventArgs(propertyName));
PropertyChangedは「event PropertyChangedEventHandler」として定義されたイベント変数です。
これは、素のXamarin Formsにおける実装と同様ですね。
まとめ
つまり・・・データバインディング周りの実装に関して、PrismのSetProperty()によって以下のような点がラップされ便利になっています。
* 値の変更チェックをラップしている
* PropertyChanged呼び出しをラップしている
* [CallerMemberName]によってプロパティ名を暗黙的に取得している